

No doubt, VMware produces one of the best virtual machine software in the world. And the VMWare workstation is widely used for Virtualization. Today, in this article we’re going to show how anyone can install macOS Monterey on VMware on Windows 10 machine.
As you know that in the year 2021, Apple announced its new mac operating system macOS 12 Monterey. And it took some time to launch its public beta version.
Therefore, it took some time to bring a comprehensive guide about the installation of this new macOS on the VMware workstation.
Many use the beta version to create the guide, but those versions usually show unexpected issues. Therefore, today, this guide includes, screenshots from the public beta version of the macOS Monterey being installed on a Windows 10 machine using a VMware workstation.
Going towards, the installation there are certain things that you need to take care of, in order to complete the installation process successfully without any problems and errors.
Well, we won’t make this guide lengthy and complicated, by explaining everything from the installation of the VMware to the final installation. We will just cover, the main parts of the process. And of course, for this, you have to have VMware installed on your Windows 10 computer.
If you haven’t that should be your first task.
So, without taking much time, let’s get straight to the topic!
Table of Contents
How to install macOS 12 Monterey on VMWare on Windows 10/11:
As already said above this guide won’t include every single common step, like installing the VMWare, or making Windows 10 appropriate for Virtualization.
The steps we’re going to cover, in this article are
- The download of macOS Monterey ISO file.
- Then create of Virtual machine for the new macOS in VMWare.
- And Final step is the installation of the operating system.
These three steps are crucial steps, that you need to follow. Moreover, if you’ve already installed the Mac operating system on VMWare software, Then this is going to be much easier for you.
So, first thing first, if you haven’t installed the VMWare workstation. Your first task is to install it on your Windows machine. The installation process is simple as installing any typical software, or application.
So, I don’t think, you’ll need any sort of guidance for that. When the installation completes. You can move on to the next step.
You might also need to install the Unlocker for Windows 10. The Unlocker enables you to install the mac operating system on Windows 10 through VMWare. So, you can download the unlocker from Github.
After completing these steps, you can move on to the next step.
Download the macOS Monterey ISO file:
The ISO file is required for the installation of the macOS Monterey on VMWare. We are going to use the same ISO file in VMWare for installation.
The only problem here is the size of the ISO image file.
But don’t worry, we’ve already produced an article about that.
And provided two sources for the downloading of the ISO image file. If you have a fast internet connection. Then you can download the complete file at once.
Or else, you can download the complete file in three turns depending on your choice.
So, for downloading the ISO, please refer to the following article.
Well, once the download completes. Next, you are going to focus on the creation of a new virtual machine on VMWare. If this is your first time creating a virtual machine. This might seem lengthy. But don’t worry!
We’ve got you covered!
Create a Virtual machine on VMware:
Here comes the second last step. Until here you should’ve downloaded the ISO file. The VMWare workstation with its all additional tools should be ready.
Once the above things are set. You can move on to the creation of a Virtual machine.
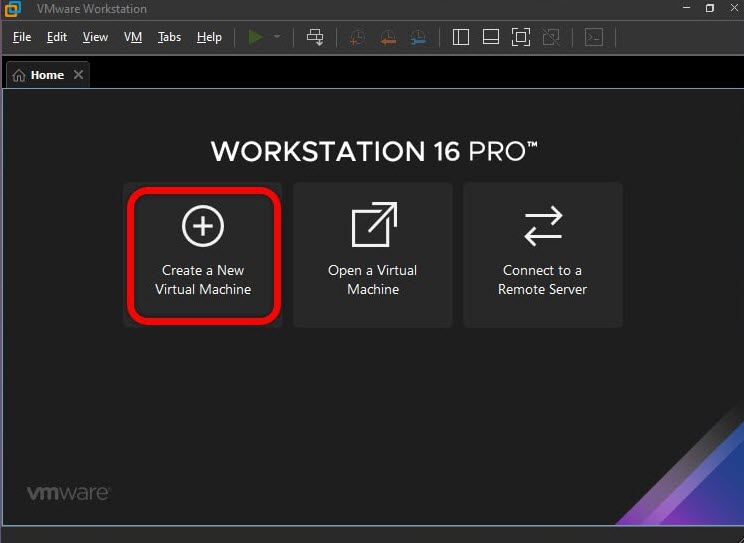
- Open the Virtual machine software. And on the interface, you should be able to see an option by the name of Create a new Virtual machine. This is the link, we need to follow.
- On the next page, there are two options to proceed. One is a typical way to create a virtual machine. And the other is a more advanced method. Well, I personally prefer the typical method, if you’re not tech-savvy. Because, the second option is particularly for technical people, who have been working with VMWare products for a long time. Even though many times the second option could be better. But again, I am going to choose the Typical (recommended) option, and proceed!
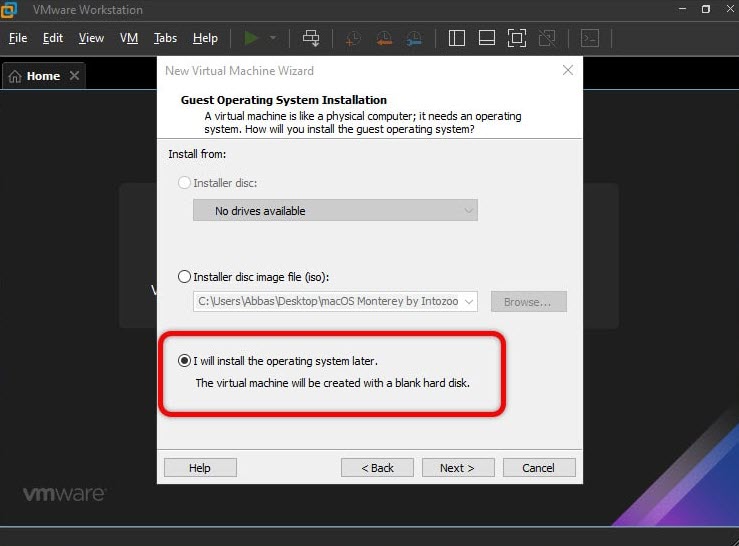
- In the next window, again, you’re going to see three options. Without wasting time I am going to choose the third option. Because, before installing the operating system, it is better to choose the operating system, which operating system I am going to create a virtual machine. Many people also choose the second option. But this option is for those, who have already selected the preferred operating system.
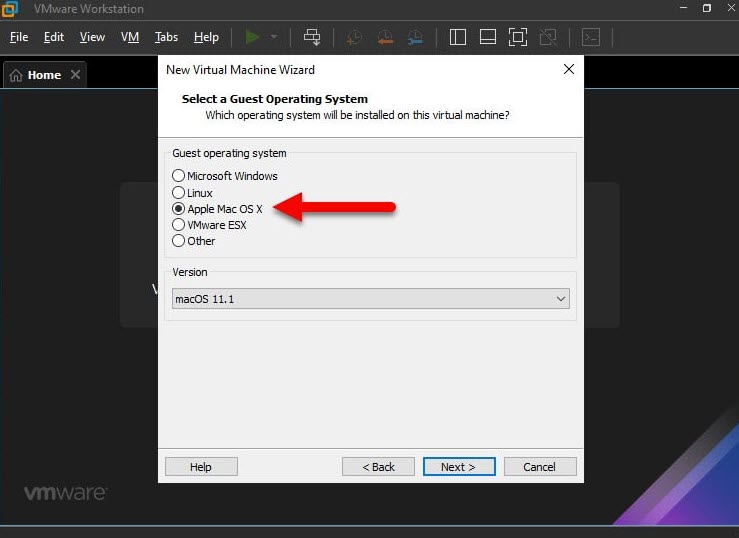
- Exactly, here we’re going to choose the operating system along with the version. And of course, we are going to install the Mac operating system, so, I have chosen the MacOSX. Moreover, for version, the macOS Monterey is the macOS 12 version. So, please select the required version.
- Furthermore, you can also name your virtual machine. I am going to name mine the original name of the macOS. Moreover, the second option is for the path, where the file of the operating system will be saved. You should copy and paste this path somewhere for now. Because you’re going to need it during installation.
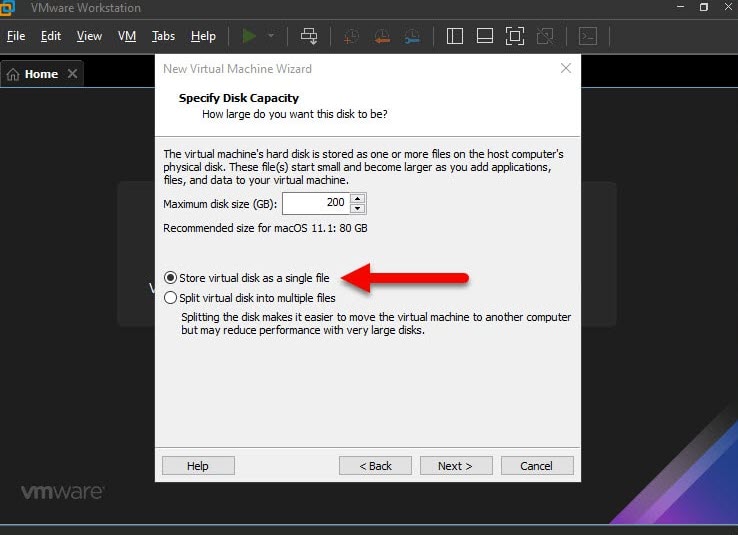
- Next, you need to allocate space for the new guest operating system. Well, this space will be used to store the operating system along with the files you install on this guest operating system. There is no hard link rule. But you should consider, why you’re installing the guest operating system. will you install an along of files on it? If yes, you should allocate that much space according to your guess and just proceed. Additionally, also select the single disk option below the space allocation option. Or you can also divide this space into multiple files.
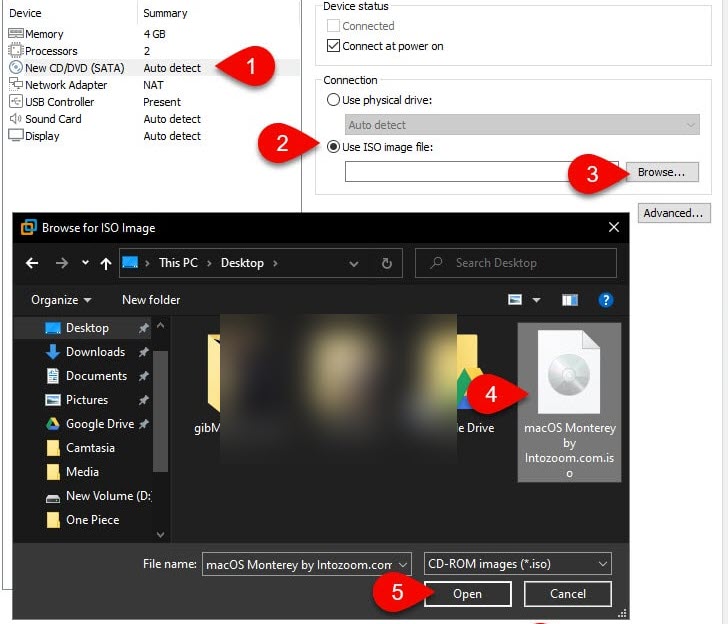
- In this second last window, there are minor changes, that you need to apply. Click on Customize hardware. In this area, you need to allocate at least 4 GB of RAM for the guest operating system. You also need to select the macOS Monterey ISO file for the Virtual machine now. Go to New CD/DVD SATA, choose the Use Image file, and locate the macOS Monterey ISO file. Once the ISO file is selected, you can click on the Finish button and finish this step.
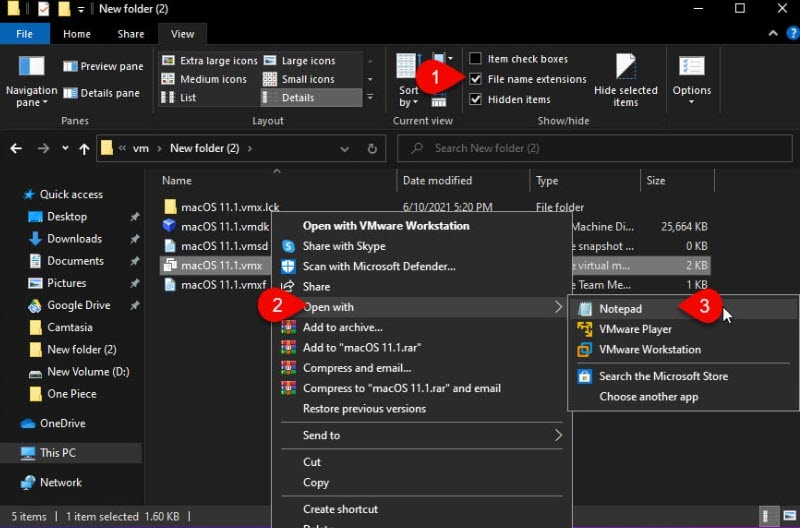
- For the very last step, you just need to change a minor code. Remember, I told you to save a path before. Now go to that path, and find the macOS version file with the extension .vmx. Right-click on the file and open it with the notepad. In the last line, copy and paste smc.version = 0 and save the file again. This will avoid any technical issues ahead. In case, it is written already. Don’t paste it again.


Now everything is fine. This step is complete. Whatever you need for installation, has been achieved. Now you can proceed to the final step, which is installation.
Install macOS Monterey on VMware:
Well, the installation process of the macOS Monterey on VMware on a Windows 10 machine should not take much time. The overall process is the same as you install the mac operating system on any Mac machine. Or if have installed the Windows operating system too.
The typical way of installation. Here also you need to follow most of the same steps, and of course with few minor changes.
So, as I already said, I am not going to complicate this guide for you. So, I will avoid all the unnecessary steps of the installation, and will only focus on the most important ones, and on those, which might get you confused.
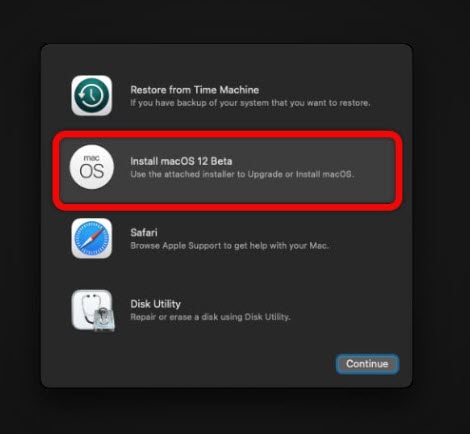
- So, first of all, turn on the new virtual machine. You might need to select the language first. Then you get a new window with four options. And the option, we need to proceed with is the fourth one, the Disk Utility option.
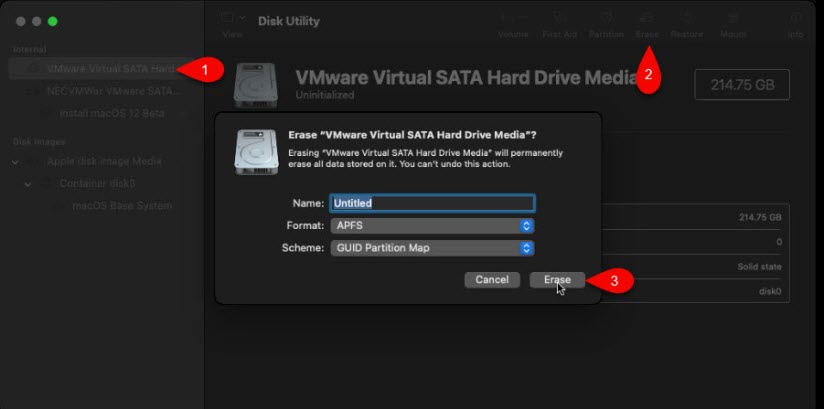
- Then, here we need to partition the disk space. As earlier, we selected our recommended amount of space. So, from the left panel, select the Virtual hard disk and proceed with erase. You can choose a custom name for the virtual disk. Then select the APFS option and finally GUID Partition map and click to erase.
- After closing the disk utility window, now from the initial window, you can proceed with the installation. Select the macOS 12 version, and Continue.
- Next, confirm the selection, and aftward, mark to agree with the terms and conditions.
- On the following window, choose the virtual hard disk for the installation of the guest operating system.
- And the further windows are all the normal ones, which you always see. Such as selecting the language, regions, and Time, Agreeing with terms, creating passwords for the operating system, and so on.


Of course, I am not going to waste your time further. If you have successfully reached here. So, there is no doubt, you will be able to successfully complete the installation process.
Most of the upcoming pages will be just like accepting or yes and no.
Moreover, you might also get a warning such as an internet not being connected. Those are not going to be a bigger issue. You can skip those warnings and pass them to the next windows.
And as a final step, you’ll need to choose a theme for the new macOS Monterey. With this one last step, the macOS Monterey is successfully installed on VMware on Windows 10 computers.
Wrapping Up:
Well, we tried not to unnecessarily lengthen the article. We just focused on the main points, which you need to follow. Moreover, we also presented all those steps, which might sometimes confuse the users.
Apart from these, if you have a good internet connection, you’ll be able to successfully install the macOS Monterey on VMware on Windows 10 in a few hours.
How did you find this guide? Please feel free to ask us anything through the comment section.


1 comment