
Like every year, this year in 2021 WWDC, Apple announced some big news regarding its products including Operating systems. Where the firm announced the latest IOS operating system, it also announced the coming of the latest macOS Monterey. The new macOS 12 Monterey is currently the latest Mac operating system. And as tradition. Today, we’ve brought a guide on how to install macOS Monterey on Virtualbox on Windows 10 PC.
Those who use MacBooks, or are in touch with Apple products. They know that every year Apple takes an annual conference, in which it introduces its new operating systems, iPhone, and other related products. Taking about the macOS Monterey, its DMG became available in fall and talking about the stable update of the macOS 12. While writing this guide, the stable version of the latest macOS 12 is available in the market. though bigger updates are still in the row.
Anyway, talking about the installation of macOS Monterey on Virtualbox on Windows PC. If you use virtual machines such as Virtualbox or VMware, you might have done this process earlier with macOS Big Sur and Catalina, etc. So, installing macOS Monterey on Virtualbox won’t be a big deal for you.
Besides, we still recommended you to read the guide, because, we’ve also provided the CMD code for macOS Monterey, which you’ll certainly need during installation.
Moreover, those who’re going to install macOS Monterey on VirtualBox on Windows 10 PC for the first time. We recommended they follow each step carefully with full focus to avoid unexpected problems and issues.
The entire process includes five steps and in each step require different files, which you need to download upfront before the initiation of the process.
Moreover, the new updates in the Virtual machines and Mac operating systems increase the system requirements too. And last time, when people tried to install macOS Big Sur on VirtualBox, they confronted unexpected problems due to a lack of system resources.
Therefore, below we’ve opened down the minimum system requirements to use a dual operating system on a computer.
Table of Contents
System requirements to run macOS Monterey on Virtualbox on windows 10 PC:
- Processor: Intel core i5 5rd Gen or equivalent (Recommaned 7th Gen)
- Processor count: Dual core processor (Recommanded Quad core)
- RAM: 8GB of RAM (Recommanded 12GB of RAM)
- Storage: 300GB HDD (Recommanded SSD)
The above are some basic requirements for the PC to have while installing macOS Monterey on Virtualbox. Because during creating a Virtual machine, the software requires partitioning these resources between the operating systems.
If your system doesn’t meet these requirements, you might experience slowness in your computer. In worst cast scenario the Virtual Machine mightn’t install the guest OS.
Therefore, we recommended you check your computer before going towards virtualization.
If you have a system that has enough specs and power to handle macOS Monterey along with Windows 10. Then follow the below steps to install macOS Monterey on Virtualbox on Windows PC.
How to install macOS Monterey on VirtualBox on windows 10 PC?
As mentioned earlier we’ve divided the whole process into five sub decisions to avoid making the process too complicated. Moreover, we recommend you to have a stable internet connection and some hours. Because the macOS Monterey ISO file takes some time for download over the standard connection. The followings are the files you need to download.
1: Download the below files on your system:
- Download macOS Monterey ISO file.
- Install Virtualbox from official website of Virtualbox.org and Vbox extension pack.
- Download the Virtualbox Code.
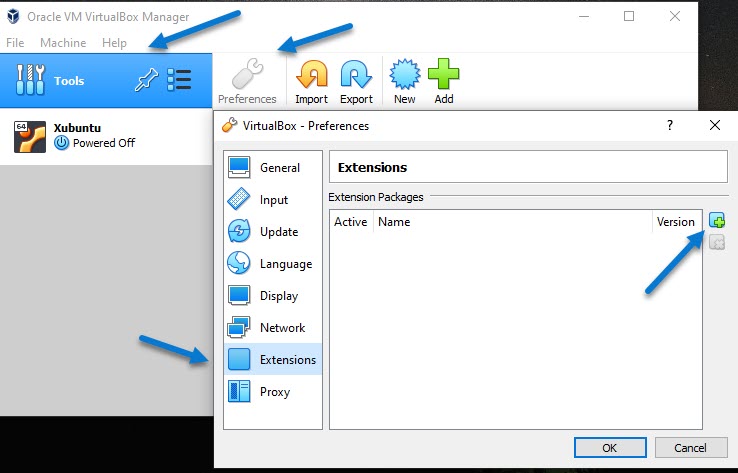
Many times the extension pack gets installed automatically. Start the Virtualbox software. Click on Tools > Preferences > Extensions. Check if the extension is already installed. If not then click on the plus icon > Open the Virtualbox file, and choose the extension pack.

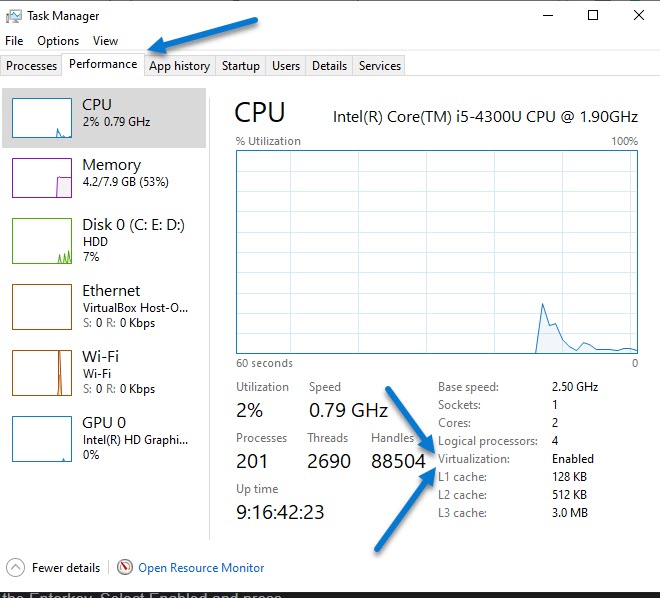
Moreover, bear in mind that virtualization should have been enabled on your system. Go to Task Manager > Performance. Check out whether virtualization is turned on. If Virtualization isn’t enabled, you need to enable this option to install macOS Monterey on VirtualBox.

2: Create a new Virtual machine for macOS Monterey:
Once you install the extension pack and enable the Virtualization on your system. Now, you can go towards the creation of a virtual machine for macOS Monterey. The creation of a virtual machine is pretty easy. And the total time that takes for this step doesn’t exceed more than five minutes.
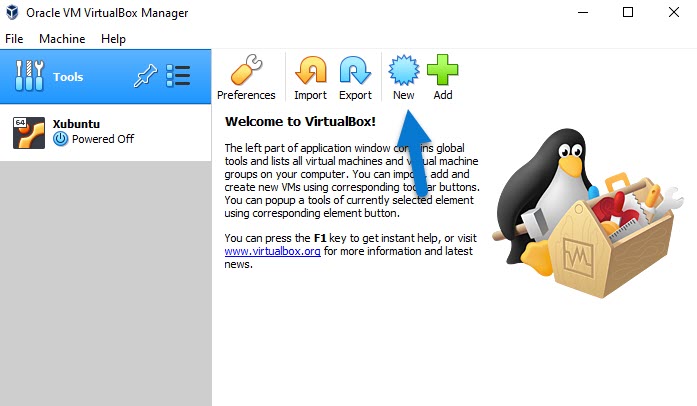
- first of all, Start the VirtualBox and click on New icon.
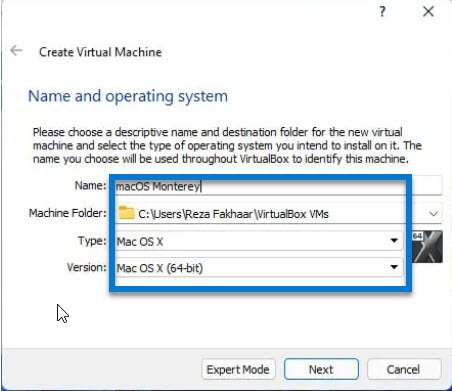
- Next, give a name to the new virtual machine. As we’re craeting a virtual machine for macOS Monterey. So, the name should be this one. Moreover, don’t change the default settings of the other options. Keep the type macOS X, and the the architecture with 64bit, and click Next.
- Afterwards, allocate amount of memory for the new Virtual Machine. We recommanded amount for macOS 12 is 4GB. But you can also devide the RAM equally between the host and guest OS.
- Next up, select the Create a virtual hard disk now option, and then click on Next to proceed.
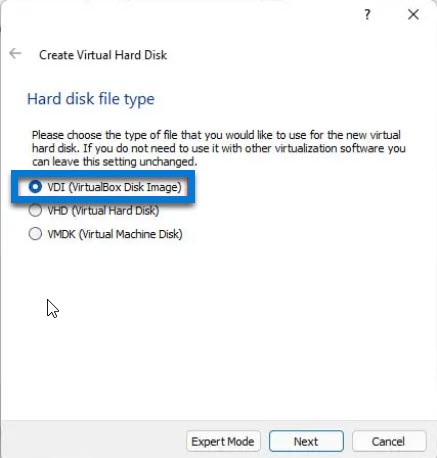
- Here select the VDI option, the Virtualbox disk image and move on.
- Afterwards, select the dynamically allocated storage option. Besides, you can read out the difference between Dynamically allocated, and fixed storage.
- Finally, select amount of storage you can to allocate for the new virtual machine. We recommand you to allow a 100GB of storage of the VM. However, you can also increase of decrese it as per your requirements.


And finally, click on Create. The basic structure of the new macOS Monterey Virtual Machine has been created. Now, you need some further settings to make the new VM flexible and reliable.
3: Change the basic settings of the newly created Virtual Machine:
- Choose the new Virtual Machine and go to Settings.
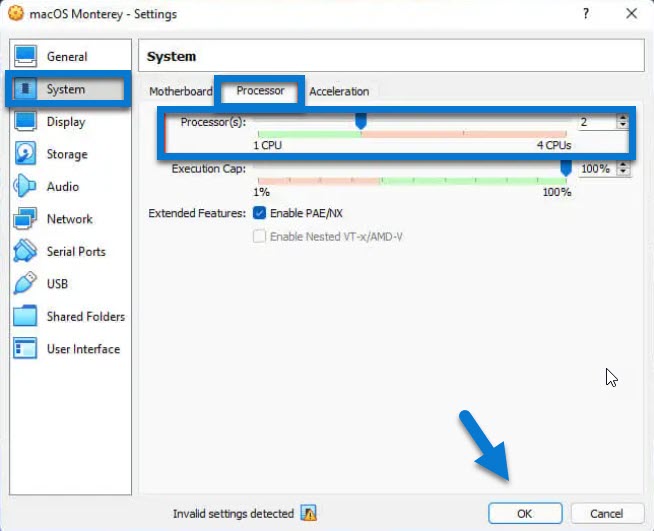
- In the settings area, click on System from the left panel and then processor. Here allocate atleat 2 cores of CPU for the new macOS Monterey Virtual Machine. If you’ve a 2 core processor. Then Choose a single core processor. Besides, click on the Motherboard, and then disable the Floppy disk option.
- Next, click on Display from left panel, and move the scale to 128MB of video card.
- Moreover also check if the USB 3.0 option is enabled from the USB section and click OK to save the setting.
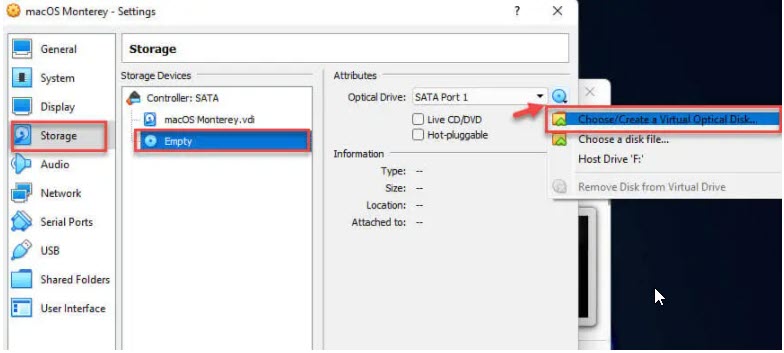
- Most importantly, go the storage section from the left panel. Select the empty CD Icon, and other windows will open. In that Window, click on the circle, and choose the Download macOS Monterey ISO file, and add that file to the Virtual Machine.


Now, everything is up to the mark from the Virtual Machine side. There are only two final easy steps are remaining to complete. Next, you’ll need to run some commands into your Windows CMD, and finally you can go towards the installation of the macOS Monterey on the Virtual Machine on Windows 10 PC.
4: Run Commands in CMD:
The CMD code that we told you to download. We need to file to run in the command prompt to make the Windows operating system compatible for our virtual machine.
- Simple open the downloaded code on the text aditor.
- Select entire code, click on the edit option from the top bar, and click on replace.
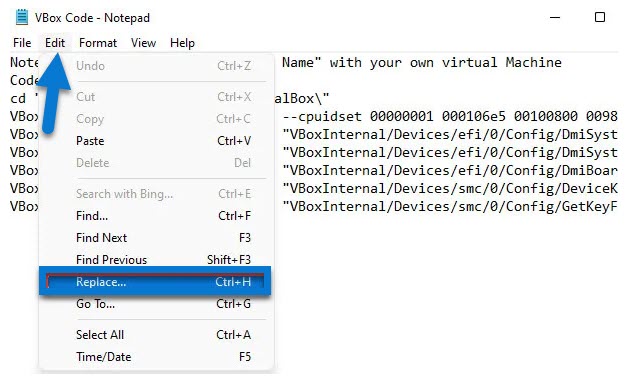
- In the code you downloaded, you should be able to see the VM Name text, replace that term with the name of your Virtual Machine. As in our case, we named our virtual machine macOS Monterey. So, we alter the term with our ones.
- After replaceing the term, open the command propmt on Windows operating system. copy and paste the code in the CMD, and click Enter. Check if the code has been executed correctly, otherwise, you’ll get an error, and you’ll need to execute the code once again.

Once you execute the code in the CMD. You’re good to go towards the final and installation step. Moreover, if you’ve installed Mac operating system before. This is going to be a piece of cake for you.
5: Install macOS Monterey on Virtualbox on Windows PC:
This is the final step. In this step, you’ll need to clean install macOS Monterey on VirtualBox on Windows PC. Make sure you’ve followed each step as shown in the article. Otherwise, you might get problems during installation. But don’t worry. You can submit your problem in the comment. We would be delighted to help you out.
- Start the Virtualbox software, select macOS Montery, and click on start.
- Wait till the system initiates the installation. You might see some code running, and an Apple logo appearing after running of the code.
- Select your language and proceed.
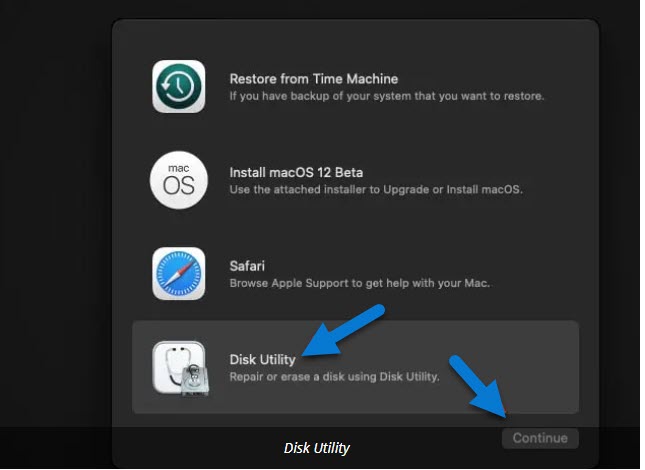
- In this Window, you’ll get four different options. Many people clicks on the second option and go directly towards installation. But here, you need to change some settings in the Disk Utility, and then go towards the installation. Therefore, firstly, click on the fourth option, on Disk Utility.
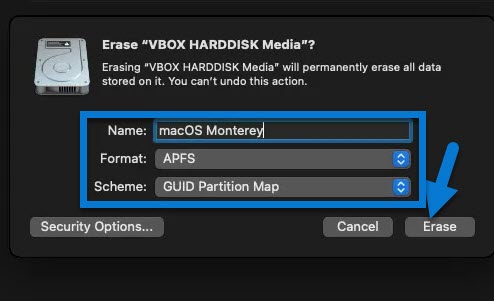
- From the disk Utility area, click on VBOX HARDDISK Media, and erase it simply. Besides also quit disk utility area. And you’ll return to the same last page.
- Now, click on Install macOS Monterey, and proceed.
- Agree to terms and policies. and proceed.
- Next up, click on the macOS disk, and the installation will initiate on the virtual Machine.


Once the macOS Monterey is installed successfully on the system. Follow the on screen instructions such as selecting language, time and passwords etc. And done! you have successfully installed macOS Montery on Virtualbox on Windows PC.
Now, you can work on the latest macOS Monterey as well as on the Windows operating system simultaneously.
Read Next:
- Download macOS Catalina VMware Image file.
- Download macOS Catalina Virtualbox Image file.
- How to edit videos on Android phone for free?
- How to play Brawl Stars on Windows 10?
- Download macOS Monterey DMG file.
Conclusion:
This is how you can install macOS Monterey on Virtualbox on Windows PC. For me personally the process has become too common. Becuase, I have been using Virtualbox for many years. However, if you’re using Virtualbox for the first time and going to install any guest operating system.
This might seem a bit too lenghtly process. But the good thing about the Virtualbox is that the overall environment in VirtualBox is too easy and straightforward. Anyone even if that person uses it for the first time, finds this app user friendly and easy to operating.
consequently, how did you find this guide? Do tell us in the comment section. Additionally if you go any sort of issue at any point, feel free to share your quarry in the comment.
FAQs:
Why the Virtualbox has made my system too slow?
The main reason behind it is that your system doesn’t have sufficient resources to handle multiple operating system. Therfore, we already suggested our readers regarding the issue, and wrote down some recommended specs.
Why I am getting crashes during the installation of macOS Monterey?
Check out the version of ISO file you’ve downloaded. This problem occurs because many people try our the unstable versions of macOS Monterey. Therefore, I recommend to use latest and stable version of Mac operating systems.
Why I am getting the following problem? #[EB|LOG:EXITBS:START]
This problem usually occurs due to AMD processors. Most people confront this problem due to old AMD processor. Check if your’s is also the same case.


6 comments