While installing the Mac operating system on Virtual machines such as VMWare, many computers miss a bunch of features, which you can enable with the help of VMware tools. Therefore, today our article is about why you need VMware tools and how to install VMware tools on macOS Monterey.
If you use Virtual machines for some time now, then you already know that your virtual machine doesn’t work properly and misses some useful features like copying and pasting, fixing the screen resolution, and so on.
The solution to these problems is the VMware tools. If you’ve installed VMWare tools before, then you just need to skip through the steps if you’ve forgotten how to install VMware tools on a Virtual machine.


If this is your first time then don’t worry, you need to perform some simple steps and you can easily install VMware tools on your machine and resolve most of the common issues that you face with your VMWare virtual machine.
The question might arise in your mind what sort of problems are fixed after installing the VMware tools? So, let’s check out what sort of problems can the VMWare tools solve and how you can install VMware tools on macOS Monterey.
Table of Contents
What issues will the VMware tools solve:
While using Virtual machines, after installing guest operating systems, there are multiple issues you might observe. Or with time they might appear. Those issues or errors include,
- Taking snapshots of the guest OS.
- Low video resolution
- Inadequate color depth
- Synchronization of time between the host and guest operating system.
- Incorrect display of network speed
- Missing or improper sound quality.
- Restricted movement of the mouse
- Inability to copy and paste and drag and drop files
The above ones are some of the common issues that you might face without installation of the VMware tools on your Virtual machine.
This isn’t important that your guest operating system or the VMware workstation show all the listed issues, most mostly, these issues occur with the operating system.
And if you are also facing the same issue with your operating system that it means that you should also install VMware tools on your guest operating system.
And as we’re talking about macOS Monterey, we’re going to show you how you can install VMware tools on macOS Monterey on a VMware workstation.
So, if you’re having one of the above issues, then turn on the virtual machine and follow some simple issues shown below.
How to install VMware tools on macOS Monterey:
Well, the process isn’t much complicated. You just need a few steps to successfully install the VMware tool on the macOS Monterey.
So, without taking much time let’s get straight onto it!
- First of all, start the VMware Workstation and close all the guest operating systems.
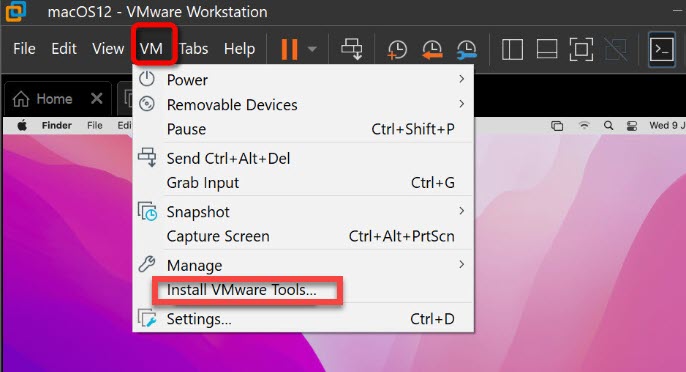
- Next, click on the macOS Monterey. From the upper list, click on the VM, and then select Install VMware Tools.
- The package is already downloaded on the machine. You just need to install it. After clicking on the install VMware tools, a new window appears with two options. Install VMware tools, or Uninstall VMware tools.
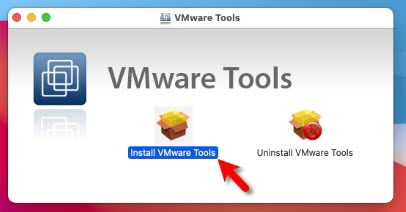
- Obviously, click on the installation option, and in another new window, you’ll get the list of the steps you need in order to install the packages.
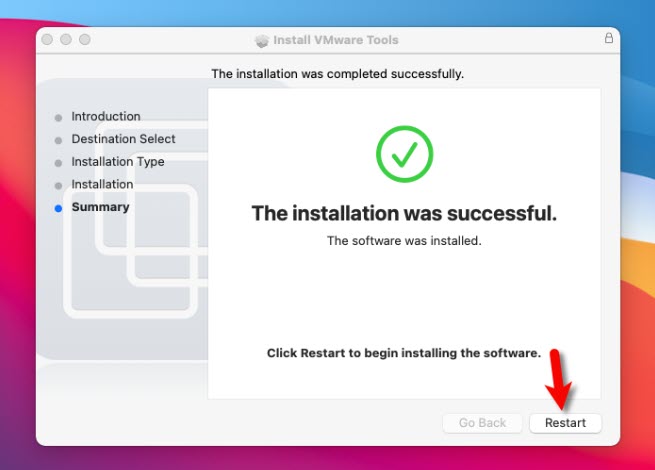
- Follow the installation guide as instructed on each step. Type in your password etc, and on the final step click on Install Software.
- Then there are two possible, whether the installation starts and completes successfully. You’ll also get a green tick after the completion of the installation.


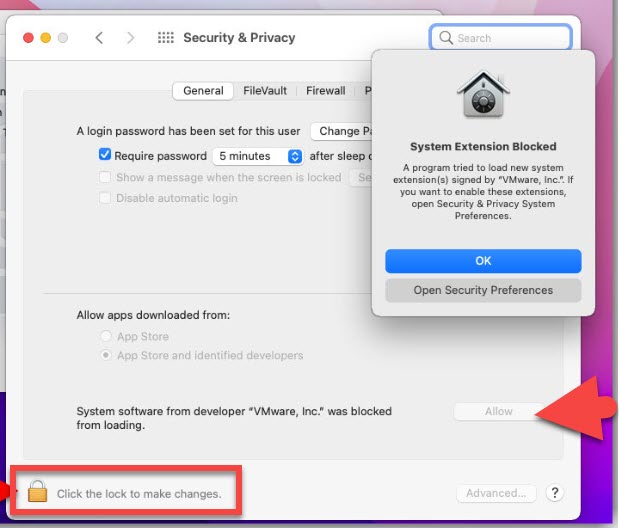
Or you’ll get a notification that blocks the installation. To solve this problem click on the Open Security Preferences window, and from there type in your username and password to enable the installation.

After that, the installation will start and complete. After installation, the interfaces also recommend restarting the machine. So, restart the VMware workstation, and hopefully, the problems you were facing have been fixed completely.
Frequently some people might observe that even after installation of the VMware tools on macOS Monterey some features don’t work the way they should.
So, the best method you can apply is reinstallation. Follow the above-discussed steps, firstly uninstall the VMware tools on the machine and restart. And then again follow the above steps for the installation.
And wallah! the problems are solved.
Wrapping Up:
This is how you can install VMware tools on macOS Monterey. The process is quite simple and straightforward. So, if you still have problems or questions regarding the VMware tools or any other related queries.
Feel free to reach out to us.
FAQs:
Q: My system doesn’t work properly after some days of the installation of the VMware tools.
Some people experience slow computing after the installation of the VMware tools. Well, the reason for that is that while creating the Virtual machine the user allocates not sufficient RAM and processors to the guest operating system.
Therefore their system can’t handle additional processes.
Q: I get a black screen during restarting of the OS after installing VMware tools.
Well, there could be two reasons, whether you need to increase the amount of RAM and processor, or you need to enable Autologin after the installation. Because, if the autologin is unable, you might need to reinstall the entire operating system.


1 comment