Those who use Virtualization software, usually have some problems while working on Virtual operating systems. One of those basic problems is the screen resolution. And therefore, today we’re going to talk about how to fix macOS Big Sur screen resolution on Virtualbox.
Well, whether you use VMware software or Virtualbox. There are some common issues, with Virtual machines, like copy-pasting unable, and facing problems adjusting the screen resolution and size.
However, these issues are not permanent, and anyone can easily fix these issues every easily in a few steps.
And if you’ve also installed macOS Big Sur on Virtualbox, and facing the same screen resolution problem. Then, don’t worry, you can fix the problem very easily in a few simple steps.
There are some methods, to fix the screen resolution problem on macOS Big Sur. Some being popular, and some being not so known.
But we’re going to show the two methods, that work most of the time and solve the problem.
So, anyone having problems with the screen size and resolution can try out these two methods and can fix the screen resolution on macOS Big Sur on Virtualbox as a guest operating system.
So, without taking much time, let’s get straight into it!


Table of Contents
Fix macOS Big Sur screen resolution on Virtualbox:
As already said, we’re going to discuss two methods to solve this problem. Firstly, we’ll try to fix the problem through the settings area. Because, as default, the display scaling option isn’t enabled.
So, we’ll show how you can enable that setting. And then if that doesn’t work in your case. you can try out the second method.
In the second method, we’ll try to fix the screen resolution on macOS Big Sur on Virtualbox through the command prompt, which we also called the terminal.
So, firstly, you can try out to solve it through the terminal, if that didn’t work, then you can check out the settings whether the option is enabled or not!
Method#1:
There are a few lines of code, that you need to run in order to fix. So, if you’ve used the command prompt before. This won’t be a difficult task for you. But if you are not techy and using the command prompt. This might seem confusing.
The best way is the follow each step discussed below.
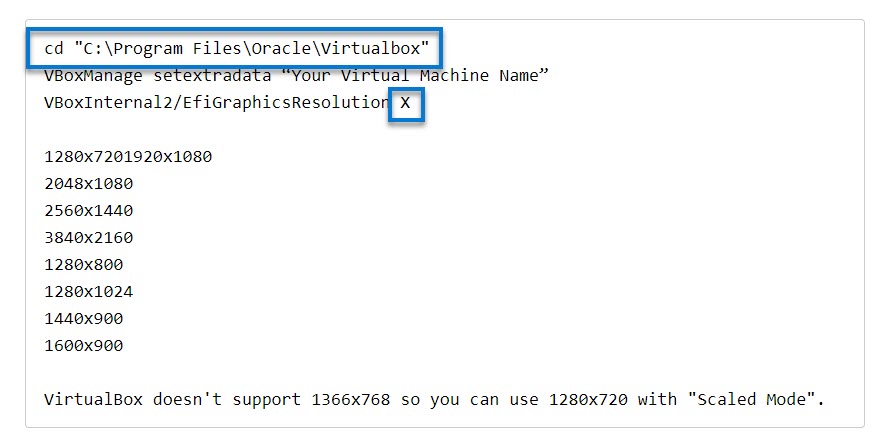
First of all, copy in the below code, which you’ll need later in the command prompt. You can copy the below code on WordPad or anywhere for now.
cd "C:\Program Files\Oracle\Virtualbox"
VBoxManage setextradata “Your Virtual Machine Name” VBoxInternal2/EfiGraphicsResolution X

1280x720
1920x1080
2048x1080
2560x1440
3840x2160
1280x800
1280x1024
1440x900
1600x900

VirtualBox doesn't support 1366x768 so you can use 1280x720 with "Scaled Mode".
You can need to change the virtual machine name with the one yours is. Like mine is the macOS Big Sur. So, I will change that synchronously.
Additionally, you also need to change the screen resolution from “X” to “1920×1080“.

Once you change these two things from the piece of code, you’re ready to implement the settings.
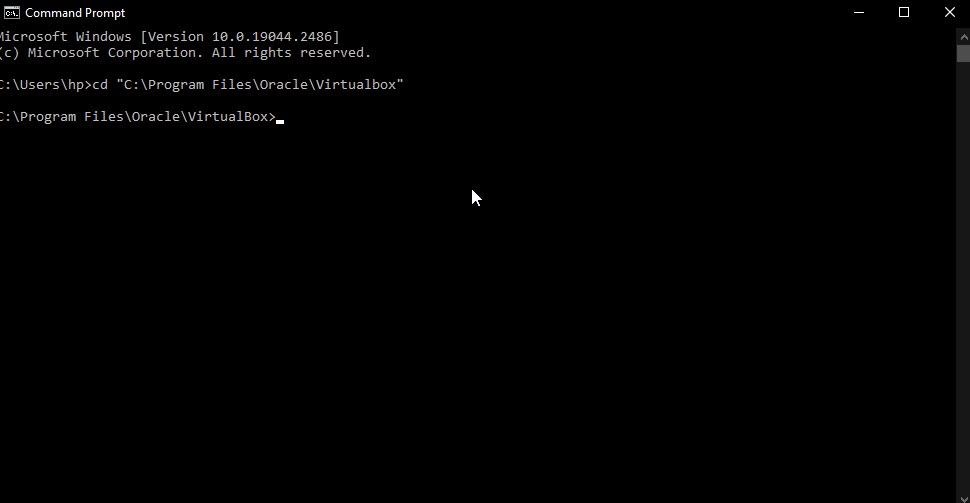
- Open the command prompt by typing the name in the search bar, or you can open it from the home menu.
- In the terminal, you need to paste the first line of code only, which is to locate the Virtual machine in that specific folder. After applying this code, if you see any sort of error. That means that your file doesn’t exist there. You need to manually check the file from the c\: drive, and copy and paste the path after cd. And then hopefully that work. If that still doesn’t work, it means you’ve not followed the correct path.
- Then copy the next line of command on the terminal. And that should solve all the problems.
- Exit the terminal and let’s check the virtual machine.

During this time, it’s better to keep the virtual machine closed. After implementing the line of codes in the terminal, start the virtual machine.
Open the display tap, and here you’re! you are able to open your desired screen resolution on macOS Big Sur.
Moreover, sometimes, this doesn’t work, because of the settings. So, you can try out the second method below if this doesn’t work.
Method #2:
This is a pretty simple way. And this works when you have installed all the screen resolution scales. If you’ve installed them. then you might not be able to use this option. So,
- Start the Virtualbox Virtual machine.
- Go to the settings of the particular operating system. Here you need to select macOS Big Sur.
- Then from the left panel, choose the screen settings.
- From the right side, you should be able to see the option for display scaling. Toggle this option.
- Restart the Virtual machine!
Tada! now the problem is solved completely.
Wrapping Up:
These sorts of small issues are common, especially for those, who use Virtual machine software for the first time. And the good news is that we’re here covered you entirely!
Here you can get all sorts of guides regarding operating systems, Virtual machines, and all those.
Moreover, how did you find this article? Please feel free to share. Moreover, if you are still stuck somewhere and can’t find the solution. Then why not comment on that specific problem?
We’ll be delighted to research that!

