There are a lot of techniques to use multiple operating systems on a single hardware. But the two most popular ones are Virtual machines and dual booting. And each method has its own pros and cons. The biggest problem with installing multiple operating systems with Virtual machines is that it partitions the system’s specifications. Which doesn’t allow you to install heavy programs due to the partition. And the biggest problem with Dual booting is, that while booting between different operating systems, it takes a bit longer time to load. But both the techniques have their own advantages too. So, keeping this discussion for another day. Today our focus will be on how you can dual boot Windows 10 and macOS Catalina on PC-Hackintosh.
The overall process is pretty lengthy. And it might take up to an hour of your time to complete this process successfully. Moreover, before, the initiation of the process, it is better to read the (A to Z) process in the guide. And then go towards the process.
So, without waiting long, Let’s get straight into the process initiation.
Note:
Such guides are only for educational purposes. (TechVatan.com) doesn’t allow or support any illegal activities in any case.
Read Next:
Table of Contents
How to dual boot Windows 10 With macOS Catalina on PC:
Before, going towards the installation process, you need to pre-download some imperative software, which will help them in this process. These files and software will assist to complete the process in a shorter time with any problem. But before that, Let’s see what is dual booting in real?
1: What is dual booting?
Long story short, dual booting is a method to install two or more than two operating systems on a single hardware. When dual-booting concludes successfully. So, you can shift between the operating systems just by rebooting the system.
Contrary to Virtual machines, dual-booting provides 100% efficiency and work. This process doesn’t divide the systems, specifications, etc. But the operating system you run at the time will use the features and capability of the entire system to run it. And you can install any sort of heavy program on the device without any hassle.
2: Files required for the dual-booting macOS Catalina with Windows 10 on PC:
- You need to have two USB drives. One is used for the bootable USB for macOS Catalina, and the other is used for Windows 10.
- macOS Catalina DMG file: This file will be used to write on the USB flash drive for installation.
- Windows 10 Image file: This file will be used for the installation of Windows 10. Download the Windows 10 DMG file directly from Microsoft.com. The other websites usually have the DMG Files for Virtual machines.
- Transmac Software: This will help you to write the macOS image on the USB drive quickly and easily.
- Rufus Software: This will write the Windows 10 image file on the USB flash drive.
- Multibeast Software: This software is used several times.
- Clover Config Tool: This will help in Bios Customization, and dual booting.
When you download these files. So, you are ready to begin the process. During the process, we will also provide a “Reminder Note”. So, you don’t get confused. And easily monitor your success. So, during the process, Do read the remind once.
Note:
Don’t forget to backup your data. Because during this process you will be asked to format the drives. You can visit this guide to backup your data on external hard drives.
Tip:
After downloading these files. Copy these files on the homepage instead of the folder. Because this will help you to easily share the files between the drives and desktop through drag and drop.
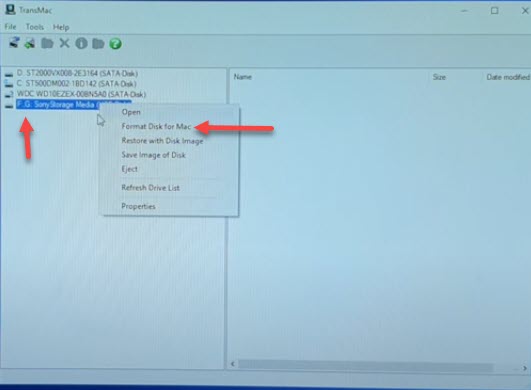
3: Create macOS Catalina Bootable USB drive using TranMac:
When you download and install the TransMac software. So, Let’s go and create a bootable USB for Catalina.
- Right-click on the TransMac software, and “Run as an Administrator”.
- On the screen, you will be able to see different drives including the USB flash drive.
- Click on the USB drive, and “Format it”.
-
- It may take some time to format a USB drive for macOS Format.
- Then, again “Right-click” on the USB drive, and select “Restore disk image”.

- Select the macOS Catalina Image file from the folder.
- TransMac will initiate writing the macOS Catalina on The selected USB drive.
- On the completion of the process. You will get a pop-up notification saying “Restore completed”.
- And the TransMac has successfully created a bootable USB for macOS Catalina.
- Don’t forget to Drag and drop the “Clover Config tool” and the “Unibeast” from the homepage to the USB flash drive, downloaded before. Then “Remove” the USB drive.


Till here, the macOS Catalina bootable USB has been created. And you have also copied the two software on the USB drive. Now, remove this USB drive, and move on towards the second step.
4: Create Windows 10 bootable USB installer using Rufus:
Though You might use any other software for this process. Rufus is officially backed by Microsoft”. Therefore, we recommend it.
- Now, connect the second USB drive, you will be used to save the macOS Catalina Bootable.
- Right-click on “Rufus” and hit “Run as Administrator”.
- Select the Flash Drive.
- Then “Partition Scheme:GPT Partition scheme UTFI”, “File sysatem:NTFS”,.
- Then select the Windows 10 image file from the folder.
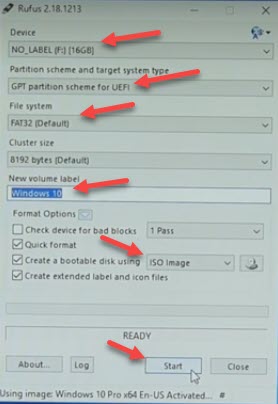
- Check all the settings once. And click on “Start” to begin creating a bootable USB for Windows 10 operating system.
- It will take some time to conclude the process successfully.

After the Windows 10 bootable USB installer is created. Remove the flash drive from the systems. Now, you need to move to the next step. Where you will need to customize the system’s Bios Settings. So that it allows the bootloader to boot between the different operating systems.
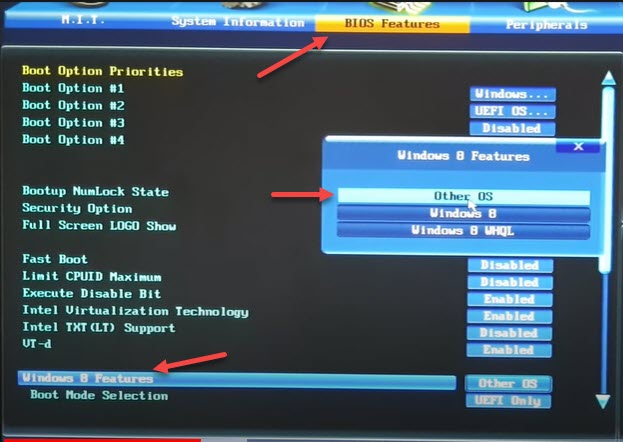
5: Customize Bios Settings:
Alteration of the Bios Settings is compulsory. Because, as default, this setting is set for a single operating system. And in order to dual boot, you have to change its settings according to your requirements.
- Restart your computer, and press the “Del” buttons to go to the “Bios Settings” area.
- Select “Bios Features” from the top menu. And Here you will see the “Windows8 or Windows 10 features”.
- Click it and select “Other OS”.
- Then below click on “Boot mode selection”, and choose “UEFI only”.
- Scroll down and click on “Storage boot option control”, and select “UEFI First”.
- Then click on “Other PCI device ROM priority” and choose “UEFI OPROM”.
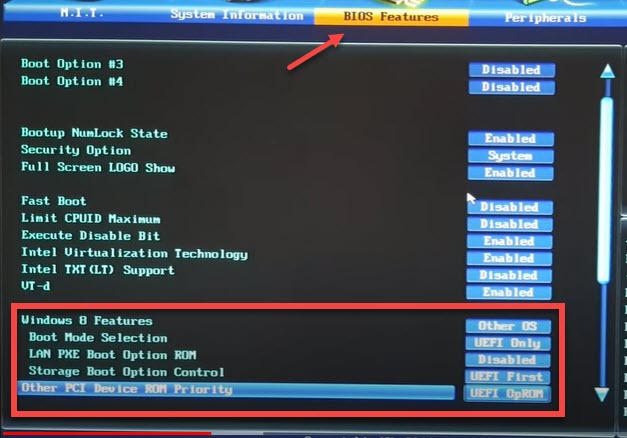
- Now, “Save and Exit” Settings by pressing the “F10” key.


Now, the settings have been changed. And the systems is ready for dual boot.
Note:
The Bios Settings page might differ as per the motherboard brand. If your Bios Settings page looks different, you will still get the same options, but with a different interface.
Reminder:
Up to this stage, you should have successfully been created a bootable USB for macOS Catalina and Windows 10. From this step further, You will have to
- Boot from macOS bootable drive.
- Partition the hard drive.
- Install macOS Catalina on the PC.
- Install Windows 10 and check whether the system boots between them.
6: Booting from macOS Catalina Bootable Flash drive:
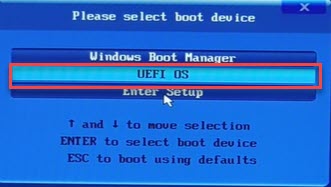
After saving the Bios settings, keep pressing the “F12” key until you get to the “Boot Device Menu”. Remember to connect the USB drive that has the macOS Catalina bootable installer.
- After coming to the “Boot device menu”, select “UEFI OS” and press “Enter”.
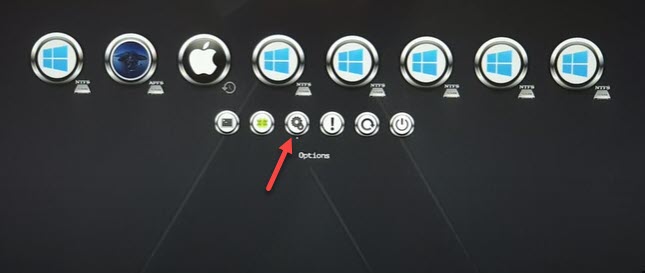
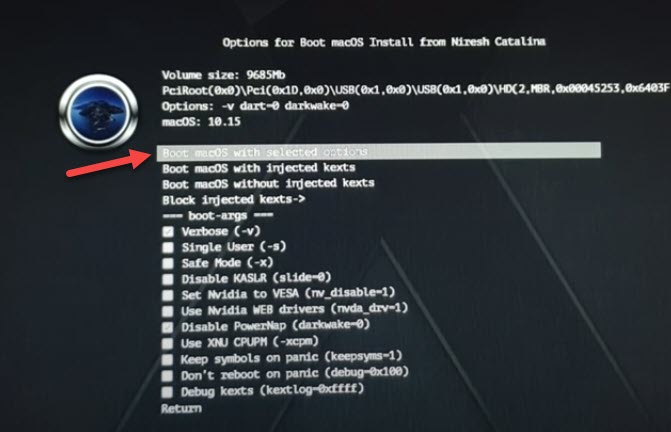
- In the “Clover bootloader” go to “Options”.
- Here Change the “Boot Args:-v GraphicsEnabler=Yes”.
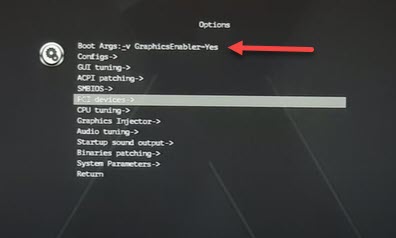
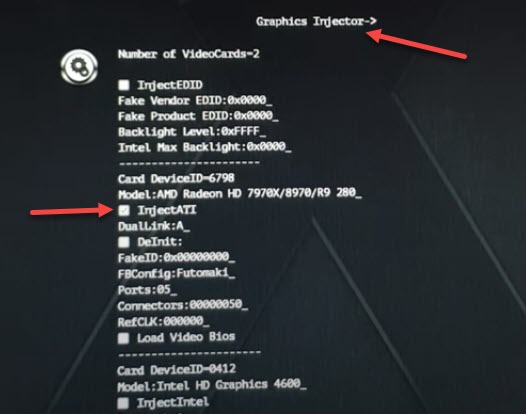
- Scroll down and click on “Graphics Injector”, and choose “Inject ATI AMD graphics”. I chose “AMD graphics” because my devices use it. And if you have to have “Intel Graphics”. So, you should go with that.
- Now, Save the settings, and return back to the main menu.
- In the main menu, bring the cursor on the “Boot macOS Install” image, and press “Enter”.
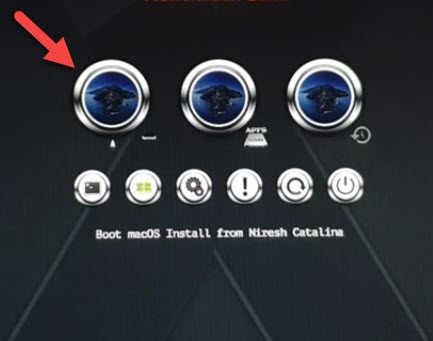
- Then again bring the cursor on “Boot macOS Selected options” and press “Enter”.


Now, the settings will initiate the booting of the system into the Mac installer. After some time, you will see the Apple logo. After loading setup files, you will be directed to the “Setup window”.
7:partition the hard drive to dual boot Windows 10 with macOS Catalina:
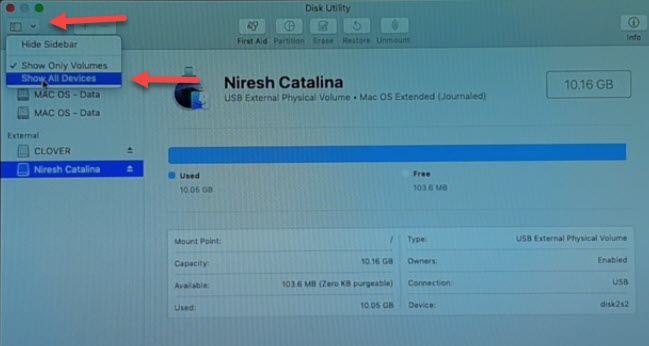
Now, before, installing macOS Catalina on the PC Hackintosh. You need to partition the hard drive for macOS Catalina and Windows 10. For the partitioning of the hard drive, click on “Disk Utility from the Top menu on the “Setup Page”.

- In the Disk Utility page, click on the “Arrow”, and “Tick mark” the “Show all devices” box, so the hard drive becomes visible.
- Click on the “Partition” from the top menu, And again click on “Partition”.
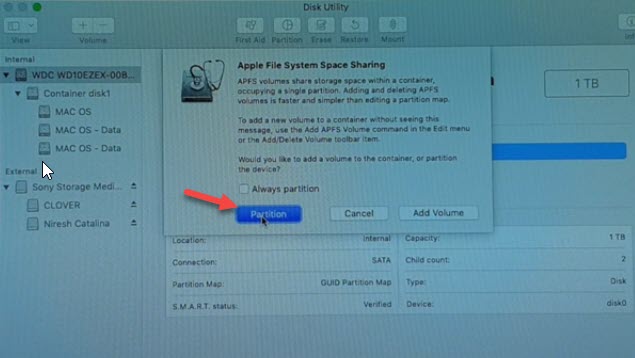
- Now, partition the hard drive for macOS Catalina and Windows 10. We recommend you partition storage equally, or allocate more space for the operating system, that you use more.
- Also, give Name to the partitioned hard drive. So, at the time of formating the disk during installation, you can easily distinguish between the different hard drives.
- Moreover, also change the format of the disks as shown in the picture below.
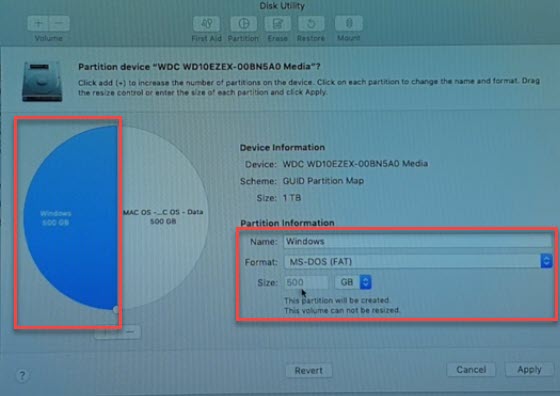
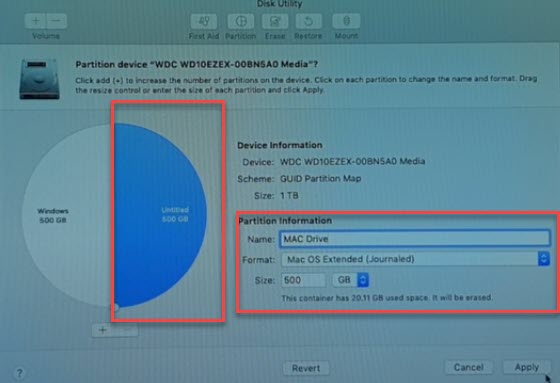
- Click “Apply” and the system will begin to partition the hard drive.
- Partitioning of the drive will take some time depending upon its size.


And after the successful partition of the hard drive. Close the “Disk Utility”. and Go to the main menu page. From here you are ready to install the macOS Catalina and Big Sur on Hackintosh PC.
8: Install macOS Catalina on PC:
After closing “Disk Utility”, on the main page, you are start the installation of macOS Catalina on the PC.
- On the main page, select macOS and Continue.
- Then choose the macOS hard drive, and hit the “Continue” button.
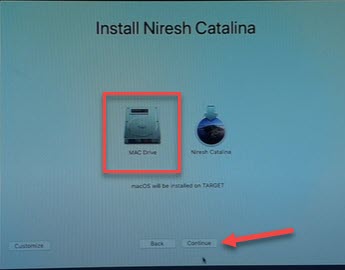
- Now, the installation of the system will initiate.
- Then follow the same usual process. Select your country, language and create an account.
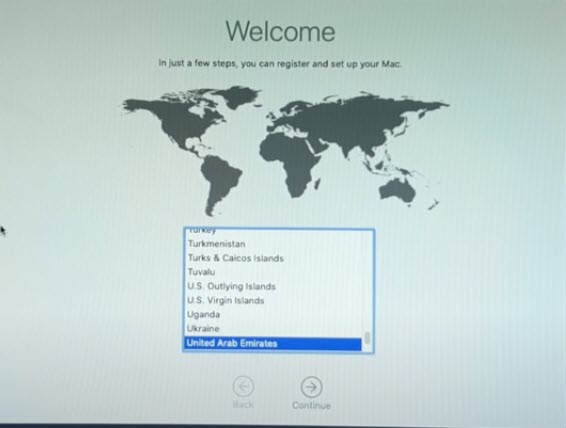
- And follow the on-screen instructions until the installation concludes successfully.
- After the successful installation of macOS Catalina. Drag and drop the “Clover Config Tool”, Unibeast and other files from the USB to homePage, which you copied to the macOS Bootable USB earlier.
- Extract the Unibeast, and set up the settings. Moreover, also install the “Text files”, and “Bootloader”. The bootloader will help you to boot the system between macOS Catalina and Windows 10. Whereas the “Text files and drivers” are used to resolve the issue for the drivers of macOS Catalina.


Now, you have the macOS Catalina will have “Drivers”, “Text files” and “Bootloader”. Now, it is time to move on towards the final step. In which you will need to install Windows 10 on the system.
9: Install Windows 10 on the PC-Hackintosh:
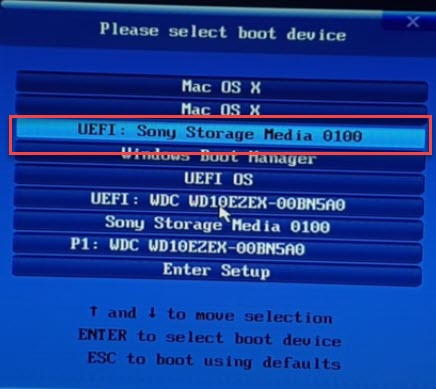
So, “Restart” the system, and keep pressing the “F12” key to open the “boot device selection page”. Also don’t forget to connect the USB drive to the computer, which has the Windows 10 bootable USB installer.
- From the “Boot device selection page” click on “UEFI: Sony storage media”.
- Then, wait till the setup is starting.
- Accept the “license terms” and proceed.
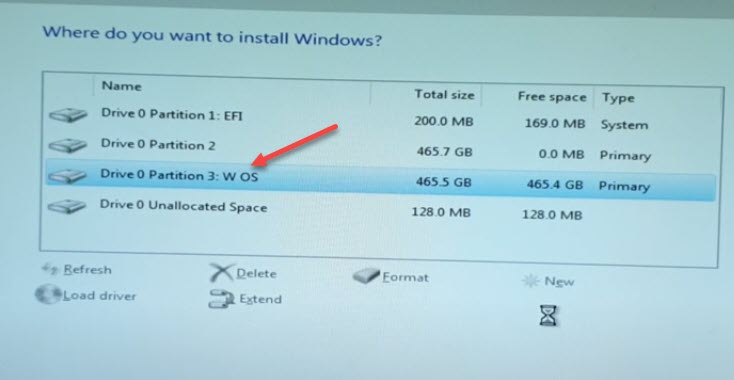
- Then select the “Custom Installation method”, and click “Next”.

- Here you will get the partitioned drives. Carefully select the “Windows 10 partition drive” and “Format it”.
- Again, select the “Windows 10 drive” and click “Next”.
- Now, the system automatically initiates the installation of Windows 10 on the systems. Wait until the system loads the installation set up.
- After loading the system will “Restart”. So, during “Reinstallation” keep pressing the “F12” key. So, you are taken to the “Boot device selection” page.
- From this page, hit the “UEFI OS” and select the “Microsoft EFI partition” and hit “Enter”.
- Then select your “Region”, “Language” and all the usual instructions.
- Follow all the on-screen instructions, until the installation complete successfully.


After the successful installation, the system will “Restart”. And here you will have been booted to the new Windows 10 operating system.
Check the hard drive, if it has been partitioned properly. Also, check the “UEFI NTFS Partition” which will help the system reboot between both the operating systems.
- For a final touch to dual boot Windows 10 and macOS Catalina, “Restart” the system, and go to the “Bios Setting”.
- In the Bios settings area, click on “Bios features” from the top menu.
- Here go to the “Boot option#1” and select “UEFI OS”.
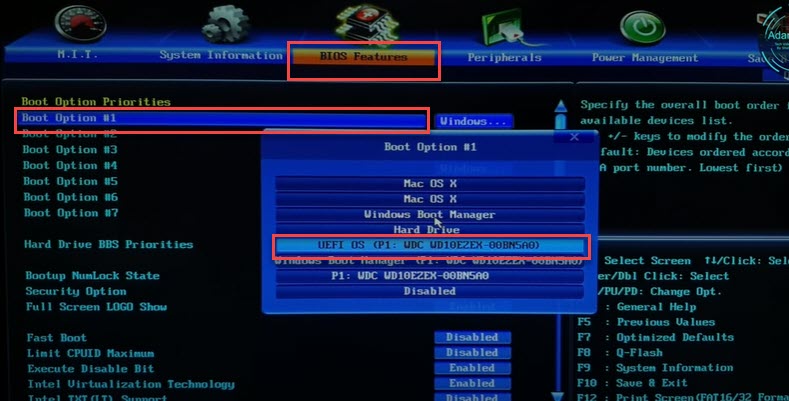
- Then “Save and Exit” the Bios settings.
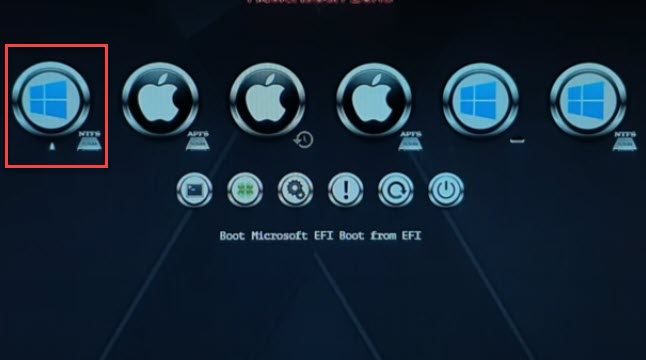
- Finally from the “Clover bootloader page”, you can boot between Windows 10 and macOS Catalina. Click on any option, and you will be booted to that operating system.

Recommended Readings:
- How to recover permanently deleted photos on Mac?
- How to recover deleted files on macOS Big Sur?
- Create Windows 10 bootable USB on Mac without Bootcamp.
- How to hide/show files on macOS Big Sur?
- How to install macOS Big Sur on VMware on Windows 10?
- Create macOS High Sierra bootable USB Installer on Windows 10.
Conclusion:
This was the complete (A to Z) process to dual boot Windows 10 and macOS Catalina on a PC Hackintosh. Overall the process was quite lengthy and complicated. Therefore, for a flawless installation, you need to consider every step deeply, and so as the tutorial guides.
Hope you successfully dual boot between macOS Catalina and Windows 10. If you need further assistance, you may call us through the comment section. We will surely reach you ASAP.


3 comments