The fully public version of macOS Big Sur has been released by Apple Inc after a long wait. Now, you can install and use the macOS Big Sur 11 without bugs and issues. And those who were waiting for the stable version of macOS Big Sur to dual boot Windows 10 and macOS Big Sur on Hackintosh PC. Now, They can dual boot the operating systems seamlessly.
Before, going to the complete guide on how you can dual booth macOS Big Sur and Windows 10 on PC Hackintosh. It is recommended to thoroughly read the entire guide first. And then go towards the initiation of the process. And if you get a question or confusion in regards to any step. You may write us through the comment section. We would be glad to help you out. And this will ease the process to understand for others too.
As dual-booting is a pretty lengthy and complicated process. Therefore, if you don’t understand the A to Z process. You might not be able to complete the procedure successfully.
So, without wasting time, lets get straight into it!
Table of Contents
How to dual boot Windows 10 and macOS Big Sur on PC |Hackintosh|:
Basically, there are two different methods to dual boot macOS big Sur with Windows 10. Some people recommend using the “Open Core Configurator”, and some recommend “Clover” as a boot loader. When we personally checked out both the models. The biggest problem with the Clover is that the only version of the Clover that helps you to install macOS Big Sur on your computer is “Version 5122”. Yet the other versions are unable to install macOS Big Sur and dual boot it with Windows 10. And perhaps, by the time, you are reading this, there could be a newer version of Clover. And that hopefully could work.
The problem using “Open core configurator” is the same, that some of the systems had issues during installation. And when we tried to figure out the problem. So, we saw that it is causing issues due to the so far older motherboards. So, if you don’t have an old age motherboard, we recommend using “CCC”. And in this guide too, we’re going to use the “Open Core Configurator”.
What is a Dual boot?
Those for whom, the dual-booting is unclear. It is the technique that we use to run multiple operating systems on one hardware. We know that originally the PCs and laptops come with a single operating system. And when you boot your system. The Bios initiates the boot loader. And the boot loader starts the operating systems.
After dual-booting, and changing the bios settings, you will be able to choose between several operating systems installed on a single or multiple hard drives. And whenever, you want to shift to the second operating system, so, you will need to boot the system again. And select that operating system.
Files required for the dual boot of macOS Big Sur with Windows 10:
- macOS Big Sur DMG file: you will need to download the macOS Big Sur DMG file. Which will be used for the creation of a macOS Big Sur Bootable USB installer, along with a minimum of 16GB of a flash drive.
- Terminal commands: You will need to paste this command in the terminal during the creation of a bootable USB installer of macOS Big Sur.
- Open Core Configurator: You will need this tool for the creating and editing of open core configuration files.
- Windows 10 ISO file: Windows 10 ISO file will be used for the creation of bootable USB for Windows 10. We recommend you download the Windows 10 ISO file from the official Microsoft.com. Because other websites provide the Windows 10 ISO file for Virtual machine software. Moreover, you will need an additional minimum of 8GB of the flash drive for the image file of Windows 10.
- Balena Ethchar: This tool will help you to copy the image files to the USB without creating problems.
- EFI files: EFI files will be used during partition etc.
Once you download these files. You can initiate the process to dual boot Windows 10 with macOS Big Sur on PC Hackintosh.
Tip 1:
When you download these files. copy these files on the home page of your computer. This will help you to easily copy the files between the USBs and the computer by drag and drop.
Tip 2:
While downloading the above-mentioned files. Bear in mind, that the files are compatible with your system. And also read the “Terminal command” before its execution.
Reminder:
Up to this stage, you should have downloaded the required files on your computer and pasted them on the home page. Then, you will need to go through the following steps.
- Create macOS Big Sur bootable USB installer.
- Partition of the EFI files.
- Create Windows 10 Bootable USB installer.
- Change the bios settings for dual booting.
- Then one by one, you will need to install macOS Big Sur first. And partition the hard drive for Windows 10.
- And install the Windows 10 on the partitioned hard drive.
Create macOS Big Sur bootable USB installer:
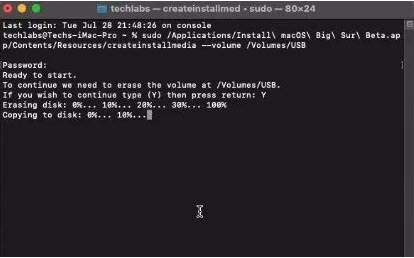
For the creating of a macOS Big Sur bootable USB installer, connect the 16GB of the drive with the PC, that you prepared for this process.
- go to the “Disk Utility”. and select the USB drive. (Remember the USB drives name)
- Click on the “Erase” option. And change “Name=USB” “Format=macOS Extended” “Scheme=GUID Partition Map”.

- Erase the USB drive. And close the disk utility.
- Now, go to the “Terminal” and paste the downloaded terminal command, and press “Enter”.
- If asked, Enter your password and press “Y” for yes to confirm.
- Wait until the process completes.


Once the process concludes successfully. You will get a popup message on the computer screen. And you are ready to move on to the next step, where you will need to “Partition the EFI files”.
Mount the EFI Partition:
Here you will need the “Open core configurator” tool.
- Start the software. And enter the username and password.
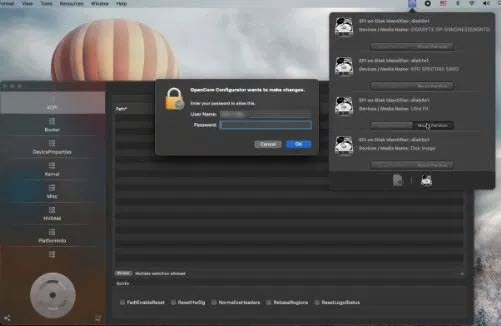
- Then mouse the EFI partition of the USB drive.
- Drag and drop the downloaded EFI files from the home screen to the EFI partition of the USB and close the EFI folder.
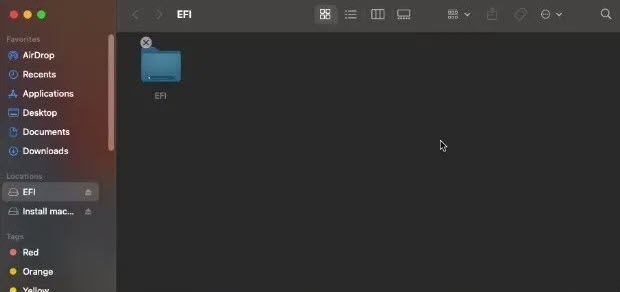
- Then drag and drop the open core configurator tool to the macOS Big Sur folder on the USB drive.

- Then remove the EFI and the USB drive, which has the bootable macOS Big Sur.


If everything goes well till here. Now, you will need to create Windows 10 bootable USB on the second USB drive.
Create Windows 10 bootable USB installer:
Now, attach the second USB drive to the computer.
- Open the “Disk Utility”.
- Click on the Erase and change the “Name=USB” “Format=MS-DOS (FAT)” and “Scheme=GUID Partition Map”.
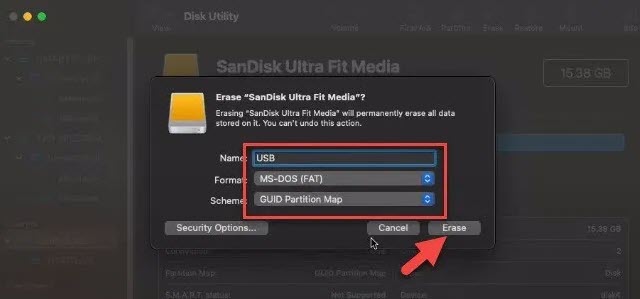
- Hit the “Erase” to confirm it and close the Utility.
- Now, start the “Balena Ethchar software”.
- Select the “Flash from file” from the home screen.

- Now choose the “Windows 10 ISO” file from the download folder.
- Ignore the warning and Continue.
- Select target.
- Select the connected USB drive and “Flash”.

- Enter the password, and the “Balena Ethchar” will start to burn the image file to the USB drive.


On the successful completion of this step, you almost have reached halfway. Next, you need to change the bios settings. So, it properly works as a boot loader when you dual boot between both operating systems.
Change the Bios settings:
Here you will need to customize the Bois settings. Because as default the bios settings work for a single operating system. And for dual-booting, you will need to change the boot loader to the dual boot loader. For this purpose, “Restart” your computer, and upon “Restarting” hit the “Delete button” to enter the bios settings page.
- Select “Save and Exit” from the top menu > “Load Optimized Default” > “Yes to confirm”.
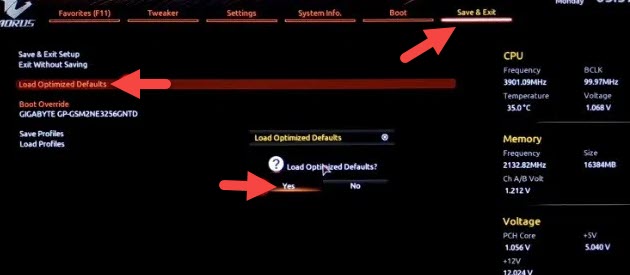
- Select “Save and exit setup” and press “yes” for confirmation. And let the system reboot.

- After again “Restarting”, go back to the bios settings area.
- Go to the “Tweaker” from the top menu.
- Select “VT-d” and “Enable” it.
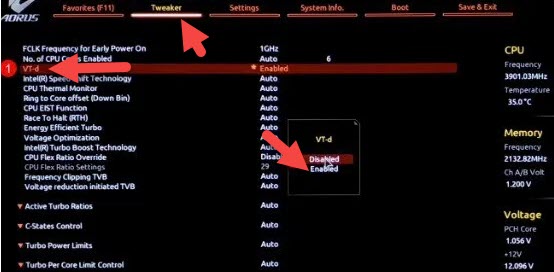
- Below this option click on “Extreme Memory Profile(X.M.P)”, then select “Profile 1”.

- Then, go to the setting area from the top menu.
- “Disable” the “XHCI Hand-off”.
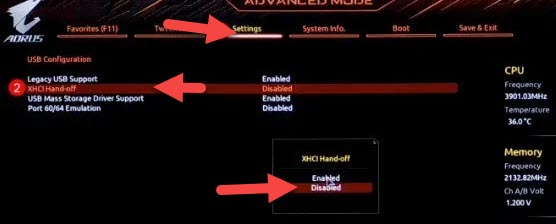
- Again go to the “Save and Exit setup” and “yes”. The system will restart for the third time.


The Bios settings have been changed. Now, you’ll be able to dual boot the PC without any problem.
Reminder:
Up to this stage, you have reached halfway. You have created a bootable USB for macOS Big Sur and Windows 10. You also have mounted the EFI files. And recently customized the bios settings for the dual boot. Further, only three things need to be done.
- Install macOS Big Sur on PC Hackintosh.
- Partition its hard drive.
- And install Windows 10 in the partitioned hard drive space.
Install macOS Big Sur on PC Hackintosh:
Now, it’s time for the installation of macOS Big Sur. So, attach the macOS Big Sur Bootable USB drive to the computer. And Restart it.
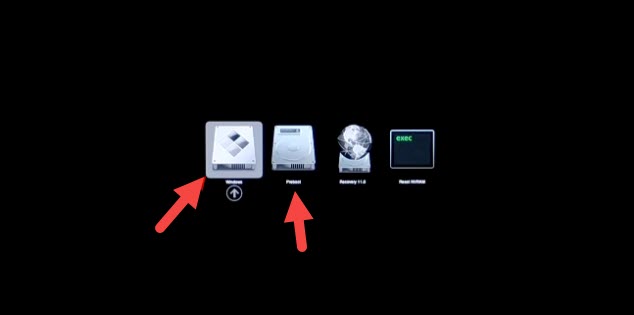
- Upon restarting, hit the “boot menu key” > Select “Open Core” and click “Enter”.

- Then select “macOS Big Sur drive” and “Continue”.

- It can take some time for the macOS Big Sur to enter the recovery mode.
- Select your “language”, “Country” and proceed.
- Choose “Disk Utility” and proceed.
- Select the drive from the side menu and “Erase” from the top menu and proceed.
- provide “Name=macOS Big Sur”, ” Format: APFS”, and “Scheme: GUID Partition Map” and “Erase”.
- Close the Disk Utility.
- Proceed with “Install macOS Big Sur” and “Continue”.
- Agree “Terms and Conditions”.
- Select the formatted drive and proceed.
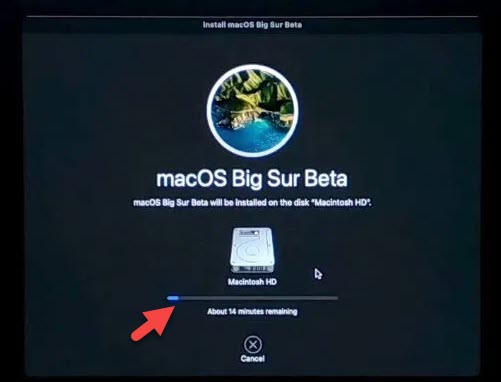


Now, the installation of macOS Big Sur starts. It can take up to 30 minutes depending upon the PC’s hardware. And after the successful installation of macOS Big Sur.
- Copy the Open Core Configurator on the home page.
- Start the Open Core Configurator software, and mount the EFI partition of USB and system drive.
- Then drag and drop the EFI folder from the EFI partition of USB to the EFI partition of the system drive.
- Eject the EFI partition and “Restart the PC.
- Check whether all the features including Wifi, brightness, and volume of the macOS Big Sur work fine.
partition the hard drive for Windows 10:
So, when installing the macOS Big Sur, you have to name and erase the hard drive storage. For the dual booting, you will need to partition the hard drive storage. So, you will able to run both the operating systems on a single hardware.
- Go to the “Utilities” and “Disk Utility”.
- Click on “View” and select “Show all devices”.
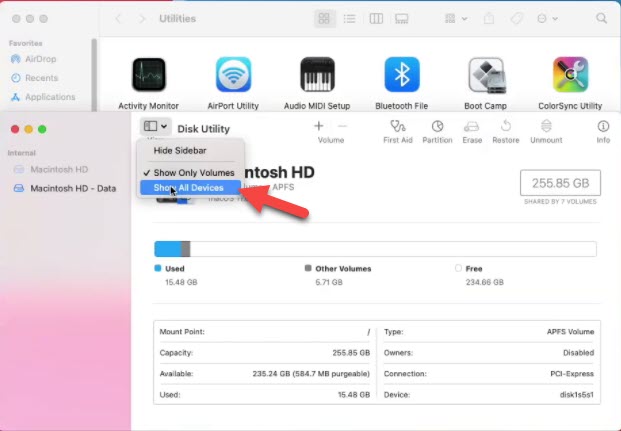
- Click on “partition” and partition the available storage on the hard drive.
- Change the “Name”, and “Format” as per the options shown below in the screenshot. As for storage, I recommend equally divide the storage space between the operating systems. Or increase the storage space for the OS, you use the most, and hit the “Apply” button.

- Again confirm the partition from the pop-up notification.


Wait for some minutes, until the partition of the storage space completes. Once the partition completes. You can move on towards the final step. Which is the installation of Windows 10 on the PC alongside macOS Big Sur.
Install Windows 10 on PC:
Now, attach the Windows 10 USB drive to the PC. And Restart it.
- At the time of restarting, go to the boot menu and select Windows 10 and proceed.

- Then select the “Time”, “Language” and “Currency”.
- On the unavailability of the product key, select “I don’t have product key” and continue.
- Then select the “Windows 10 version” installation method.
- Accept the “Terms and Conditions”.
- For the installation method, select “Custom: Install Windows only (advanced)”.
- Then you will see the different partition drives. Be careful to select the partition of Windows 10 OS.
- Delete the Windows 10 drive, and click “Next”.
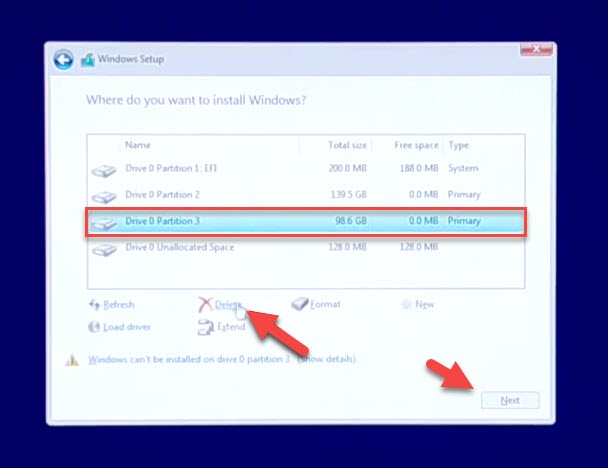
- Then, select the “Unallocated space” drive and move on.


Finally, the system will initiate the installation process. Again this process may take up to half an hour depending upon the hardware. And after successful installation of macOS Big Sur. Once check out the brightness and volume etc, whether those work properly.
If these drivers are having issues. Then go to the settings area. And update the Windows 10 operating systems. These issues will get resolved. Now, both the operating systems have been installed on a single hardware. To shift between the two operating systems, just reboot the computer. Upon rebooting, you get OS options, so, you can choose any of the installed operating systems. And the system will launch that particular one.

Conclusion:
So, this was all about, how to dual boot Windows 10 and macOS Big Sur on PC Hackintosh. The process is pretty lengthy. And believe it or not. It took our writer three days to work on this single guide to write on. So, again as stated at the beginning of the article. If you have any problems, feel free to ask us in the commend section. We will reach out ASAP.


I’m very confused about creating the bootable USB installers. Am I supposed to do that on a separate computer that’s already running Big Sur? All of those screenshots are from a macOS, isn’t this for PC?
I’m really new at this so I don’t really know what I’m doing, and very very confused
You can create a bootable USB installer on mac as well as on Windows 10. you just need to have the required software/tool.
Is there any different steps to be followed for dual boot in existing windows 10 system