What you were waiting for, has arrived. The new macOS 11 Big Sur has been announced in the WWDC 2020 (Worldwide developer conference). And the new macOS Big Sur has a lot for mac fans. However, our main focus in this article will be to install macOS 11 Big Sur on Virtualbox.
The new macOS 11 brings a lot of new surprises to its lovers. The Apple Inc modified and altered Planty of functionalities in its new OS. You can observe changes made in Safari. Many modifications have been included in Navigation panels, toolbars, Notification center, Support of IOS control center, and so on.
Furthermore, not to forget that new IOS 14 also has been announced at this conference. Today in this article we have brought the(A to Z) guide to install macOS 11 (Big Sur) on Virtualbox along with the embellished guides.
However, before that let’s take a look at the devices that support the new macOS 11 Big Sur. The supportive Mac are as follows.
- MacBook from the year 2015 or later.
- Mac Book Air from 2013 onwards.
- MacBook Pro late 2013 and later.
- Mac Mini from 2014 onwards.
- iMac 2014 or later.
- iMac Pro 2017.
- Mac Pro 2013 and 2019.

Table of Contents
How to install macOS 11 (Big Sur) on Virtualbox?
The complete process has three divided parts. first of all, we are going to download the ISO file of macOS 11. However, in this article, we will be using the beta version. But don’t worry. You can exactly copy these steps while you install the full version of the new macOS.
Secondly, we will download and install Virtualbox Virtual machine software on our device. However, if you have already installed open-source Virtualbox software and its extension, you will jump to the third step.
And in the third step, we will create a macOS 11 Big Sur virtual machine, and install the new macOS.
download new macOS 11 ISO file:
As we already stated before, we are using the beta version of macOS 11 in this article. But you can follow our instructions during the installation of the full version. For this, we are going to log in to our Apple’s developer account (Paid). then we download the dmg file from there. When the full version gets released (scheduled in fall 2020). You can download the file from the official website of Apple.com.


Moreover, you can visit the here to see the complete guide to download and install the .dmg file of the new macOS 11. This guide will assist you to comprehensively and straightforwardly download the macOS 11 ISO image file.
Once you download the .dmg file of the new macOS 11. Or if you download the macOS 11 file in compressed form, remember to extract the file before starting the installation.
Then we are good to go to the second level.
download and install Virtualbox software and virtualbox extension pack:
Now, head over toward the download and installation of Open Source virtual machine software “Virtualbox”. Those who are unfamiliar with Virtualbox.
So, Virtualbox is a free and open-source virtual machine software by Oracle Corporation. This virtual machine is the first recommendation for those, who want to run multiple Operating systems on their only desktop or laptop.
download and installation process include,
- visiting the Virtualbox.org website.
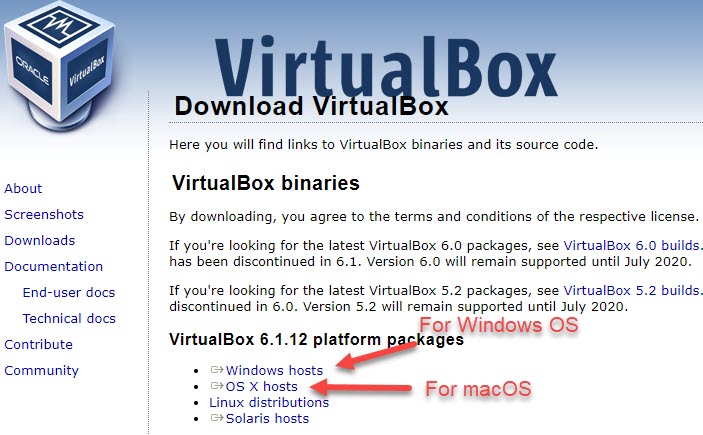
- download the latest version of Virtualbox for your Windows or macOS.
- Install the Virtualbox software.
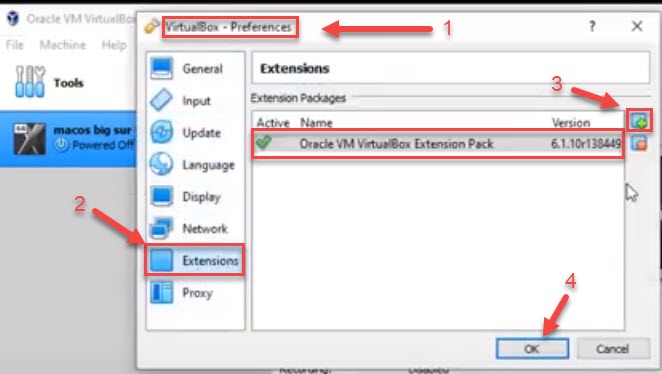
- Download and Install the Virtualbox extension pack. The extension pack prevents your computer to confront any issue during the installation of virtual machines.

And if you have already the Virtualbox extension pack. So, you need to update the extension pack to the latest version.
To upgrade the extension pack!
- Open up VirtualBox, navigate to Tools>Pereferences>Extensions.
- Click on Plus icon and select VirtualBox extension which you’ve downloaded.
- Upgrade and then click the OK button.

You may also visit the following link, that instructs you the entire procedure to download and install Virtualbox on Windows PC and Virtualbox extension pack.
download and install Virtualbox and Virtualbox extension pack on your Windows PC.
Once you configure both the software, now it is time to create a Virtual machine by the name of the Operating system we want to construct. And install that OS on the Virtualbox.
create the Virtual machine and install the macOS 11 (Big Sur) on Virtualbox:
Now, this is the final step to install the macOS 11 on Virtualbox software. Here first of all we are going to create a Virtual machine by the name of macOS 11 (Big Sur). and configure all the settings.
After the complete creation of Virtual machine. Then we will finally install the macOS 11 on the virtaulbox.
Create a Virtual machine:
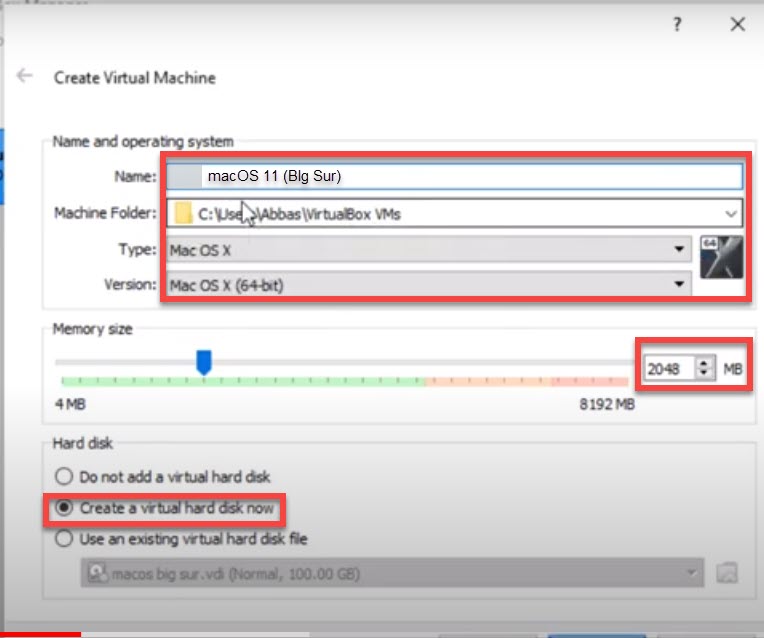
- Open the Virtualbox software and click on New option.
- Then click on the expert mode.
- Now, in the name section, put the name as macOS 11 (Big Sur). And then the type and version of your PC will be caught by the software automatically.
- Then specify the RAM size for the new guest OS. And the specified amount of RAM will be usable by the guest OS. Afterward, select the create a virtual hard disk now. And hit the Create button to proceed.

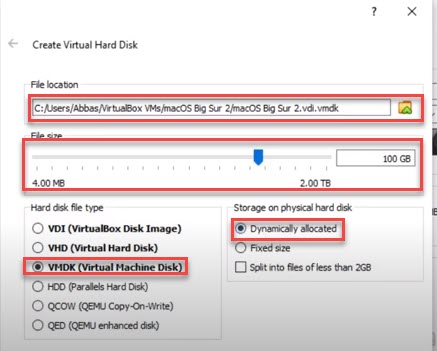
Create Virtual hard disk:
- Now, you are shown the default location of file size, there the macOS 11 file will get installed. You may alter the location of the file.
- secondly, designate the amount of storage you want for your guest OS. If you are going to take a test drive of the new OS. You should specify the little amount of space. Or else vice versa.
- Then select the VMDK format for the hard disk type.
- and then choose dynamically allocated.
- And hit the create button.

Configure some more settings:
Now,after the creation of Virtual machine. It is nacessary to configure some more changes for our macOS 11. For that,
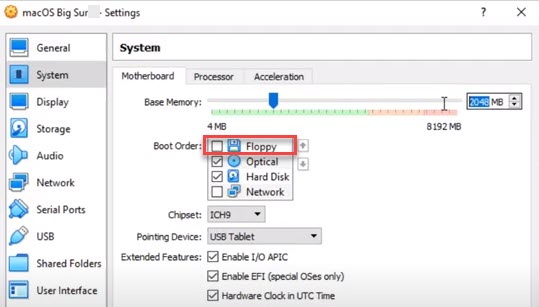
- Go to Settings > System > Processor. Here choose the amount of Processor you want to specify for the new guest OS. Here I choose two CPUs. You can select what you desire. Again the more complicated work you do, the more CPU’s you need to designate.
- Then, go to the motherboard option and uncheck the floppy disk and Ok.

Select the macOS 11 Big Sur ISO file:
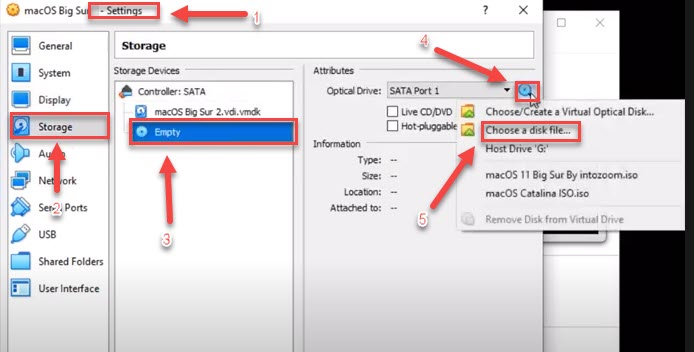
- Now, Go to settings.
- Then, navigate to Storage > Empty > Disk icon > Choose a disk file. From there, select the macOS 11 (Big Sur) file. and finally hit the OK button.

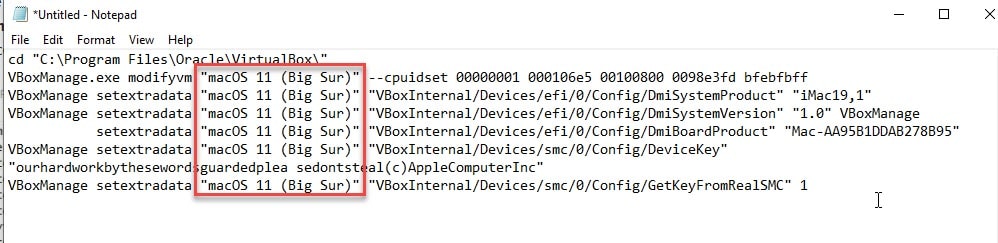
Copy and paste the following code in Command Line:
Now, Go to the search area and type CMD. and then launch the Command LIne app. In that app copy and paste the following commands one by one. Remember that the name file, that has been highlighted in the picture below should match the Operating system name in every field.
cd “C:\Program Files\Oracle\VirtualBox\”
VBoxManage.exe modifyvm “macOS 11 (Big Sur)” –cpuidset 00000001 000106e5 00100800 0098e3fd bfebfbff
VBoxManage setextradata “macOS 11 (Big Sur)” “VBoxInternal/Devices/efi/0/Config/DmiSystemProduct” “iMac19,1”
VBoxManage setextradata “macOS 11 (Big Sur)” “VBoxInternal/Devices/efi/0/Config/DmiSystemVersion” “1.0” VBoxManage setextradata “macOS 11 (Big Sur)” “VBoxInternal/Devices/efi/0/Config/DmiBoardProduct” “Mac-AA95B1DDAB278B95” VBoxManage setextradata “macOS 11 (Big Sur)” “VBoxInternal/Devices/smc/0/Config/DeviceKey” “ourhardworkbythesewordsguardedplea sedontsteal(c)AppleComputerInc”
VBoxManage setextradata “macOS 11 (Big Sur)” “VBoxInternal/Devices/smc/0/Config/GetKeyFromRealSMC” 1

Install macOS 11 (Big Sur) on Virtualbox:
If you have installed guest OSes before, bear in mind that this process is going to be a bit different. But no worries! We are going to guide step by step (A to Z) to conclude the installation successfully.
- Open the Virtualbox software.
- select the macOS 11 (Big Sur) and hit the start button.
- Now, a code will run on your computer, and after couple o seconds the Apple icon will appear on the screen. It means that the installation process has been started.
- Now, select your language, then proceed.
- select to install the macOS and continue.
- Now, accept the terms and conditions of the Operating system.
- Hit the install button.
Moreover, you will have usual on-screen instructions, that you simply have to accept and proceed. During these steps, you will also have to sign in with your Apple ID account, set up screen time, analytics, Accessibility, enable Siri, and so on.
The rest process in a child’s play, therefore, is not necessary to lengthen the process and make the installation process complicated. once you reach the Setting Up screen. Now, leave the mouse and wait until you see you see a fully new and different interface on the new macOS 11 Big Sur.
Next Up in Virtual machines:
- How to download and install Ubuntu on Virtualbox?
- How to install Windows 10 Virtualbox on Mac PC?
- The (A to Z) Guide to download and install VMware on Mac PC.
- How to install Kali Linux on Virtualbox? (Complete Guide).
- How to install macOS Catalina Final on Virtualbox on Windows PC?
- A complete Guide on how to install Virtualbox on Windows 10.
- How to install VMware Workstation on Windows 10?
Bottom Line:
In this article, we comprehensively explained the entire process to install the new macOS on Virtualbox virtual machine. The overall installation process is not so complicated but lengthy.
Moreover, DO tell us in the comment section, what feature of the new macOS 11 did you like the most and why through the comment section. and if you have additional queries please contact us through commenting below.


1 comment