Virtual machines such as Virtualbox has made to too easy to use two Operating software on one computer. In this article, we are going to guide you step by step on how to install The Kali Linux on your Windows OS using Virtualbox. Though there are more than on methods to execute this action, the Virtualbox is the most straight forward method to use multiple Operating systems on one computer.
Moreover, in this article, we are going to put a glance on Kali Linux OS. And the prerequisite of installing the software on Virtualbox. And the entire process step by step with screenshots. We will also provide some FAQs that most of the users face when they install the Kali Linux on Windows using Virtualbox.
Table of Contents
Kali Linux:
Kali Linux is a Linux distribution by offensive security certified professional used for penetration testing and Digital security auditing. The software is maintained and funded by Offensive security LTD. The primary purpose of the software is to check the vulnerabilities of digital products and resolving those vulnerabilities, While it is also used in illegal activities like Hacking.
But in this article or purpose is to install the Kali Linux on your system for purely legitimate and constructive activities. So, let’s start to download and install the Kali Linux on Windows, but first of all, check out the prerequisites.
Prerequisites:
- First of all, you must have enough space in your system to partition that space between the main OS of your order and the guest host. The Recommended hard drive space is 1.5TB space (But not compulsory).
- You must have at least 4GB of RAM. And the recommended size is 16GB.
- The Virtualbox should be up to date.
- In this case, Your central Operating system should be Windows, But not necessary, we will guide you further which steps are different in macOS rather than Windows.
- You must have the Virtualbox installed on your windows. If yet, you have not installed Click Install Virtualbox on Windows 10 to see the Process of installing the Virtualbox on Windows 10.
Downloading And installing the Kali Linux:
In this step by step method, first of all, we will download the ISO file of Kali Linux from the official website of Kali Linux. Because the Virtualbox requires the ISO file to install the guest host. Then we will start a guest host on Virtualbox and name it Kali Linux. And finally, we will come to the Process of installing the Kali Linux on Virtualbox. And finally, you can use kali Linux on Virtualbox. As well as Windows as a central Operating system.
Step 1:
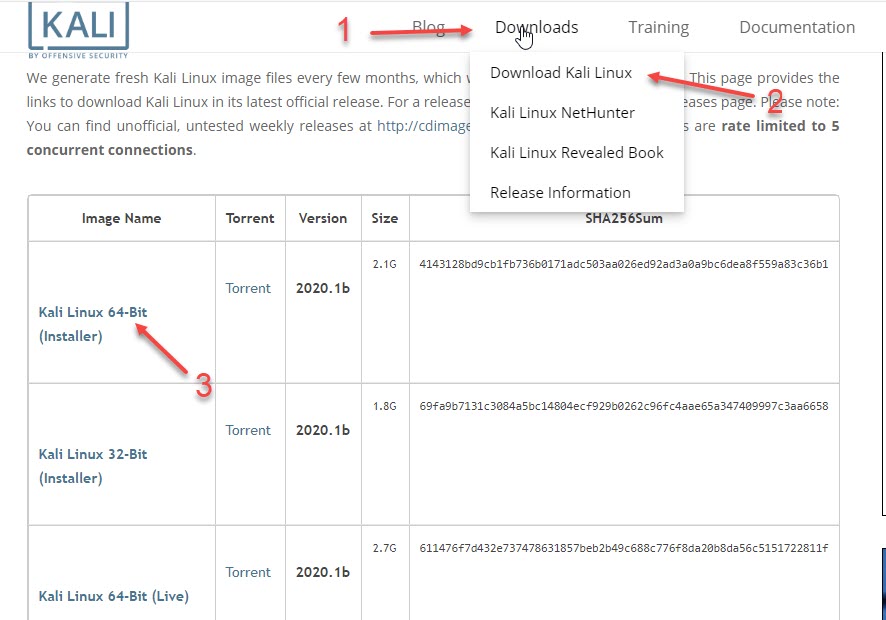
- Go to the Official website of the Kali Linux and download the IOS file which your order requires, In this case, we are going to download the 64bit file as per our computer requirement. The link to the official website of the Kali Linux is given below. Click on the line. It will redirect you to the download page.first of all, click on the Downloads and then click on the download Kali Linux. And below, the available versions of Kali Linux will appear. Now, click on your desired text. And a file of almost 2.0GB will start to download on the bottom left side of your screen.
Note: The home page of the official website changes from time to time. Do not worry about the change interface when you click on the download link.
Go to Kali Linux official Website

Step 2:
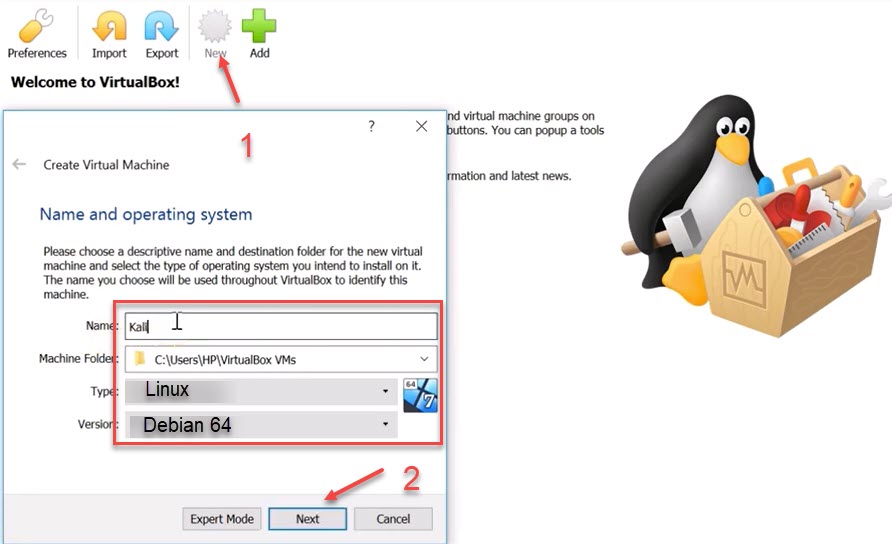
- Once the ISO file has been downloaded. Then open the Virtualbox application. And Click on the New button. It will open a window for the creation of a new virtual machine. Now fill the spaces by the name. And choose the machine folder. And select the type and version of the virtual machine you want to create.and finally click on the Next button.

Step 3:
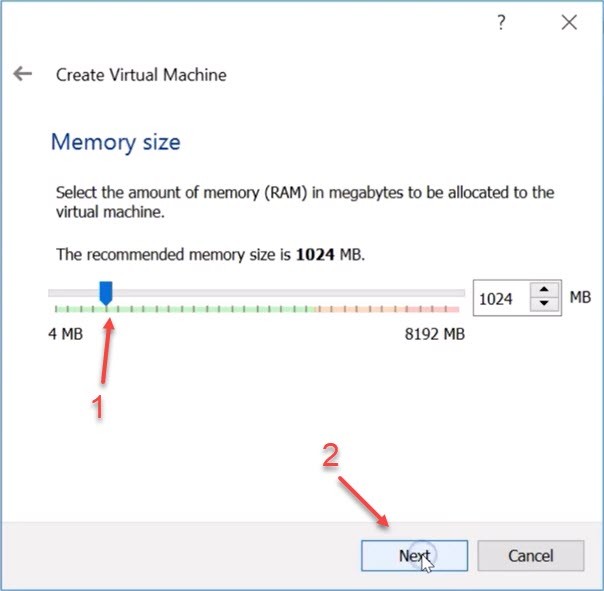
- Once you click on the Next button. A new window Will appear asking you to partition the RAM. And choose the RAM size you want for the Kali Linux. And once you select the Size, Click on the Next button to proceed to the next step.

Step 4:
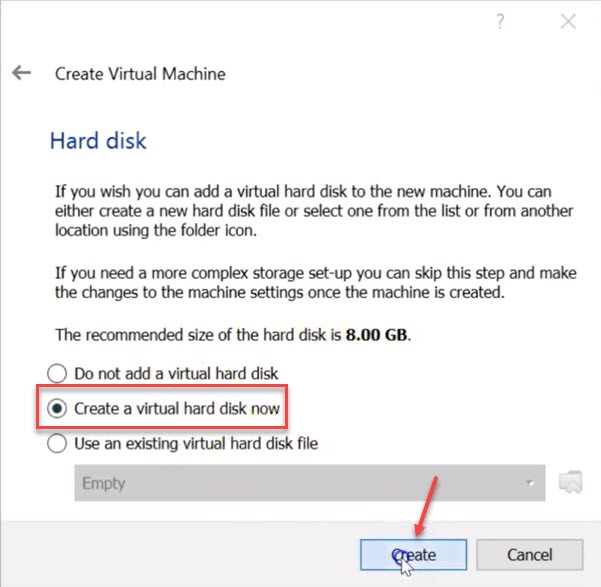
- In this step, you have to partition the hard disk space. The minimum size is 8GB. But the bigger size you allocate for the Virtual machine, the better it will Run. So, now click on the Create virtual hard disk And click on create to create the virtual hard drive.

Step 4:
- As you have clicked on Create. The new window will ask you the type of hard drive you want to create. The three options will be VDI, VHD, and VMDK. You have to select the VDI option and then click on the Next button to proceed.
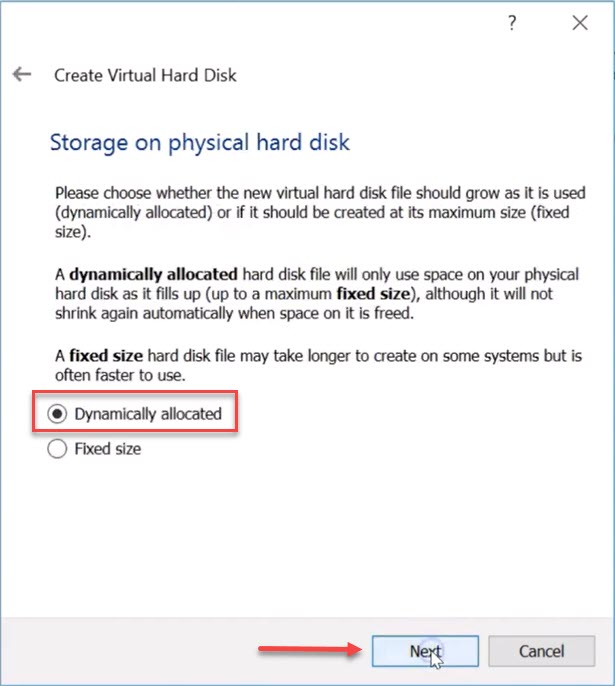
- As you click Next. A new window will open, asking to choose one of the two possibilities appearing below in the image. If you want the dynamically allocated, it means that the fixed hard disk size for the virtual machine can shrink or expand ( up to fixed size) as a requirement. And If you select a fixed size, then the system will not shrink or develop to maintain the disk size. In this case, we are going to choose the dynamically allocated option. And click Next to proceed.

Step 5:
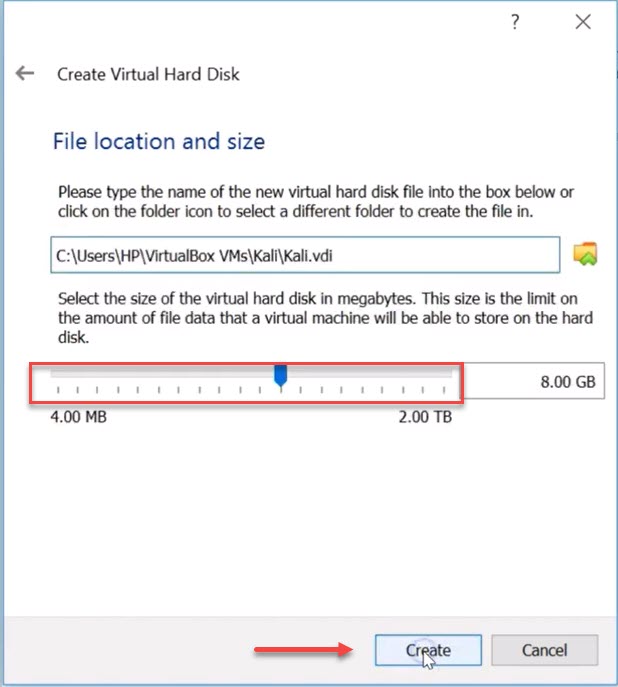
- In this step, you need to choose the size of storage you want to partition between the two Operation systems. It depends on your requirements. How much you need for the guest host. If you use the guest host of everyday activities, up to 50GB will be enough, Or else you can select the larger size. And finally, click on the Create button to create the virtual hard disk.

Step 6:
- Finally, the virtual machine has been set up. You only need to install the ISO file which you had download recently. But before Installation, we need to make some minor changes in setting. For that, go to Virtualbox software. You can also see the Kali Linux virtual machine that has been created. Now click on the setting button to open the setting area.


Step 7:
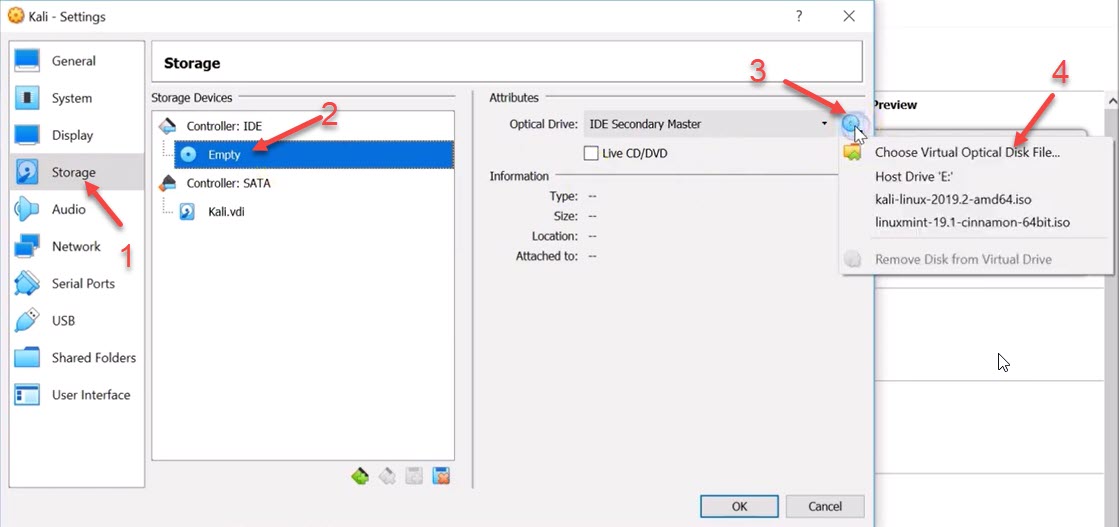
- Once you enter the setting panel. Click on Storage.
- Now, you will see a controller: Empty IDE. Click on Empty.
- Now another small window will open. Click on the disk highlighted in the picture by the name of Three.
- And now, click on Choose Virtual optical disk file.
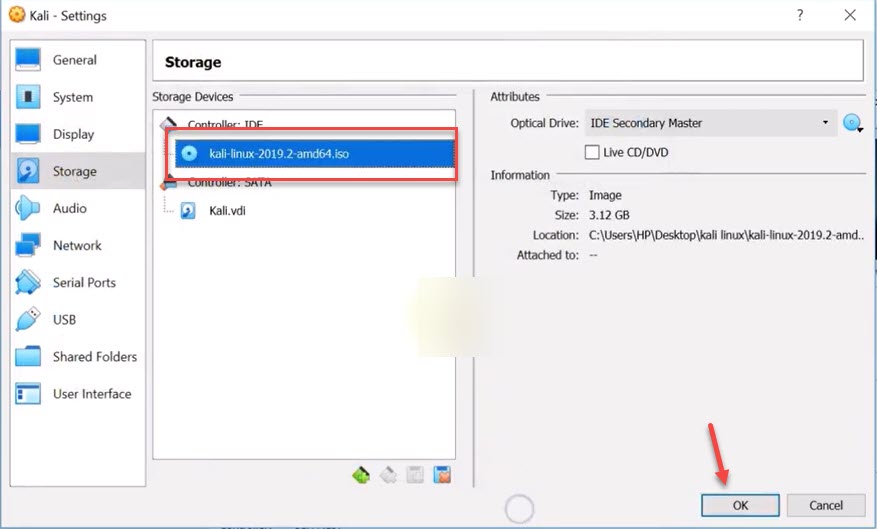
- This click will open the folder in your computer where you have saved the downloaded ISO file of Kali Linux.

- Now click on the file and click Next. And then, you can see that the file has been added in the Controller: IDE.So, now it’s complete. It is time to install the Kali Linux in Virtualbox. So, click on the Ok button.

Step 8:
- Now to start the installation process. Open the Virtualbox and select the Kali Linux and select the start button. You will see that the new window will appear to continue the Installation Procedure.
- Now choose the Graphical Install by using the Arrow keys on your keyboard and press Enter to go to the next step.


Step 9:
- Now from here, it is a necessary installation process.
- Firstly, you have to choose the language you want to work in Kali Linux and click Continue to proceed.
- Secondly, select your country where you live and click Continue to move.
- Thirdly, select the keyboard format you in a while using kali Linux and click Continue to proceed.
- Fourthly, A process will begin to configure the Network, and automatically The Kali will be selected. And again, click Continue to move.
- And after that, another option will appear to write the Network configuration. Leave that box Empty and click Continue to proceed.
- Now in this window, you need to set up a password for your Kali Linux. Set the password and Click Continue to Proceed.
- It is time to partition the disk. Click on the Guided-use entire disk from the options and click Continue to proceed.
- Now in the new window again, you will be given opportunities regarding partitioning of the drive. Click on the All files in one partition ( recommended for new users) from the options and again click on Continue.
- Now, this is a confirmation message; This option asks to Write the changes to the disk? Click on Yes and then click on Continue.
Now the installation process will take place live; after Installation again, you will be asked to select a couple of the options to install the configuration packages, etc.
- Once again, you are asked to use a mirror network? Choose yes and click Continue.
- Now the new windows ask the HTTP proxy information. Leave the box Empty and click Continue.
And now, the Process for configuration of package manager will start. And after some time, the Process will complete.
- Now the new window asks whether to install the GRUB boot loader on the hard disk? Select the yes option and click Continue.
- And the final window asks to choose an option from two options. Here do not select the Enter device manually; choose the Second option Because this will prolong the Process.
Now after Installation of different tools and packages. Finally, you will receive the Congratulations! Massage. That means the Installation has successfully been complete. And click again on Continue.
On this spot, the system will automatically Restart. And after Restarting the Kali Linux is ready to be used.
Some problems And their Resolutions while using Kali Linux on Virtualbox:
Que: The mouse is not working after I installed the Kali Linux on Virtualbox?
Ans: Open the Virtualbox, And in the right bottom corner of virtual box windows right click on the mouse icon and disable mouse integration. If this does not work, Install the Virtualbox Extension pack on your computer. For the full procedure, click on how to install the Virtualbox Extension pack on the computer.
Que: My system has gotten slow after installing the Virtualbox?
Ans: This due to less compatibility with your computer. Moreover, try to increase the size of the virtual hard disk and RAM.
Editor’s Recommendations:
- The complete guide on how to install Virtualbox on Kali Linux.
- How to download Virtualbox on MacOS?
- How to install Virtualbox on Windows Ten? ( A to Z guide)
- Install VMware Workstation on Windows 10 Step by Step Procedure.
- How to install VMware tools on Windows 10 using Virtualbox?
- How to install macOS Mojave on Windows 10 using VMware Workstation?
Bottom Line:
The article was a complete guide on how to download and install the Kali Linux on Virtualbox. Moreover, the Process has been explained step by step with screenshots.there is no difference between the Installation in windows and Mac. Don’t forget to read our Editor’s Recommendations too.

