Have you hear about macOS Mojave and you are looking on How to install macOS Mojave 10.14 on VMware on Windows? Then you are in a good place. In this article, I am going to guide you on the macOS Mojave installation on VMware Workstation Pro 15. However, Apple announced macOS 10.14 Mojave on 4th June 2018 on World Wide Developer Conference (WWDC). Firstly, Apple will release the developer beta for users to test the latest operating system, later on, it will announce the public beta for public and Apple released macOS 10.14 Mojave for the public in September 2018. Hands down, macOS Mojave is one of the top Operating systems like Windows OS and this year apple included tons of features on macOS Mojave although MacOS 10.14 Mojave features are second-to-none and it will be a succor for Mac users.
Anyhow, you want to install macOS Mojave on your Windows PC but you don’t have a clue how to do that Or you might be thinking it is unfeasible. No, you are wrong, you can run Mac OS on your Windows with help of third-party software. Finally, thanks to Virtualization software for giving such a platform to Windows and Linux users to run MacOS on their PC. Therefore, you can install any Mac Operating systems on your Windows or Linux with the support of Vmware and Virtualbox.
Vmware is the best virtual machine for Windows users to test any new release of Operating system even mac users can use Vmware to test the new operating system and get an experience of it. Although every new operating system has some bugs and errors for the first time but later on the bugs and errors will be fixed on the new version of the OS.
Therefore, to install guest operating systems on Virtual machines whether Vmware or Virtualbox, you will need to download virtual machines image files and you have to download and install VMware Workstation on windows. Afterward, download the macOS Mojave VMDK file and create a new virtual machine for macOS Mojave guest operating system.
Installing Mac OS on a virtual machine is quite different and will take a long time to complete the installation. Don’t worry, this article will guide you on How to Install macOS Mojave on Vmware on Windows.
Table of Contents
What is a Virtual Machine?
A virtual machine is a virtualization software although you can say it is third-party software that allows Windows and Linux users to install guest operating systems. Needless to say, you have several virtual machines like Virtualbox, Vmware Workstation, Hyper-V, and many others. However, the best virtualization software is VirtualBox and Vmware, these two virtual machines are in high demand so far.
Virtualization software is in stock for Windows and Linux Users, Therefore, you can download and install any of virtual machine on your PC. After that, you can try with any Operating system without having a tension of your files and data. You won’t lose your data or system files because the virtual machine is the only way to run a guest operating system.
Best Features of macOS Mojave 10.14
- Dark Mode: Apple has included Dark Mode feature on macOS Mojave present-day version, now you could exchange your Operating system mild mode to darkish this is the first-class characteristic for the one’s users who spend a long term at the computer.
- Dynamic Desktop: The 2nd handy function of macOS Mojave is Dynamic Desktop or Dynamic Wallpaper. you could select dynamic wallpaper to your macOS Mojave and it’s going to trade your desktop color robotically with the time.
- Easy Screenshot: If you need to take a screenshot on your macOS Mojave then you may do it with the Easy Screenshot feature. whenever anything you may make a screenshot of it.
- Group FaceTime: Apple has updated Facetime function on macOS Mojave state-of-the-art version, now you can make chat group with your buddies and even you could make a set of 32 humans at the identical
What you’ll Need for macOS Mojave Installation?
As you know, you want to install macOS Mojave on Vmware on Windows, therefore, you will need some requirements before going to start the installation and the requirements are: Firstly, make sure your system has a minimum of 2GB memory and 2 cores of processors. after that, check your hard disk space because macOS Mojave needs at least 20GB space, Therefore, your hard disk should have 20GB free space. Moreover, MacOS Mojave will need 256 MB Graphics memory. Hands down, many computers can support Intel or AMD VT (Virtualization Technology), So, check your system that can support or no. At last, enable Virtualization Technology from BIOS setup.
You can Download the Required Files:
- Download Vmware Workstation Pro
- Download macOS 10.14 Mojave (On File)
- Download macOS 10.14 Mojave (9 Parts)
- Download Patch Tool latest Version
- Download WinRAR or 7ZIP software (Uploading Soon)
Steps to Install macOS Mojave on Vmware on Windows
There are a few steps to complete the macOS Mojave installation on Vmware Workstation pro 15 and I will show you step by step with heading to not be confused during the installation. However, pay attention to all steps and follow the instructions correctly.
Step 1: Extract macOS Mojave Download File
As the MacOS Mojave download file is located on Google Drive and the file is compressed and save from Malware and viruses. Therefore, once you download the macOS Mojave VMDK file then you will need to extract the file with WinRAR or 7ZIP software then you can use the macOS Mojave Vmware Image file. To Extract the macOS Mojave download file, Right-click on the file and click the Extract Here and wait for a while to complete the extracting.
In case, you have download 9 Parts of macOS Mojave then Right-Click on the one part of the macOS Mojave image file and click the Extract Here. The reason we have uploaded 9 parts of the macOS Mojave VMDK file because some users might have a slow internet connection, therefore, the best way to download macOS Mojave is to download the 9 parts one by one.
Step 2: Install Vmware Workstation Pro 15 on Windows
Hands down, you are going to install macOS Mojave on Vmware Workstation on Windows then it means you should have VMware on your PC. Therefore, download the latest version of Vmware and install it on your PC. However, the installation is quite simple and easy although you check the below article. The below article will guide you completely about Vmware installation on Windows 10.
- Related Article: How to Install Vmware Workstation on Windows 10?
If you haven’t checked the Vmware installation article then follow the below instructions to install Vmware Workstation Pro 15 on Windows 10.
- Once you download the Vmware setup file then go to Download Folder and find the setup file.
- Double-click the setup file to start the installation Wizard Setup.
- Now, wait for a while because the setup is preparing Vmware Workstation for the installation.
- So, Welcome to the Vmware Workstation Pro Setup Wizard, here, click the Next button to continue the installation.
- On the next step, you will be asked to agree to the End-User-License-Agreement and click the Next
- On the Custom Setup page, select the folder you want to install Vmware application and check the box of Enhance keyboard Driver and click the Next
- After that, you will see User Experience Settings. Here, leave everything as it is and click the Next
- Now, Select the Shortcuts you wish to place on your system and click the Next
- The Vmware Wizard Setup is ready to install on your Windows, therefore, click the Install
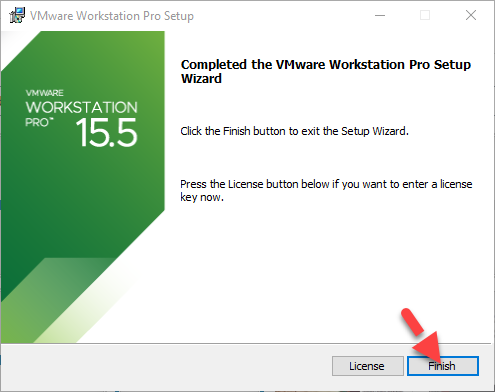
- Once the Vmware Workstation pro 15 has been installed on your PC then click the Finish button to close the installation Wizard Setup.

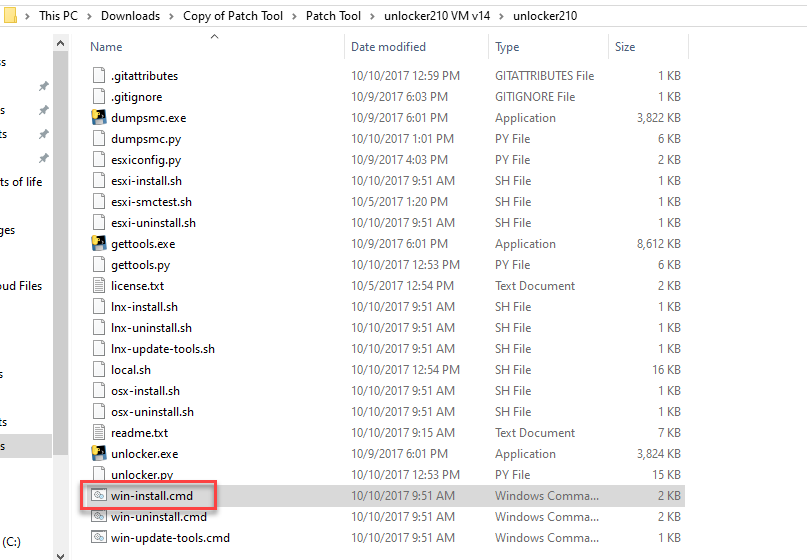
Step 3: Install VMware Patch Tool
The third step is to install the patch tool on your system, you can download the unlocker patch tool from the above download link and navigate to the unlocker folder. Here, find Win-install and Run as Administrator to install patch tool. You have to install the patch tool to get Mac OS X on the operating system list of Vmware. Until you didn’t install a patch tool then you can’t install any Mac operating system on VMware.

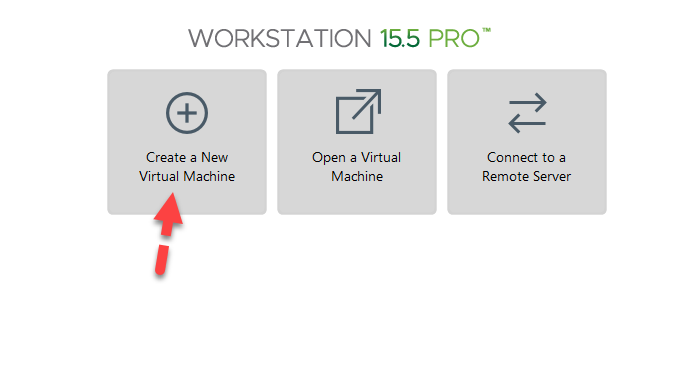
Step 4: Create a New Virtual Machine
For every guest operating system, you have to create a new virtual machine whether on VMware or Virtualbox. Therefore, open the Vmware workstation and click the Create a New Virtual Machine.

#1: After that, you will see the first screen and it will be the Welcome Wizard Setup, So, select the Custom option and click the Next button to go ahead. Then, on the next page, you have to choose the virtual machine Hardware Compatibility and click the Next button.


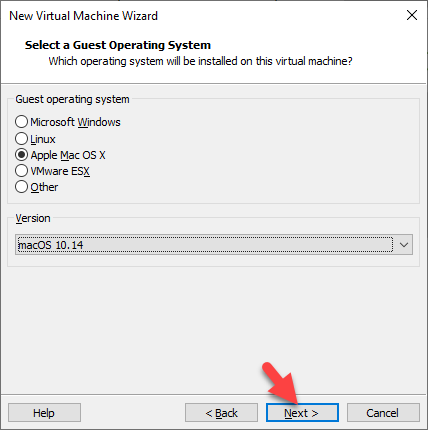
#2: On guest operating system installation select I will install the operating system later and click the Next button. Afterward, select a guest operating system if you installed the patch tool successfully then you will see Apple Mac OS X option from OS lists. Therefore, select Apple Mac OS X and select MacOS 10.14 version from the drop-down menu. finally, click the Next button.

#3: Now, give a proper name for Virtual machine as I have given MacOS Mojave 10.14 and you can change the default location for Virtual Machine. then click the Next button. On the next page, you will need to configure the processor for a virtual machine, therefore, check the screenshot and set the processor then click the Next button.


#4: Then, you have to select 50% of your computer RAM for a virtual machine and click the Next button. Afterward, on Network Type leave as it is and click the Next button.


#5: Later on, select LSI Logic for I/O controller types and click the Next button. after that, select SATA for Disk type and click the Next button.


#6: On the disk selection, select the second option which is use an existing virtual disk and click the Next button. afterward, you will be asked to insert the MacOS Mojave VMDK file, therefore, browse the MacOS Mojave VMware image file that you downloaded from above and click Next. Although you can download MacOS Mojave 10.14 VMDK File.


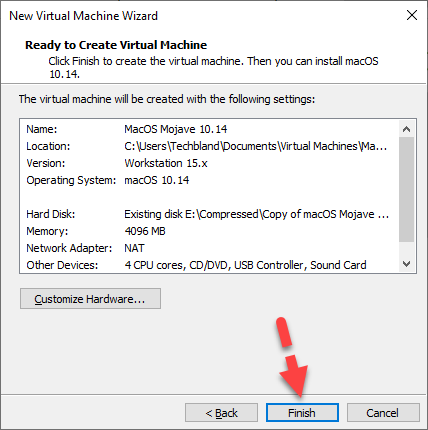
#7: Finally, the virtual machine is ready to create, you can check the virtual machine summary and if you want to make any changes then click the Customize Hardware option and make changes. otherwise, click the Finish button.
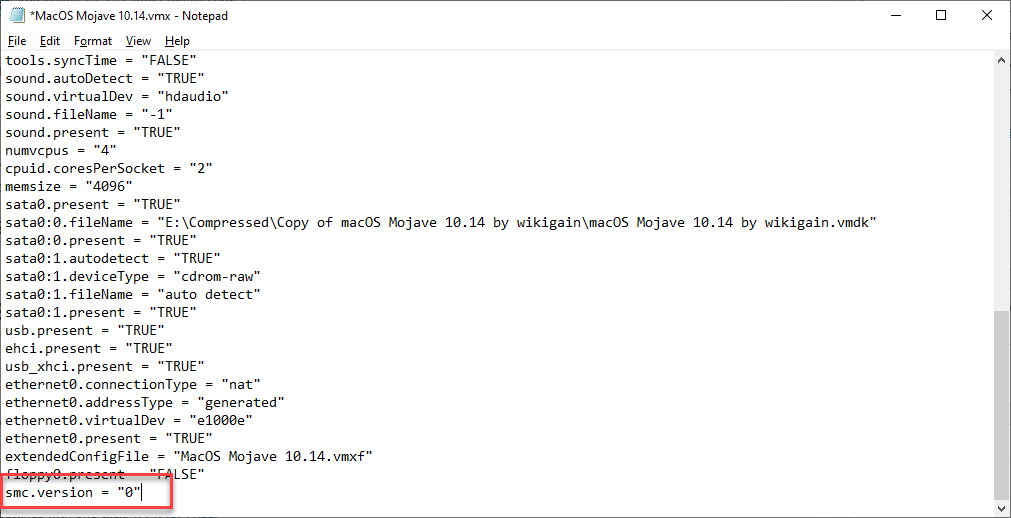
Step 5: Edit macOS Mojave VMX File
Once you created a new virtual machine for macOS Mojave. Then you will need to edit the MacOS Mojave VMX file by adding one line code using notepad. Although this file is the modification of VMware Virtual Machine, therefore, navigate to macOS Mojave virtual machine folder that you selected the location in step 4 -> #3. if you haven’t find the macOS Mojave then go to the default location which is Document -> Virtual machine.
When you get macOS Mojave virtual machine folder then find macOS Mojave 10.14 VMX file and open it with a notepad application.


Now, scroll down to the bottom of the file and add this code smc.version = “0”. Or you can add this code smc.version = 0 and save the file.

Step 6: Install macOS Mojave on Vmware on Windows
You are ready to install macOS Mojave on Vmware on Windows as you have created a new virtual machine for macOS Mojave. And you have to edit the macOS Mojave VMX file. Therefore, now you can install macOS Mojave easily with a few steps.
#1: the first step, open Vmware and select created Virtual Machine and click Power on this virtual machine. When you start VM then you will see Apple logo with progress bar, here, wait for a while.


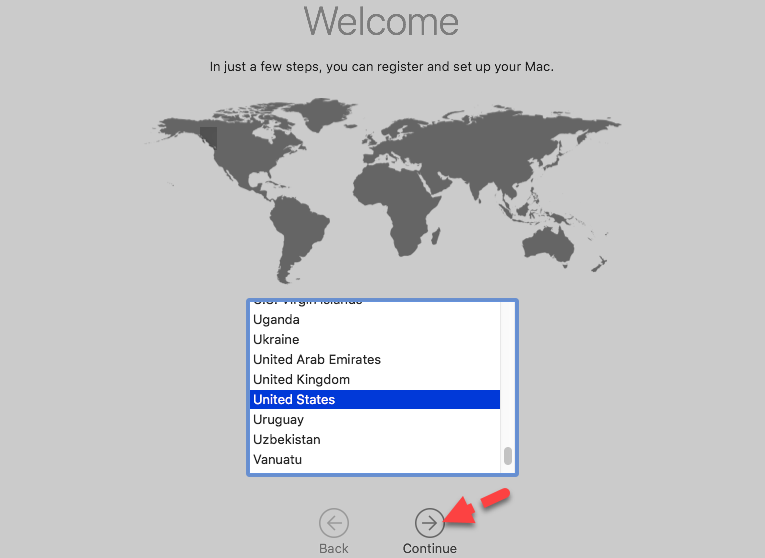
#2: You will see the first screen with a welcome page. And here it will ask you to select your country and click continue.

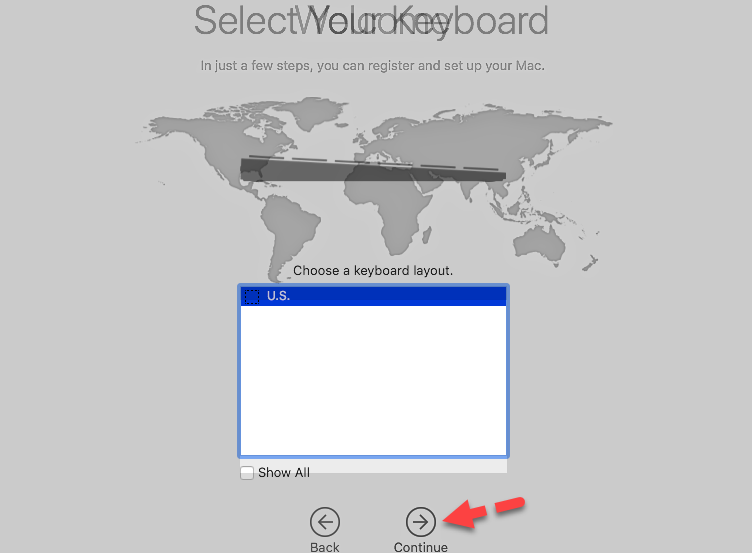
#3: Afterward, you will be asked to select your keyboard layouts, therefore, select your Keyboard layouts and click continue.

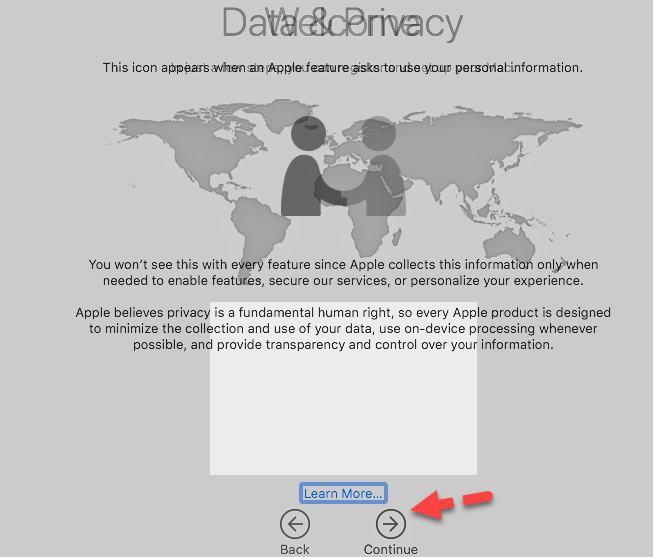
#4: On Data and Privacy screen, read the description and click continue.

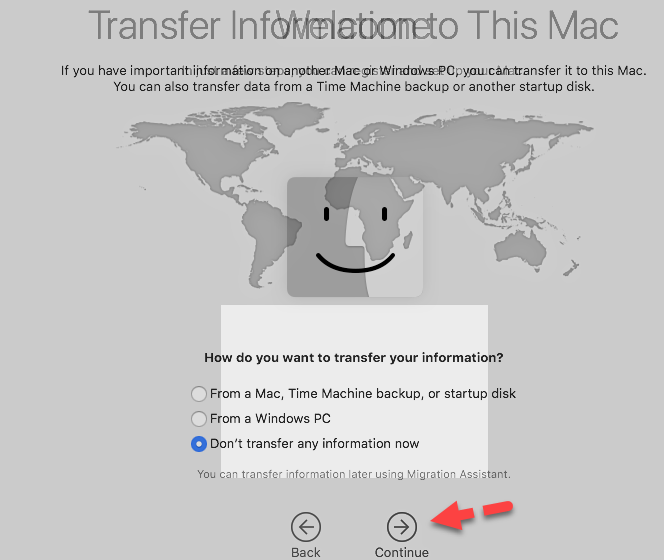
#5: Now, if you want to transfer your windows information with Mac OS. Then you have the option although it is not recommended. Therefore, select Don’t transfer information to this Mac and click Continue.

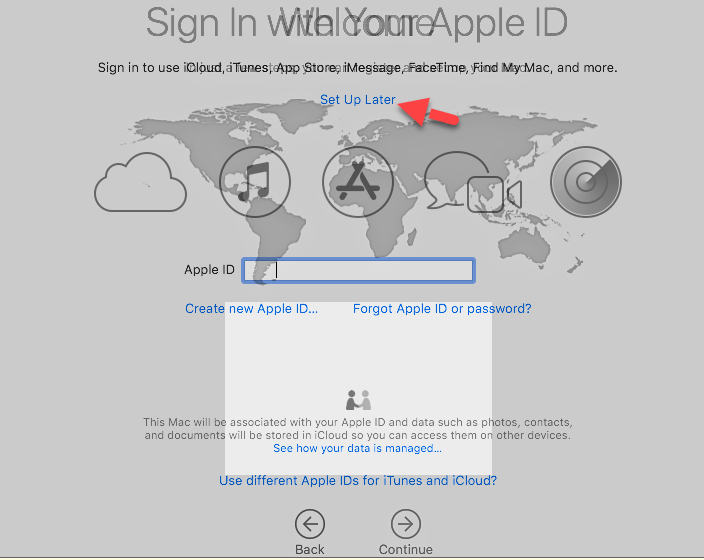
#6: On the next step, it will ask you to sign in with your Apple ID. In case, you have apple id then I recommend you sign in. If you don’t have then simply click the Set up later and click Skip to go ahead.

#7: Now, you have to agree on Terms and Condition that provides information on the use of your Mac computer. So, read the agreement and click the agree button.
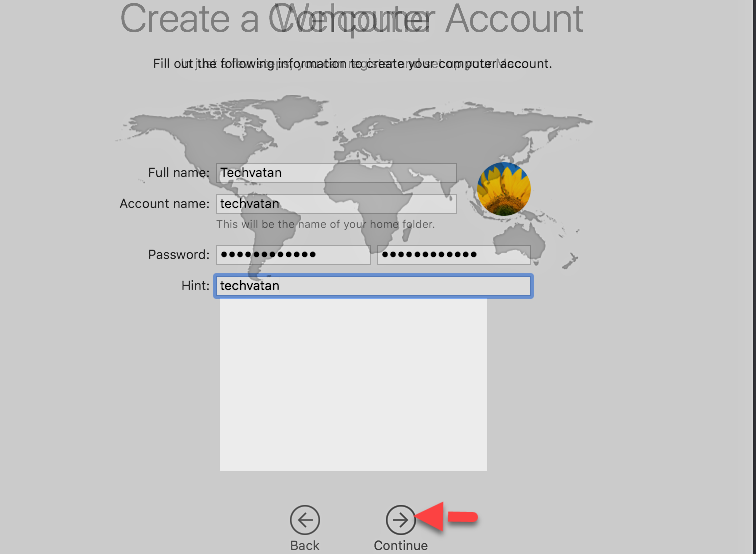
#8: As you are new to macOS Mojave and you have to create a new account, therefore, follow the steps and fill the blanks then click the Continue

#9: On Express Set up, it will set up all the below features. And settings or you can customize the one you want to set up. Otherwise, click the Continue.
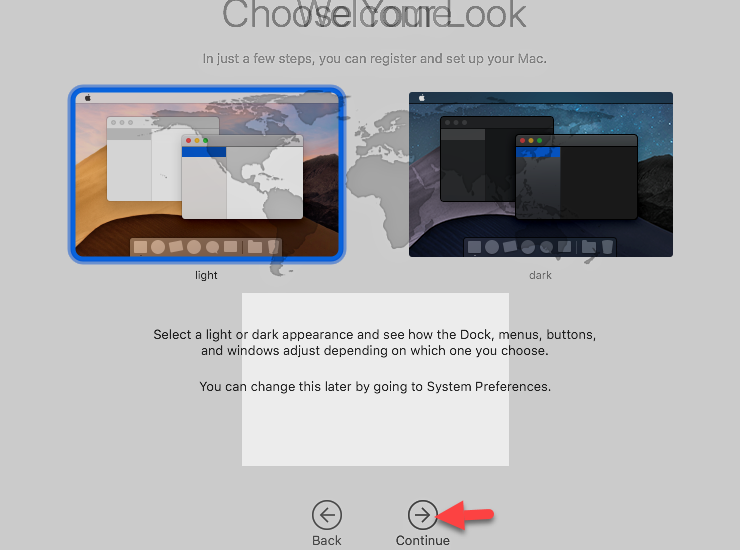
#10: Finally, choose your look of macOS Mojave whether you want to continue with Dark mode or light mode. Simply select the one and click continue. however, you can change the theme on system preferences.

#11: Wow, you have installed macOS Mojave on Vmware on Windows 10 successfully. Now you can enjoy macOS Mojave with its features.

Related articles:
- How to Fix Mouse & Keyboard Stuck on macOS Mojave
- How to Fix macOS Mojave Screen resolution on Virtualbox
- Reset macOS Mojave Forgotten Password
Bottom Line
That’s all about installing macOS Mojave on Vmware on Windows 10. Moreover, you get all the ideas of macOS Mojave installation and requirements. So, if you get any kind of question during the installation process. Then please feel free to ask me in the comment box.


6 comments