Do your some of the important programs or games are launched slowly or don’t work properly? There could be many reasons behind this delay. Similarly, there are several ways to fix this problem as well. One of the best methods to resolve this issue is to prioritize the specific programs that lag. Or Your favorite game lag during play? The best way to fix this problem is to set the game to high priority in Windows 10. So, when you launch the game. The system uses more of its resources to start the application. And Thus it becomes faster and quicker.
For example, I play CSGO on a mediocre system. The system’s processor and graphics card take a lot of time to launch the game. To make it launch a bit quicker, I set game priority to a higher level in the system.
When you start a game on your computer, so the systems’ don’t work on the game only, it runs many other programs and software in the background. And setting a game to high priority directs the system to back the game with more resources and power. Now, you understood how prioritizing works; the important thing is,
Table of Contents
How to set a game to high priority in Windows 10 permanently:
Almost all the programs and games are prioritized on the normal level as default. But as per your requirements, you can change its scale. To do so,
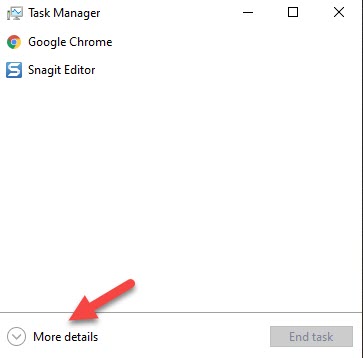
- Right-click on the taskbar, and move the cursor to the Task Manager. Or you can also press (Ctrl + alt + Del) to open the Task Manager directly.
- Then tap on “More details” from the bottom.
- Now, all the third-party software and games are shown by the list running on the system, whether in the background or real-time.
- Then go to the “details” page from the top menu.
- You will see the number of CPUs, status, and memory usages of all the running software on this page.
- Scroll up and down to find the lazy video game. Right-click on it > Set Priority.
- There you’ll see six levels of priority.
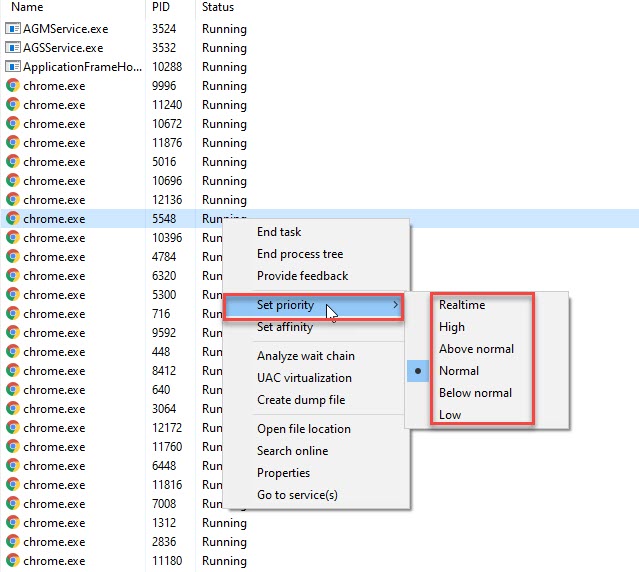
- Set the priority to a higher level than normal. This will set the game to that priority for good; to change this setting, you need to apply the same process.


Now, the system will use more than normal resources to run the particular game, and hence you’ll experience much speed gaming.
Another way to “Set priority” for a particular game or software is the use of “Command Prompt.” But As we have guided through the easiest and quickest way. There is no need to move on to the second option.
Note:
We don’t recommend “Set priority” to “Realtime.” The best way to optimize the specific program is to Set it “Above Normal.” This way, the other programs that run in the background aren’t disturbed. But, if your video game still not as much quick as you want. You may change the priority to “High.” But if you run another intense resource software simultaneously. This setting will have its impact on the second software. And if still, your game doesn’t work at your desired pace. It means that the system isn’t compatible with the specific game.
How to set process priority on the startup:
Before, whenever I used to start the system, It used to take a lot of time to show the home page. And after figuring out the reason, I found that a lot of applications are set to start on the startup of the system. Therefore it takes a longer time than usual to land on the home page.
If you’re are facing the same issue. There is a great possibility that your computer has the same problem. Because many times when you install additional software and programs. Those are set to start in the background with the start of the system as default. And as a result, you face a long login time.
To disable running these programs from the startup, you need to go to “Task Manager.”
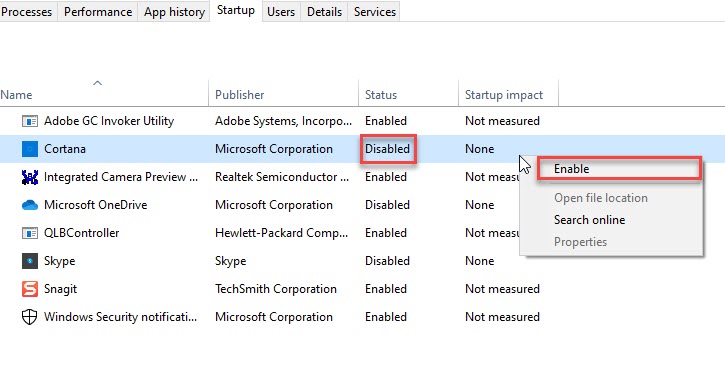
- In the “Task Manager,” tap on “More details.”
- Then tap on “Start-Up” from the top menu bar.
- On this page, you will see all the apps and programs that start with the start of the system.
- Right-click on the particular software, and “Disable/Enable” it.

Now, once again, restart the system, and check whether the system restarts quicker than before. This will surely reduce the loading time of the system.
How to set a program to high priority on Windows 10 permanently:
Rather than any game, if you want to set a specific program to high priority on Windows 10. You have to follow the same process.
- Go to the “Task Manager” by clicking the “Ctrl + Alt + Del” buttons.
- Then click on “More details” from the bottom of the page.
- Click on “Details” from the top menu.
- Here you will see all the programs running on the system.
- Please right-click on the specific program and change its process priority.
Don’t forget to change the same settings if the system shows any instability.
Recommended Readings:
- How to dual boot macOS Catalina with Windows on PC (Hackintosh).
- Dual boot macOS Big Sur with Windows 10 on PC Hackintosh.
- Create Windows 10 bootable USB on macOS Big Sur without Bootcamp.
- How to convert NTFS to FAT32 without losing data?
- How to backup data on an external hard drive on Windows 10?
Conclusion:
This is how you can set a game to high priority in Windows 10 permanently. Bear in mind that once the setting is changed. It will remain in the same settings unless you change it again.

