Virtualbox is one the best software to run multiple guest OSes on one host OS. Therefore today we will learn how can we install Ubuntu on Virtualbox. Here it does not matter, what is the host Operating system. But for your information, we say the host OS is Windows 10.
In this article, we are going to teach you how can you install Ubuntu OS on Virtualbox successfully. The Entire process is divided into three major parts.
In the first part, we will download the latest version of Ubuntu on our device.
In the second section, we will create a Virtual machine by the name of Ubuntu.
And in the final step, we will install the Ubuntu on Virtualbox. And then we can run the Ubuntu on our device as a guest OS without any problem.
But first of all, you must have installed Virtualbox on your system. If you have not installed Virtualbox on your system. You can access the entire process of downloading and installation of Virtualbox on any system from the links given below by our editors.
Table of Contents
Download Ubuntu:
First of all, we need to download the latest version of Ubuntu on our system, that can be installed later.
Open Website:
So, for this purpose click on the link given below. It will direct you to the official website of Ubuntu.
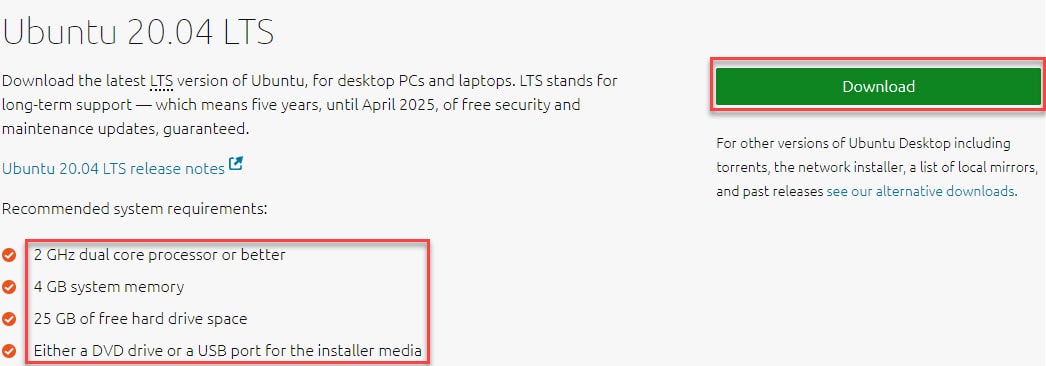
Read the system requirements:
Now, you will see some requirements for the system, you want to run Ubuntu on. Read those, If your system meets the requirements, click on the Green Download button on the right side of Screen.

Download:
Once you click on the download button, the downloading will start and the file will appear in the corner of the Screen. The file which is being downloaded is about 2.5GB. Moreover, It will take you to support page.
Remember that downloading of the ISO file will start automatically. If did not, click on Download button appearing on the support page.
After some time the file will download successfully. That you can find in the download folder of your device. Now, it is time to create a new Virtual machine before the installation of Ubuntu. So,
Create New Virtual machine:
Now, you must have installed Virtualbox on your system. So, go to your system, whether it is Mac, Windows or any other.
Open Virtualbox:
Click on the Virtualbox software to open. Now, on the home page, you can see many options click on the New. It will open a new window.
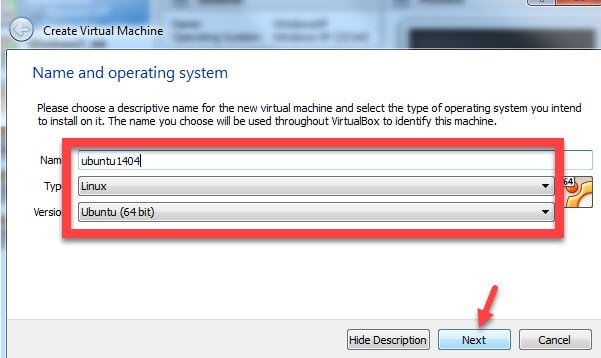
Fill the required space:
Now give a name to your new Virtual machine. Select the type of OS along with the architecture. In most cases, the two options are selected automatically. And once done! Click on Next button to proceed.

Allocate RAM:
Now, in the new window allocate RAM for the new Virtual machine. It totally, depends on you how much RAM you fix for the Virtual machine.
Our recommendations are If you are using heavy files on your Guest OS, Allocate more RAM. Or else you can simply choose 40% of your RAM. And finally, click on the Next button.
Create a Virtual hard disk:
Now, in the hard disk creation step, first of all, select the Create a Virtual hard disk now option from the given three options. And click on Create button to step ahead.
Then select the hard type from multiple given options. Here we are selecting the default VDI type. However, you choose the rest options also depending on your choice. And then click on Next Button.


Now, again you need to select one option from the options Dynamically allocated or fixed size. However, you are given hint on the difference between the two types. In here we choose the fixed size option. and then click on Next Button.
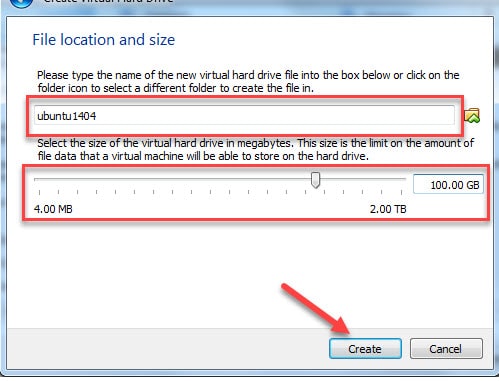
Select Hard disk size and Location:
Here Name the virtual hard, that you have created. Moreover, you can select differently folder by clicking on the folder icon.
And below as highlighted move the pointer to select the size of the hard disk. Again it depends on your desire. If you plan to store more files, so choose more space. And finally, click on create button to create the virtual hard disk.
And then the hard disk creation will start.

Now, the first two sections have been completed. We have downloaded the ISO file of Ubuntu. and also created a Virtual machine.
For the proper work, the guest OS needs to be installed on the Virtual machine, Without that the virtual machine has no value. So,
Install Ubuntu:
There are two ways to excess the downloaded file. You can directly double click on the Virtual machine what you have recently created. It will prompt you to the option of file. And from there you can select the downloaded file from the download section of your system. Or
Open Settings:
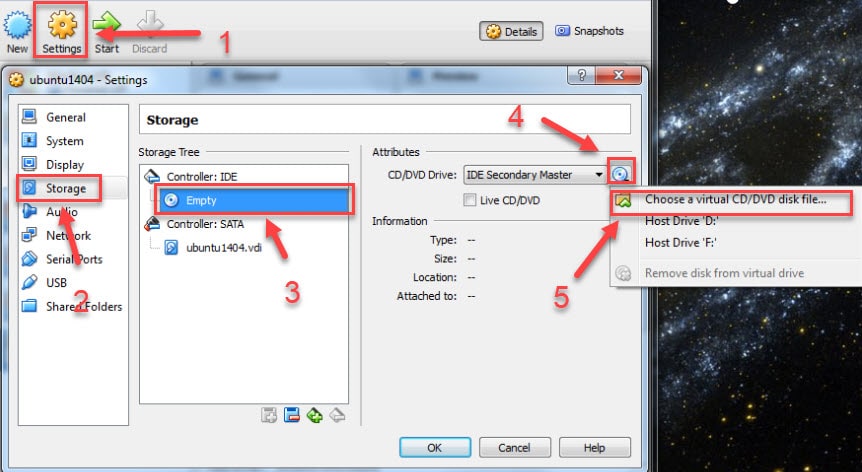
Open the VirtualBox software and click on the Settings button.
It will open a new page. In this page click on Storage. And it will open a new section. In this section click on Empty.
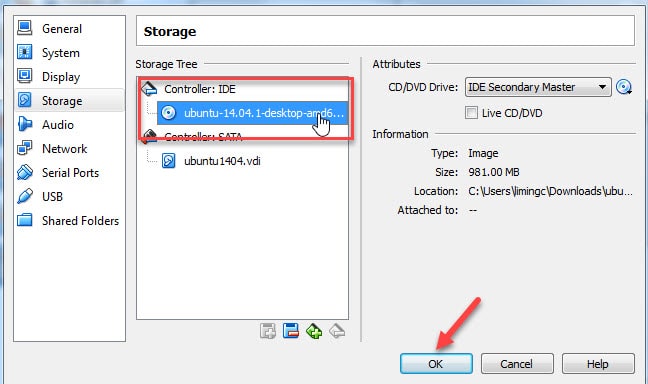
Than again a new section will appear. Click on the disk icon(also highlighted in picture) and than click on Choose a Virtual CD.DVD disk file…

And than it will prompt you to folders of your computer. Find the folder, where there the ISO file has been downloaded. Once you find the ISO file, click on Open. And it will open the file in the Virtual machine.
Here you can see the file has been identified. So, click on OK to proceed to next step.

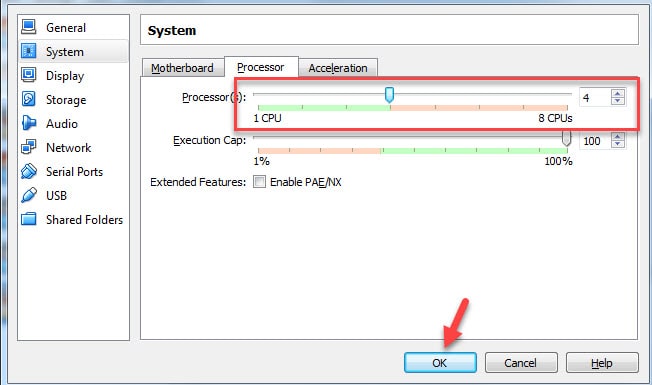
Specify number of Processors:
In the settings of Ubuntu. Now it is time to choose the number of processors to allocate for the guest OS. You can do it from the System page of settings area. Once done! Click on OK button .

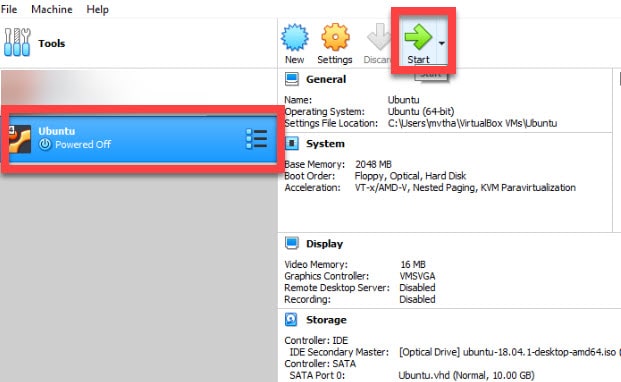
Start Installation:
So, in the Virtualbox manager. Select the the new Virtual machine and than tap on Start button. Moreover, you may see any massage of Auto capture keyboard. Click on OK .

So, now a new window opens, giving you the massage of Try Ubuntu or Install Ubuntu. As our propose is installation. So, we will click on Install Ubuntu.
Checking System:
In this step the the software checks for the available space in hard disk and internet. Bear in mind to check the box of Download updates while installing . And than once everything is clear click on Continue button.
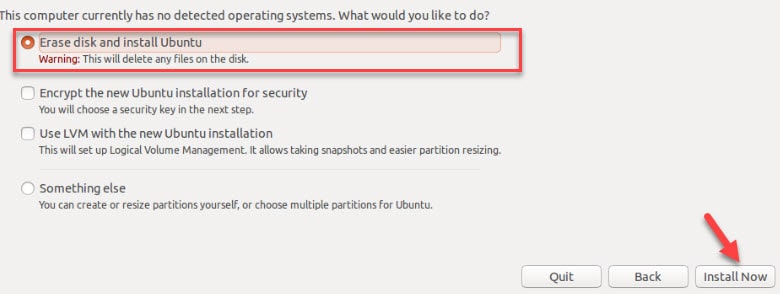
Installation type and Location:
So, now select the option which is highlighted in the image below, and click on Install Now. Don’t worry about the warning. Because, the Virtual hard disk is already empty.

Now, select the region you live, there do not try to choose the wrong Location. As it may create issues in future. And than click on Continue.
then select the language of the keyboard you want. In our case we select the English US. And click on the Continue button.
Final Step:
One step before installation, you need to generate user name, name of computer and a password while you login to the Operating system. and then click on the Continue button.
Now, the installation will start and after some time it will complete. After completion click on the Restart button to restart your system once.
And after restart, go to the Virtual machine and Enter the login password, that you recently created on your computer.
And now the Ubuntu is fully ready to be used as another OS rather than original OS.
So, some other features along with fullscreen option can be installed with the help of Virtualbox guest addition. For this, you need to install the Virtualbox guest addition on Virtual machine.
Editors’ Recommendations:
- How to Install Windows 10 on Virtualbox?
- How to install macOS Catalina Final on Virtualbox?
- Install Kali Linux on Virtualbox. ( Complete Guide)
- (A to Z) guide on how to install Virtualbox on Ubuntu.
- How to download and install Virtualbox on MacOS?
Bottom Line:
So, this was all about downloading ,how to install the Ubuntu on Virtualbox and finally running of Ubuntu on Virtualbox as a guest OS. However, if you face any issue regarding the installation, you can ask us by commenting.
To conclude, we would like to say that DO follow us for more information and knowledge on technology and Virtualbox. And do not forget to read our Editor’s Recommendations too.


Usefull content, best topics