Without shaders, I may not play Minecraft with zeal. But the shaders defiantly improve the game graphics and enhance the overall visualization. These are a simple way to modify Minecraft, renders its lighting and shadows to create the desired effect. The best Minecraft shaders will enlarge your advanced world with elaborate changes and corrective updates; in this manner, making the earth increasingly beautiful. Shaders are, for the most part, responsible for variations in light and realistic textures. They will, in general cause the game to show up progressively reasonable. There is likewise an abundance of Minecraft shader alternatives that can assist you with achieving anything from nitty-gritty photograph practical makeovers to creating shading conceals that are progressively centered around the game’s air. In case you’re hoping to flavor things up without playing out any significant adjustments to ongoing interaction or by and large capacities, at that point your most logical option is introduced shaders on Minecraft. But how to install the shaders in Minecraft.
In this article below we are going to guide you through step by step procedure of installing the shaders for Minecraft 1.14.4. Moreover, this article is not only for this version. But you can also install the shaders for other versions with the same steps stated below. So, without wasting any time, let’s get started!
Table of Contents
Download the OptiFine:
The first thing you need to do is to install the OptiFine. Why? Because OptiFine is compulsory for the installation of shaders. If you do not have OptiFine, you cannot install and use shaders in Minecraft. Therefore you need to download and install the OptiFine first.
We have already written an in-depth article on how can you download and install OptiFine on your computer. IF you have not installed the OptiFine, So, click on the link below and that article will guide you through the entire procedure on downloading and installing OptiFine on mac or windows OS.
How to download and install OptiFine
Download shaders pack:
Now, as you have downloaded and installed the OptiFine successfully, it is time to download your desired shaders pack. There are tons of shaders pack that you can install. But which one you need. It is up to you. But again if you are confused about which one should you install, so, below we have given the names of the top five shaders that you can install if you cannot decide which one to install.
- Continuum.
- Slider’s vibrant shaders.
- BSL shaders.
- Sonic Ether’s Unbelievable Shaders.
- Chocapic13’s Shaders Pack.
These are some of the popular shaders packs. And you can select any of the above shaders to download. The downloading is straight forward.
- First of all, go to the shaders pack website. In this case, we are going to download the Continuum shader.
- And now click on the Download button.
- Now, this window will appear. Click on your desired version to download. And then a file will start to download on your computer.
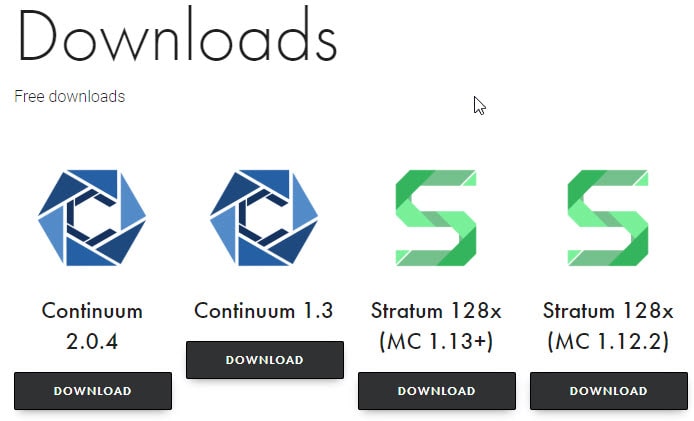
- Once downloaded. You will see a zip file will have been download.

Install the shader:
To install the shader, you need to go to Minecraft launcher. And from there you can add the shader in your Minecraft game. So,
- Double click on the Minecraft Launcher to open it.
- In the Minecraft Main menu, click on Options.
- Then click on Video Settings.
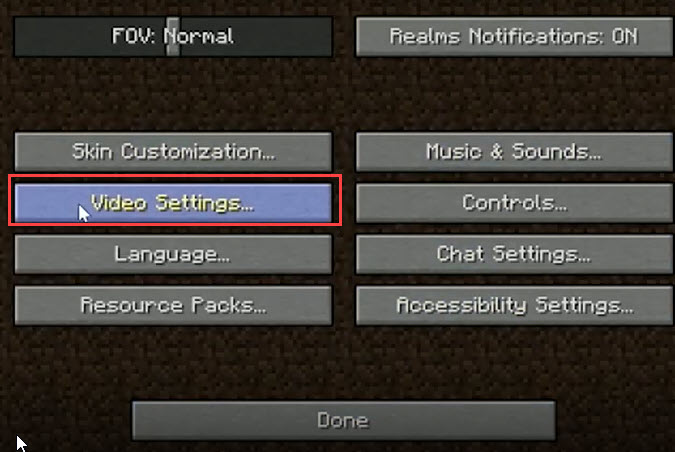
- Here you will see an option of shaders. Click on that.
- In the shader menu, you can see that no shaders are installed in Minecraft. So click on Shaders Folder. It will open a folder where all the download shader should be.

- Now, the only thing you need to do is drag and Drop. Just drag and drop the downloaded Zip file of the shader in the shaders folder. All the shaders need just to drag and drop to run it in Minecraft. Therefore do not worry that you have any other shader downloaded. Just drag and drop the shader pack in the shader folder.
- Then close the folder. And you may see the shader added in the video Settings windows. If not. Once restart the Minecraft, And the shader will appear in the Video Settings window.


Moreover, once the shader is added in Minecraft. Go to the Shaders options. That is located at the bottom right side of the screen in the Shaders window.
Read Next:
- How to download and install OptiFine in Minecraft 1.14.4?
- How to download and install Minecraft Forge in Windows and macOS?
- A Complete guide on how can you speed up your macOS.
- 10 tips that will speed up your Windows 10.
- A complete guide on how to install VMware on Mac.
- best Gaming laptop under $500.
- Pokemon Go spoofing without jailbreak.
Bottom Line:
So, this was all about installing shaders for your Minecraft game. The shaders impact the game visualization and graphics to a high extend. Many shaders brights the game while many others bring realistic effects in the game. Anyway in this, we brought the entire procedure of installing shaders in Minecraft. In conclusion, we would like to say if you had any sort of confusion or issue regarding the installation of the shaders in Minecraft do comment us.


1 comment