Hello, In this article, I am going to guide you on How to Install macOS Mojave on Virtualbox on Windows but before installing macOS Mojave on Virtualbox let’s discuss a little bit about macOS Mojave itself. macOS Mojave is a well-known Mac Operating System developed by Apple company in September 2018. However, Apple has announced its best operating system on WWDC 2018. before MacOS Mojave Apple released macOS High Sierra and so far it is in stock but not like macOS Mojave. Although macOS Mojave has tons of features and the handy one is a dark mode that is available on macOS Mojave 10.14. there are several major features that Apple included on macOS Mojave 10.14 and you will learn it below.
So, the question is here can you install two operating systems on one machine? Yes, of course, Windows user has the best platform that allows them to install operating systems on another OS. as you have virtualization software for Windows OS and with the help of Virtualbox and Vmware you can install any Mac operating system easily. However, Windows is the best Operating System among all but sometimes the user wants to try Mac OS and its features. In computer terms, we have many operating systems such as Linux, Ubuntu, Windows, and Mac. but Windows and Mac are popular and legions of users are using.
If you want to try macOS Mojave before going to install it on your original operating system then Virtualbox is the best way to provide you each and everything. Therefore, in this article, you will learn everything related to macOS Mojave 10.14 with the best explanations. So, make sure you have more than 2GB RAM and more than 20GB free storage space on your computer to install macOS Mojave successfully. To install macOS Mojave without facing issues then follow each step attentively and follow us.
Table of Contents
What is Virtualbox?
As I am going to show you the MacOS Mojave installation on Virtualbox, therefore, you have to know a little about Virtualbox itself. Well, Virtualbox is an open-source Virtualization software that allows the user to run multiple operating systems at a time on the same Operating system. Especially, Windows users need Virtualbox to run Mac OS on their original system, even, you can use Virtualbox on any operating system. Simply, download and install Virtualbox on your PC and run your favorite OS.
To install any operating system on Virtualbox you need to create a virtual machine, after that, you have to download the OS image file. without an image file, you will not be able to complete the installation. However, installing an operating system on Virtualbox is quite simple but it will need experience. in this case, you can install any OS successfully.
Although you have Vmware virtualization software too that allows you to install a Guest operating system like Virtualbox. Vmware is the best software to create virtual machines and run multiple operating systems. there are no big differences between Virtualbox and Vmware, every instruction is the same but the only changes are, on Virtualbox you will need to run Virtualbox code for Virtual machine other steps are identical.
Can I install macOS Mojave without Virtualbox?
Very good question for every user and the answer is “NO”. Here, I will tell you why you can’t install macOS Mojave on Windows without Virtualbox. as you know we can’t run an operating system on another operating system because it is impossible and Virtualbox is the program that allows us to create a virtual machine or run multiple OS on the same system. that’s why people love Virtualbox, the same we have Vmware Software where we can install a guest Operating system like Virtualbox virtualization software.
No matter you are a Windows user or a Mac user but without Virtualbox, it’s impossible to run multiple OS. a question might be raised on your mind, without VirtualBox there are tons of software where you can install a guest operating system? of course yes, there are many software’s but Virtualbox is the best one and it is easy to use. Therefore, the legions of users prefer Virtualbox and Vmware Virtualization software to try there favorite Operating system.
What Is macOS Mojave?
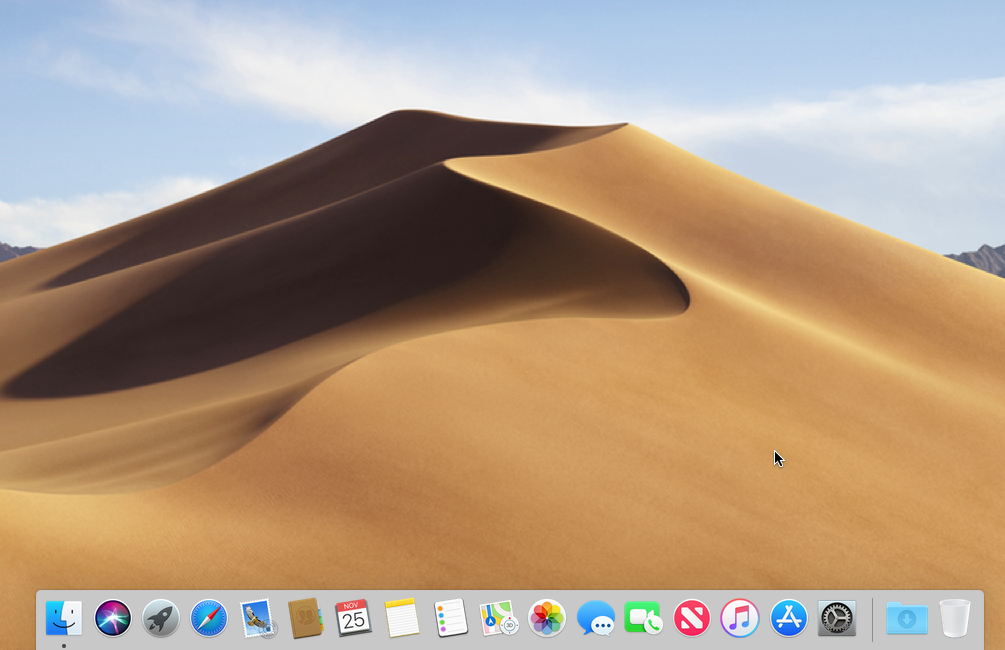
macOS Mojave is the latest and best Apple Operating system so far, Apple released macOS Mojave 10.14 in September 2018, moreover, they have included many new features such as Dark Mode, Dynamic Desktop, easy Screenshot, and many other handy features. However, macOS Mojave is the district in North America and that region is full of deserts. that’s why, when you start macOS Mojave then the first thing you will see on desktop is desert mountain wallpaper.
macOS Mojave 10.14 New Features
1: Dark Mode
Apple has included Dark Mode feature on macOS Mojave latest version, now you can change your Operating system light mode to dark mode. this is the best feature for those users who spend a long time on the computer.
2: Dynamic Desktop
The second handy feature of macOS Mojave is Dynamic Desktop or Dynamic Wallpaper. you can select dynamic wallpaper for your macOS Mojave and it will change your desktop color automatically with the time.
3: Easy Screenshot
If you want to take a screenshot on your macOS Mojave then you can do it with the Easy Screenshot feature. anytime anything you can make a screenshot of it.
4: Group FaceTime
Apple has updated Facetime feature on macOS Mojave latest version, now you can make chat group with your friends and even you can make a group of 32 people at the same time.
Some other macOS Mojave features:
- macOS Mojave Software updates are now in Settings
- Favicons in Safari Browser
- Autofill Security Codes
- Emoji Selector in Mail
- More Control over Permissions
- Siri can help with password
- Full Meta Data in Finder
- More Accent Colors
Steps to Complete macOS Mojave Installation on Virtualbox
The above information is very important before installing macOS Mojave on Virtualbox using windows. Therefore, I hope you understand the above headings. Now it is time to install macOS Mojave on Virtualbox on Windows, So, I will show you all steps including a number to complete the installation. remember, make sure you are using Windows 64-bits because on 32-bits you will not be able to install macOS Mojave. So, let’s begin
Step 1: Required Files
- Download WinRAR or 7Zip to extract the macOS Mojave image file.
- After that, Download Virtualbox and Virtualbox Extension Pack.
- Then, Download macOS Mojave 10.14 Image file (One part)
If your internet connection is fast then I prefer you to download the one part file. - Download macOS Mojave 10.15 Image file (9 Parts)
If your internet connection is slow then download the macOS Mojave image file one by one. - Before installing macOS Mojave on Virtualbox, you will need some Virtualbox code to run on CMD, therefore, download the (Code for Virtualbox).
Step 2: Download & Install Virtualbox on your PC
As you are going to install macOS Mojave on Virtualbox on Windows, therefore, you need to download and install the latest version of Virtualbox on your PC. as I mentioned the download link on step 1, so, download it from there. after that follow the below steps to install Virtualbox.
- Once the download is done, then, go to download the folder and find the Virtualbox setup. afterward, double-click on the setup to launch the Setup Wizard.
- On Custom setup dialog box click the Next Button.
- On Custom Setup click the Next button.
- After that, you will see the Custom Setup Features, here, click the Next button.
- Simply, click the Next button.
- Now, Virtualbox is ready to install, therefore, click the Install button.
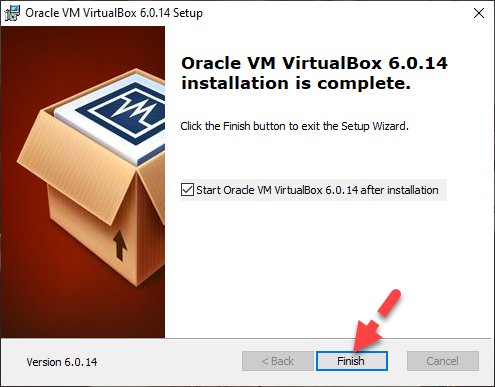
- Once, Virtualbox has been installed successfully, then click the Finish button.

Download & Install Virtualbox Extension pack
Once you installed Virtualbox on your computer then you have to install a Virtualbox extension pack. the pros to install extension pack is, you will not face mouse and keyboard stuck during installing the operating system. therefore, follow the below steps to install Virtualbox Extension Pack.
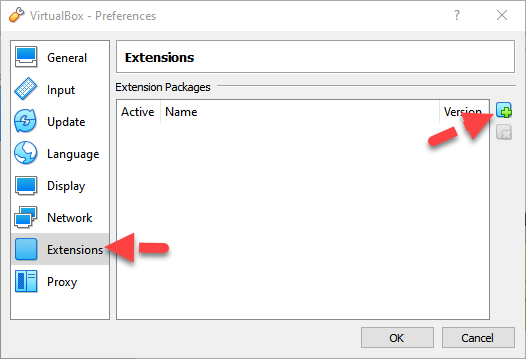
- Open Virtualbox.
- Go to File -> Preferences.
- Select Extension from the left side of the window.
- Now, click the Browse button located on the right side of the page.
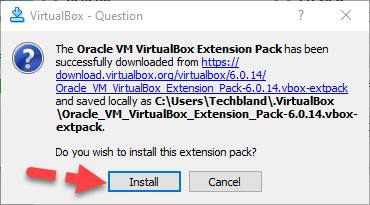
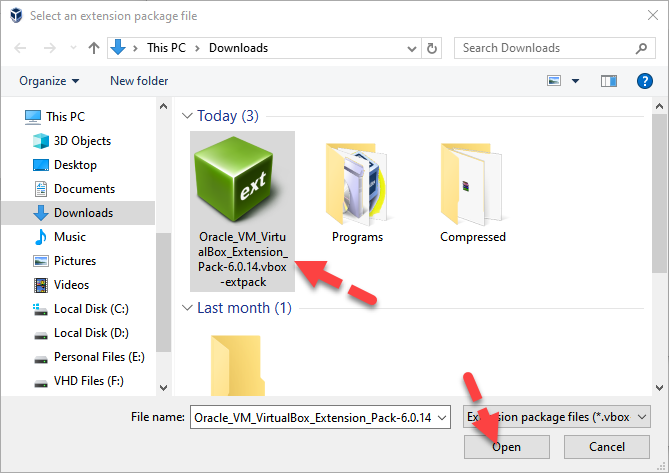
- After that, select the Virtualbox extension pack download file that you downloaded later, then, click the Open button.
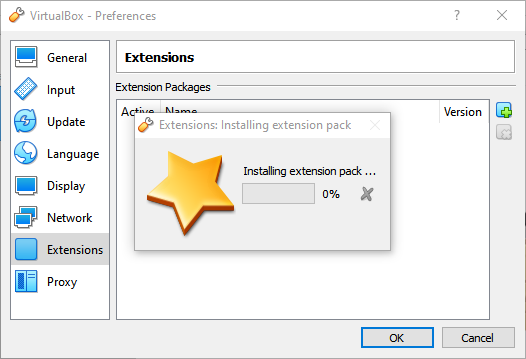
- Virtualbox Extension Pack is ready to install, therefore, click the Install button.
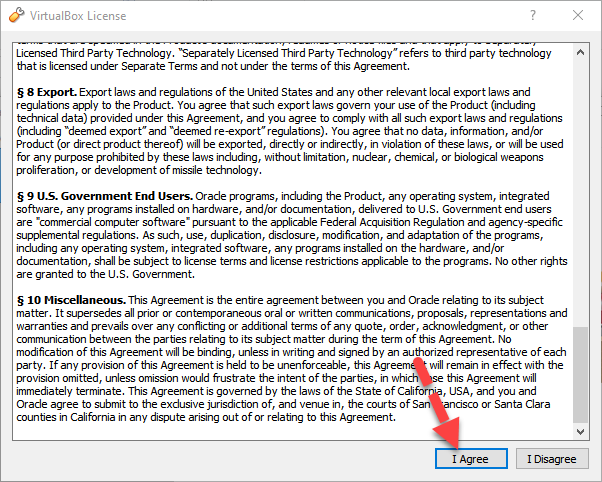
- Afterward, Agree to the terms and conditions.
- Wait for a few seconds to complete the installation.
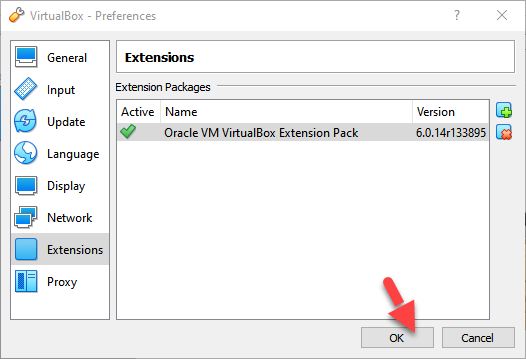
- Once the Virtualbox extension pack has been installed, then, click the OK button.

Related Article: Download and Install Virtualbox on Windows
Step 3: Extract macOS Mojave Image file
Once you download the macOS Mojave image file then you will need to extract it with WinRAR or 7ZIP software. therefore, if you don’t have one of these software then download and install it on your PC. after that, find the downloaded file and right-click on the macOS Mojave image file. then, click on the Extract macOS Mojave 10.14. Once you extract the file then you will see the file by the name of MacOS Mojave 10.14.vmdk.
Step 4: Create A New Virtual Machine
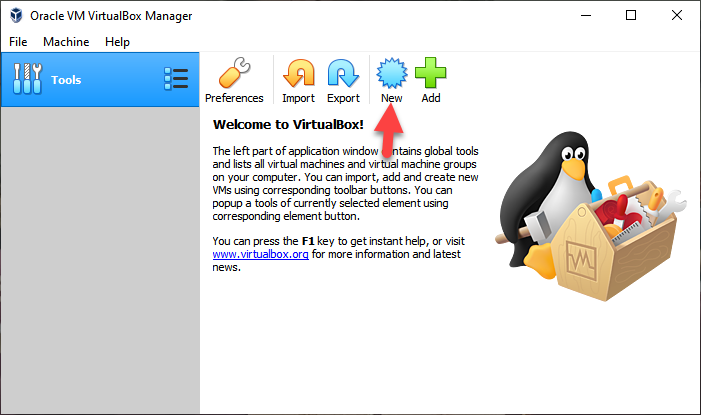
#1: To install macOS Mojave on VirtualBox you will need to create a new virtual machine for that, Needless to say, installing any operating system on Virtualbox you need to create a new virtual machine then you can install the OS. therefore, launch Virtualbox and click the New button.

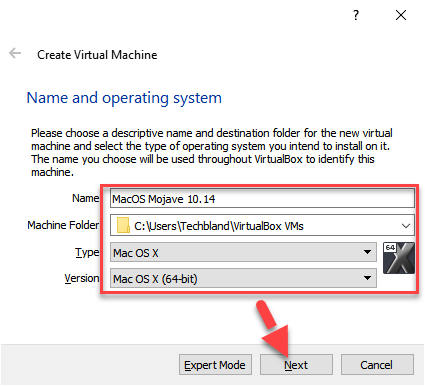
#2: On the next page, it will ask you to provide the Operating system name, type, and version. therefore, follow the below screenshot and fill it the same.

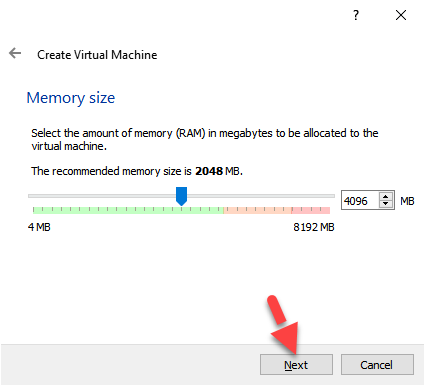
#3: After that, select the amount of memory for macOS Mojave, you need to select more than 50% of your computer RAM. then click the Next button.
#4: Now it is time to insert macOS Mojave vmdk file that you downloaded from the above link. therefore, select the last option which is Use an existing virtual hard disk file, then click the small folder icon and insert macOS Mojave vmdk file. finally, click the Create button.

Step 5: Customize Virtual Machine
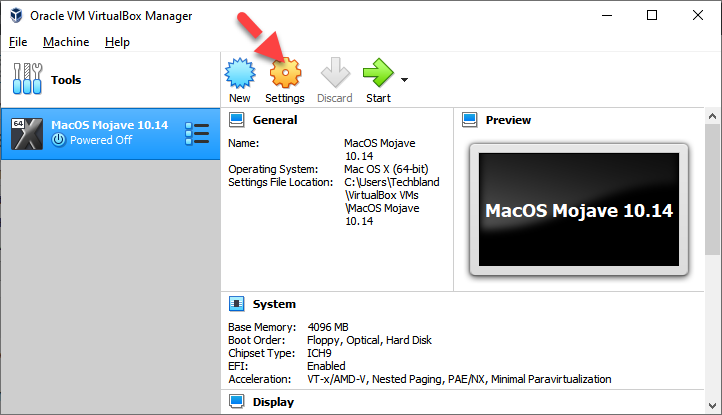
Once you create a new virtual machine for macOS Mojave 10.14, afterward, you will need to make some changes to the created virtual machine. to customize virtual machine follow the below steps.
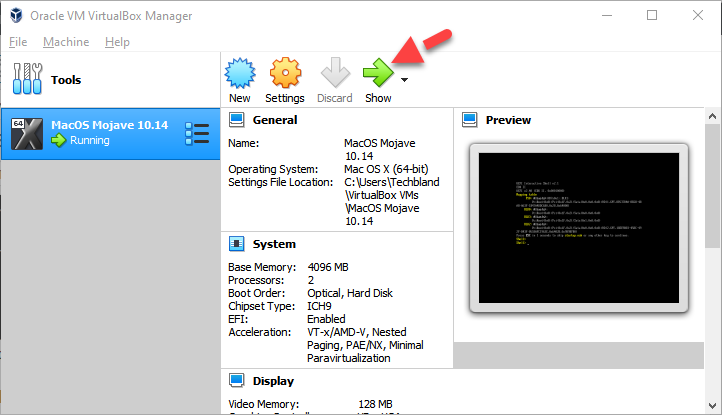
#1: select the created virtual machine from the left side of the page and click the Settings button from the top menu.

#2: Here, select System and uncheck the floppy option, afterward, go to Processor and increase the CPU amount.


#3: After that, jump to Display option and increase Video Memory size up to 128MB.


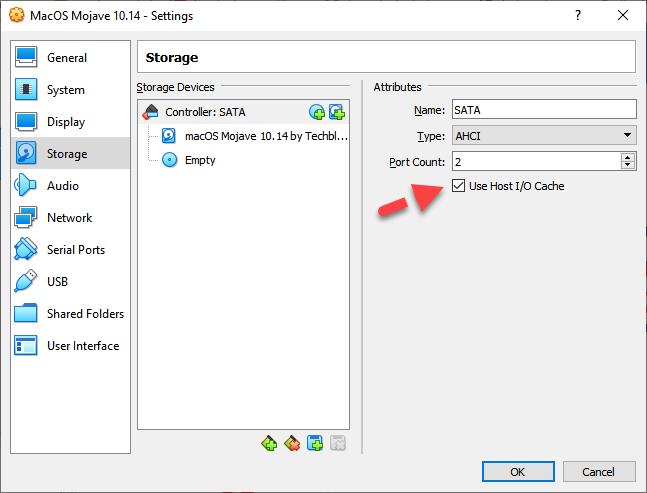
#4: on Storage option, you don’t need to bring changes because you have inserted macOS Mojave vmdk file before, therefore, simply check Use Host I/O Cache.
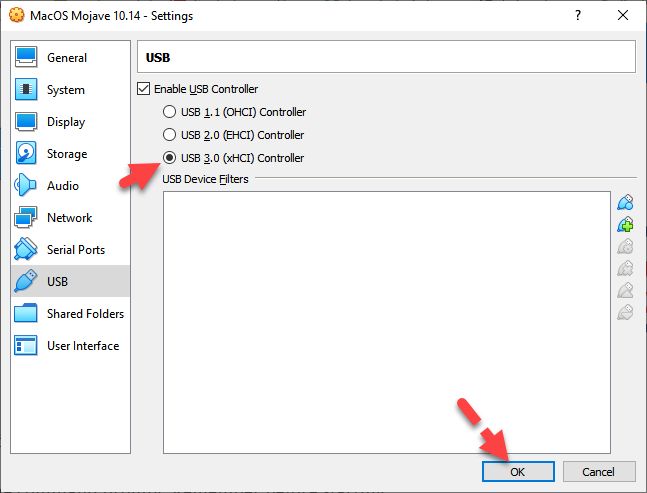
#5: Now, go to USB option and select USB 3.0 (xHCI) Controller. the pros to select this option is, you will not face mouse and keyboard stuck problem during macOS Mojave installation. then click OK button.
You have customized virtual machine successfully, now you need to add code for VirtualBox, therefore, exit Virtualbox. to do that, go to the File menu and click the Exit button.
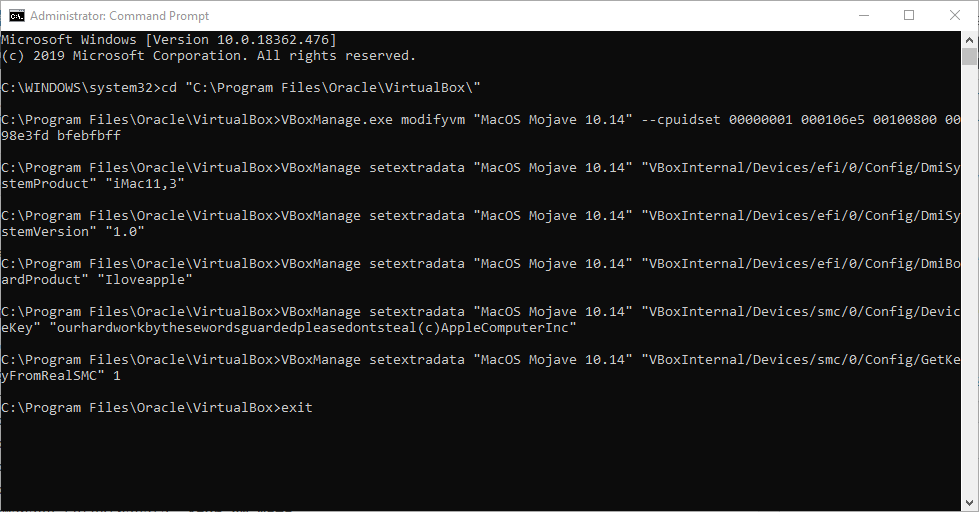
Step 6: Add Code for Virtualbox With CMD
So, now you need to add code for Virtualbox with CMD, therefore, go to Start Menu and search CMD, after that, right-click on the CMD and select Run as Administrator.


Now, copy the code and replace “Your VM Name” with your virtual machine name in VirtualBox. after that, paste the code one by one on CMD and press Enter button.
cd "C:\Program Files\Oracle\VirtualBox\"
VBoxManage.exe modifyvm "Your VM Name" --cpuidset 00000001 000106e5 00100800 0098e3fd bfebfbff
VBoxManage setextradata "Your VM Name" "VBoxInternal/Devices/efi/0/Config/DmiSystemProduct" "iMac11,3"
VBoxManage setextradata "Your VM Name" "VBoxInternal/Devices/efi/0/Config/DmiSystemVersion" "1.0"
VBoxManage setextradata "Your VM Name" "VBoxInternal/Devices/efi/0/Config/DmiBoardProduct" "Iloveapple"
VBoxManage setextradata "Your VM Name" "VBoxInternal/Devices/smc/0/Config/DeviceKey" "ourhardworkbythesewordsguardedpleasedontsteal(c)AppleComputerInc"
VBoxManage setextradata "Your VM Name" "VBoxInternal/Devices/smc/0/Config/GetKeyFromRealSMC" 1
So, copy the code and paste it on CMD one by one and press Enter after each code. Once you paste all the code then exit CMD.

Step 7: Install macOS Mojave 10.14 on Virtualbox on Windows
This is the last step of macOS Mojave installation, your virtual machine is ready and you configured everything. Now, it is time to install macOS Mojave 10.14 on Virtualbox. to install macOS Mojave completely follow the below steps.
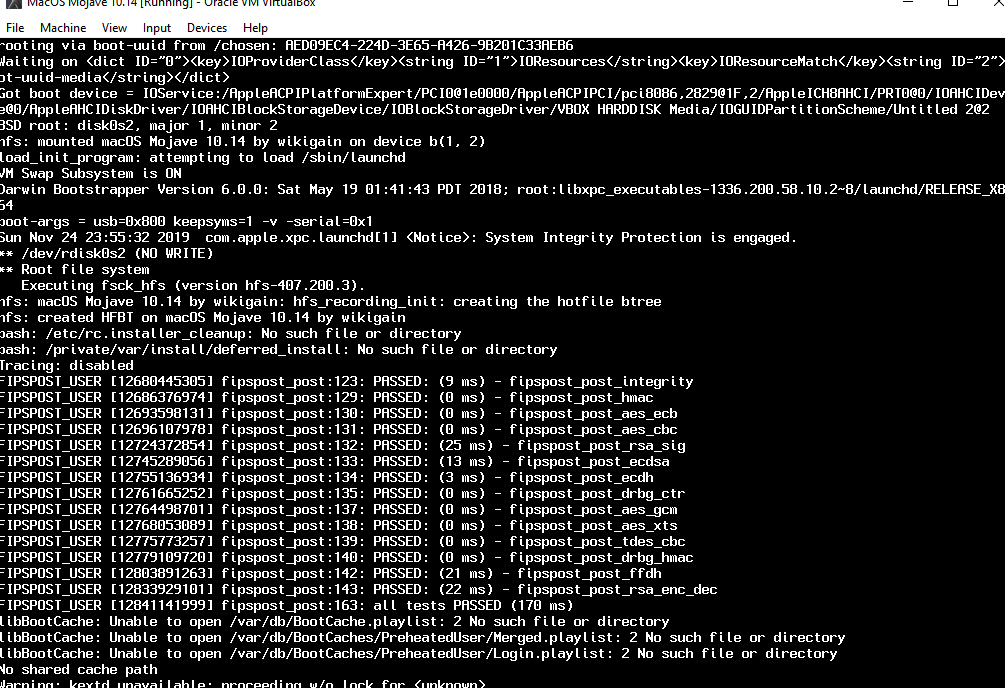
#1: Launch Virtualbox and double-click on the created Virtual machine or select virtual machine and click the Start button from the top menu.
#2: Then, you will see several codes running on the screen but don’t worry about it, its loading and boot up macOS Mojave. However, it will take several minutes.

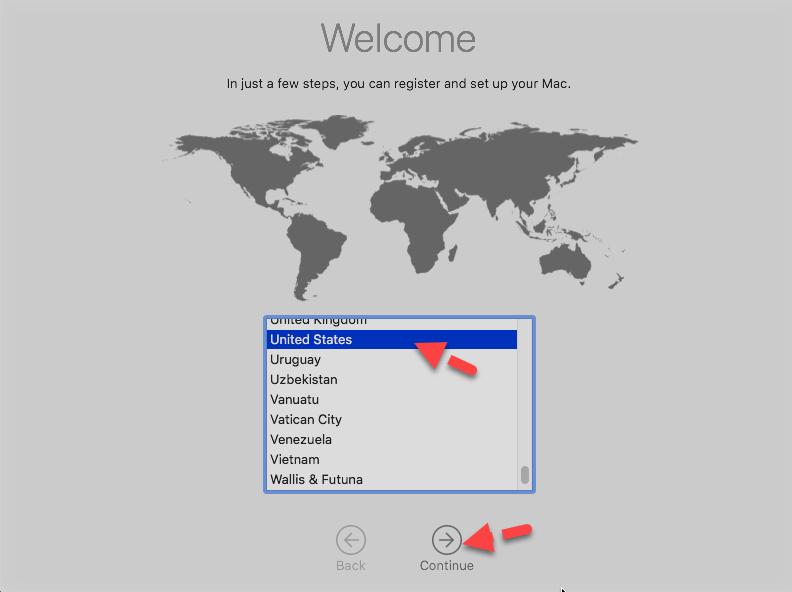
#3: After that, you will see the welcome page and here it will ask you to select your country and click the Continue button.

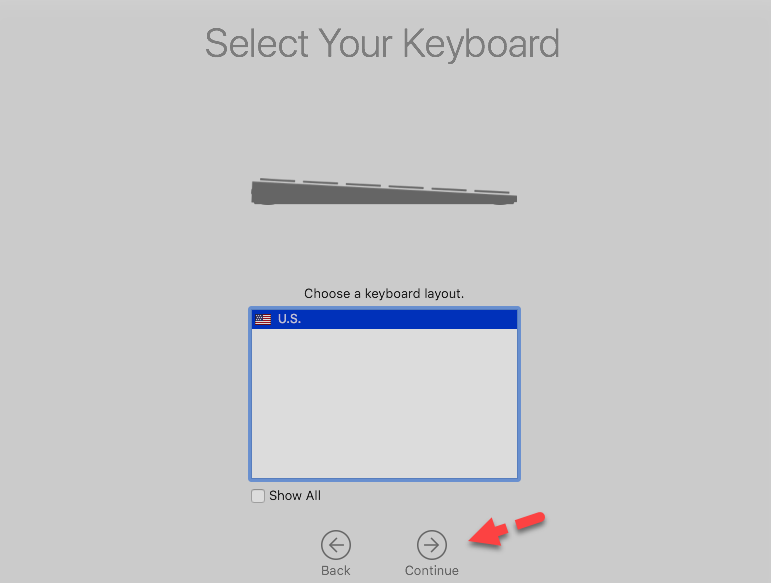
#4: Then, select your keyboard layouts from below, if you don’t see your keyboard then click the Show all and pick your one and click the Continue button.

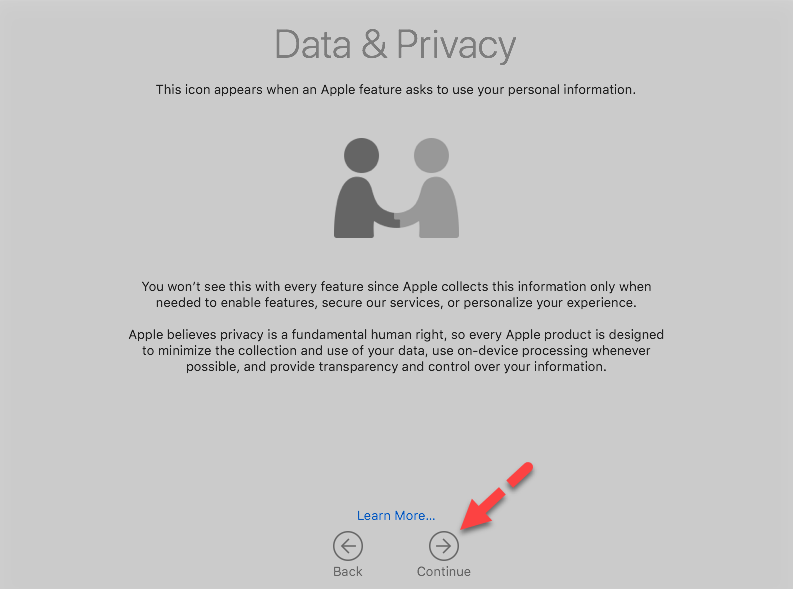
#5: On the next screen, you will see Data and Privacy, So, read the privacy attentively and click the Continue button.

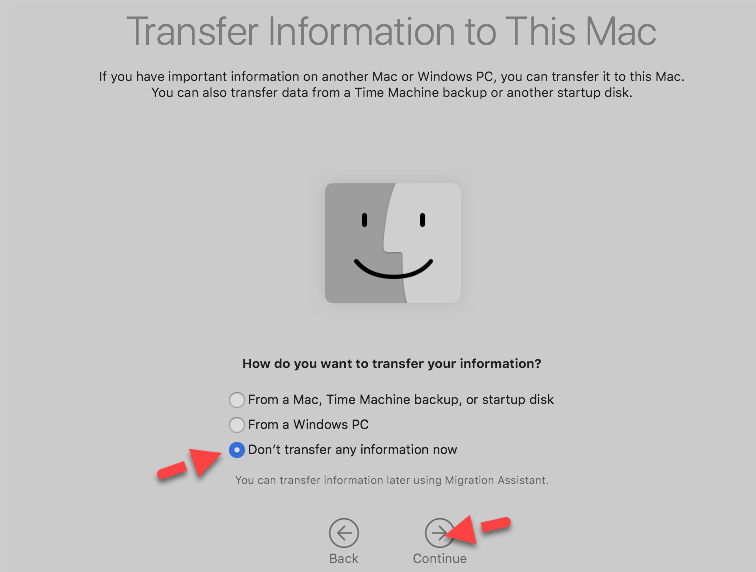
#6: Needless to say if you don’t want to transfer information to this Mac then select the last option which is Don’t transfer any information now and click the Continue.

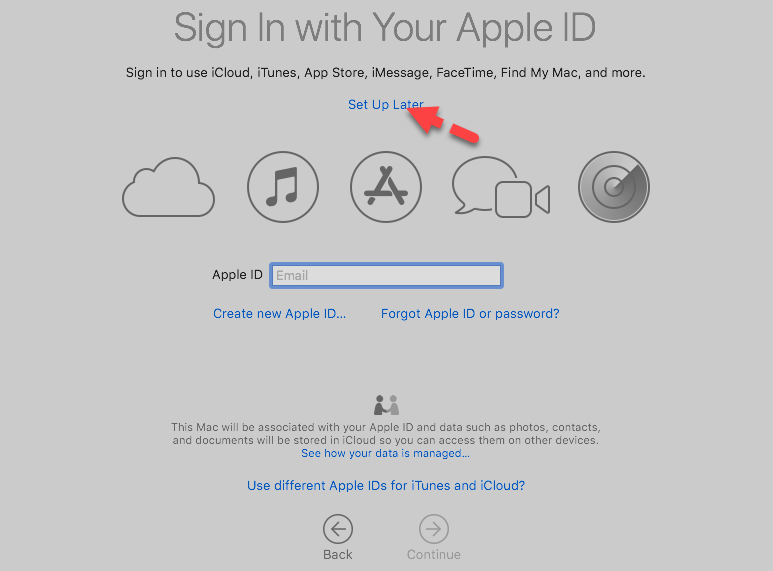
#7: To have Apple ID will help you to use macOS Mojave all features, therefore, on this page, it will ask you to provide your Apple ID. So, if you have Apple ID already then type your Email and Password if you don’t have then create a new one or click the Set up later and click Skip.

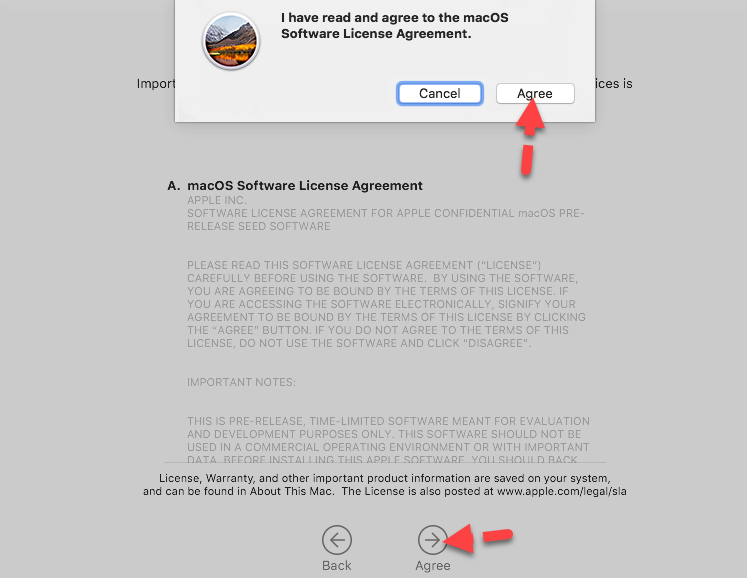
#8: Read the terms and conditions carefully and click the Agree button.

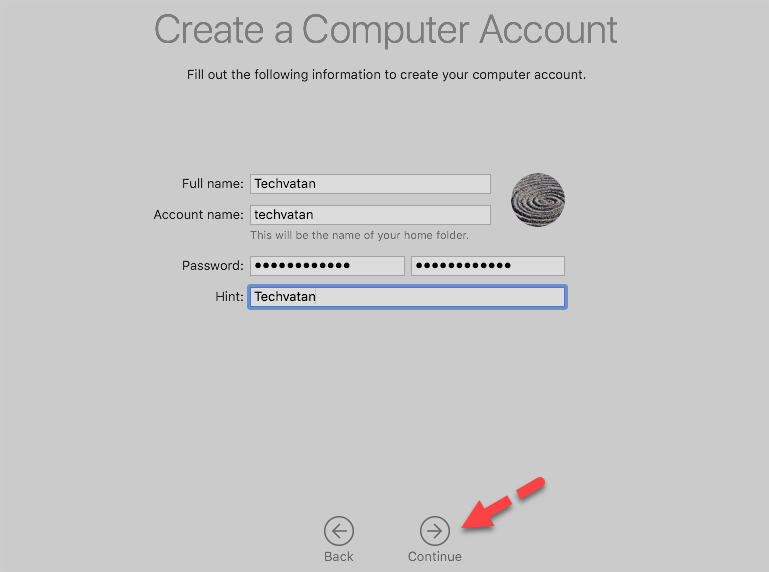
#9: As you are installing macOS Mojave first time then it will ask you to create a new user or create a computer account. Therefore, follow the below list to create a computer account.
- Full Name: type your full name.
- Account Name: the account name will be selected automatically. However, you can give it by yourself.
- Password: Now, give a password to login to your Mac and confirm the password.
- Hint: give a hint to your password, in case you forget your password then the hint will help you to recall the password.
- At last, click the Continue button.

#10: On the next page, the features and settings below will be set up for you, or you can customize the settings yourself by clicking the Customize Settings. Otherwise, don’t do anything simply click the Continue button.


#11: As I told you Apple included Dark Mode to the new version of macOS Mojave and here you can see two variations. the first one is Light mode and the second one is Dark Mode, So, choose the look for your macOS Mojave. Remember, you don’t need to be worry, if you dislike the look then you can change it later on System Preferences. Therefore, choose one of the looks and click the Continue button.

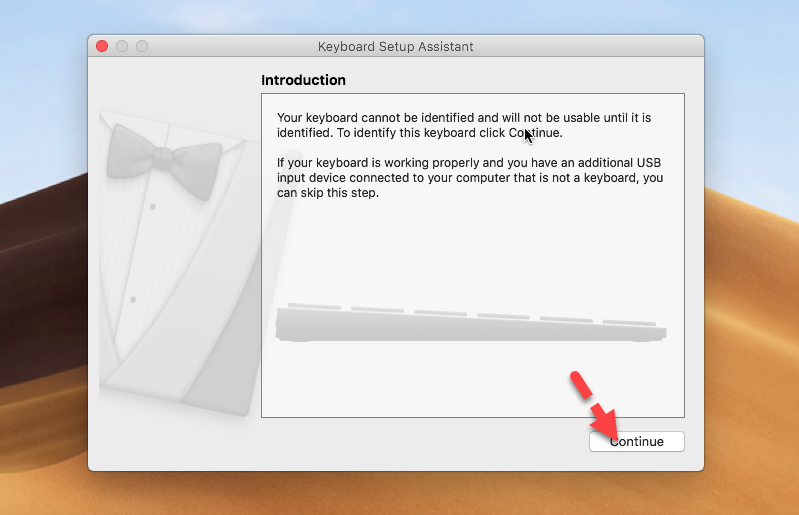
#12: Here, you have to click the Continue button to identify your keyboard layouts. you can see the introduction paragraph, therefore, read it and click the Continue button.

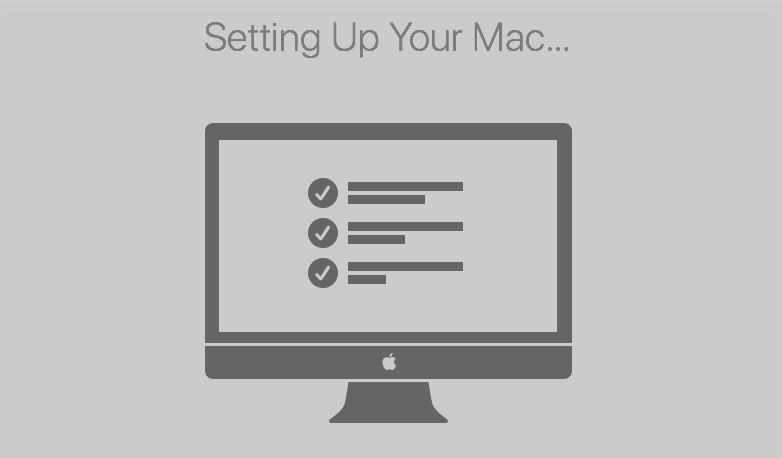
#13: Congratulations, you have installed macOS Mojave 10.14 successfully. now, wait for a while to set up your computer and it will take sometimes for configurations. afterward, you will see your macOS Mojave 10.14 for the first time.

Troubleshoot the macOS Mojave 10.14
After macOS Mojave installation you will face some problems but those issues are not about macOS Mojave, this is because of Virtualbox. However, thanks to Apple’s company because you can solve those problems. And I will show you below how you can fix it.
#1: Mouse and Keyboard is not working on macOS Mojave 10.14
When you install macOS Mojave on Virtualbox then you will see mouse and keyboard are not working properly. And it will be stuck in one place. So, to fix the mouse and keyboard stuck on Virtualbox follow the below steps.
Step 1: Download Virtualbox Extension Pack
However, I mentioned above that you have to install the VirtualBox extension pack after installing Virtualbox on your PC. If you have installed a Virtualbox extension pack already. Then you will not face mouse and keyboard stuck. Moreover, I will show you again how to install the extension pack on Virtualbox.
So, download the Virtualbox Extension Pack from the required file heading or go to Virtualbox official website and go to download option from the left side of the window and download the Virtualbox extension pack.
Step 2: Install Virtualbox Extension Pack
To install Virtualbox extension pack, launch Virtualbox and go to File -> Preferences -> Extensions. after that, click the small folder icon.

Afterward, find the extension pack file that you downloaded from the Virtualbox official website. Select the file and click the Open button.

Now, click the Install button to install the Virtualbox extension pack.
Once you start the installation then it will ask you to agree to terms and conditions. Therefore, click the I Agree to button.

Wait for a while to complete the installation.
Finally, Virtualbox Extension Pack has been installed successfully.
#2: Full-Screen Mode in macOS Mojave 10.14
So, you have fixed Mouse and Keyboard stuck successfully. Now you have to fix macOS Mojave screen resolution. And this is the main problem with Virtualbox for macOS Mojave 10.14. However, when you installed macOS Mojave then by default the screen resolution is low. And you need to fix it using some code. Therefore, follow the below steps.
Step 1: Copy your virtual machine name from VirtualBox.
Step 2: Go to Start Menu and search for CMD, when you find it then right-click on the CMD and “Run as Administrator”.
Step 3: the below lists are screen resolution for macOS Mojave. And you need to run only one code in CMD to fix macOS Mojave screen resolution.
- 1920×1080
- 1280×720
- 2048×1080
- 2560×1440
- 3840×2160
- 1280×800
- 1280×1024
- 1440×900
- 1600×900
Now, copy the below code and replace “Your Virtual Machine name” with your virtual machine name that you created. And in place of X pick one of the Screen Resolution from the above list.
- cd “C:\Program Files\Oracle\Virtualbox”
- VBoxManage setextradata “Your Virtual Machine Name” VBoxInternal2/EfiGraphicsResolution X
So, copy the code one by one and paste it on CMD then press Enter key.


Step 4: Close CMD and open Virtualbox and run macOS Mojave, then check the screen resolution.
Step 5: Besides that, if you want to change the Scale Mode to full screen then go to the View menu and click the Full-Screen Mode or Scaled Mode to change the size of the screen. Although you can use shortcut keys to change the screen from Full-Screen mode to Scaled Mode by pressing right Ctrl+F and Ctrl+C.
At last, you have fixed MacOS Mojave screen resolution. Now enjoy using macOS Mojave with full HD high resolution and everything will be with high resolution.
Related Articles:
- How to Fix Mouse & Keyboard Stuck on macOS Mojave
- How to Reset Forgotten Password of macOS Mojave
- Fix macOS Mojave Screen Resolution
Bottom Line
So, I have explained each and everything about the macOS Mojave installation. And I tried my best to give you full detail about macOS Mojave. Moreover, if you find any problems then feel free to ask me in the comment box. And if our article was helpful to you then don’t forget to give your feedback.


Hi,
Hope you can help me.
I had follow all the steps, how to install it on Virtualbox
I did not get any errors.
When I start the virtual machine, I get some lines on the screen, but no code.
Then it stops and shows the message that I have 5 seconds to hit the ESC to stop the install or any other key to continue.
I hit SPACE and it stops.
I only get the prompt, saying
Shell >
Nothing happens after that.
Hope you can help me with this.
Thanks
Do you get it after installation of before?