macOS big Sur is the latest OS of Apple. And with the new OS version, apple altered many settings. Like new control center, Pinning control center, widget customization, color adjustments, and so on. And today we are here to show you how to hide/show files on macOS big Sur.
With so many other settings, macOS big Sur also has got a different method to show or hide files and folders, etc. This is one of the most used features of operating systems. Because, we all have got some secret files, that we don’t like to be seen by others. So, the best way is to hide them, and when required, again unhide them.
But how to do that in macOS big Sur?
Let’s discuss that in the following paragraphs!
Table of Contents
How to hide files on macOS Big Sur?
Hide files or folders Using terminal:
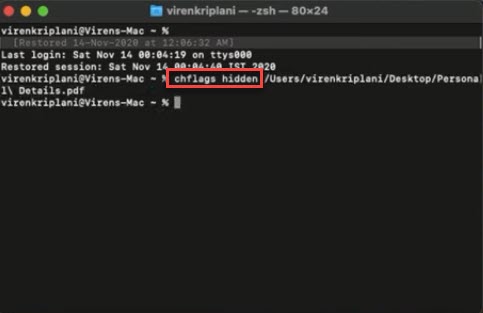
The most straightforward method to hide files on macOS Big Sur can be done through terminal command.
- First of all, open the terminal from the spotlight search or the Utilities.
- Then in the terminal type in the following command.
- Type “Chflags hidden“.
- Now, drag the specific file or folder to the terminal.
- And the terminal will locate the file. Then press Enter.
- Now, the file has been hidden by others. And no one can access your file unless unhide that.

This is the best way to hide files. Because it doesn’t shift your file or the folder to another location. It just makes that invisible. However, if you have an issue using this, So, you can also execute the following technic to hide files.
Though this method doesn’t hide your files. it shifts the files or folder to the period folders. The period folders and hidden folders, that contain critical system files. And like that the shifted files will also remain sound and secure.
- Open the terminal.
- Type in “mv filename .filename“
- Replace the first file name with your file name. And the second one with the name of the system-protect file.
- Now, close the terminal. The file has been moved to the period folder.
Moreover, you can also third party apps to hide your files. But if you can hide files without them. Why should risk privacy by installing additional apps?
How to show files on macOS Big Sur?
As of now, you know how to hide the files. So, how to access them again? when needed. So, using the following commands you can easily unhide the files on macOS big Sur just like you hid them.
Show hidden files using Terminal:
- First of all type in the following command.
- Command+Shift+.(dot)
- The above command will show the file for a while. However to unhide that permanently, Open the terminal.
- And type the following command.
- Chflags nohidden.
- And drag the file to the terminal that is appearing.
- Then press Enter.
Now the file has come to the normal position. And anyone can access that. This is the basic way to show hidden files without having too much knowledge of computers.
Show files that are hidden by default:
Some several files and data are hidden by default, from the public. And if you are a developer, and require to fix something, you may require to access those. In other cases, it is recommended to keep your hands away from this command.
- Open the terminal.
- And paste the following command.
defaults write com.apple.Finder AppleShowAllFiles true/false- typing True will show the files. And to hide those files again, type the false instead of True.
- Now, press Enter. And then press the following command.
killall Finder
Related Articles:
- How to install macOS big Sur on VMware?
- Download macOS big Sur DMG, And ISO file directly.
- How to create macOS Big Sur bootable USB?
- Create macOS high sierra bootable USB Installer.
- Disable iMessage notifications on Mac.
Wrap Up:
I usually hide files that I don’t want others to open. And the above-mentioned commands do that successfully. And again, at the time of unhiding them too. So, next time, when you require to hide/show them. Just execute these commands. And for more knowledge base articles, don’t forget to follow us.


1 comment