Burning disks and creating bootable USBs are difficult for the non-tech savvy. And as the Bootcamp assistant is no longer supported on Mac operating systems now. Some people may have gotten concerned. But wait! there are still several methods to create Windows 10 bootable USB on macOS Big Sur without Bootcamp assistant in just some steps.
You may find several guides using the command prompt/CMD for the creation of Windows 10 bootable USB. But the problem is, most of the folks are unfamiliar with it. Moreover, the CMD seems to be difficult to use for most people. But in this guide, we’ve brought the easiest method to create a bootable USB on macOS without Bootcamp. And instead of using the CMD, we’re going to use free and open-source software to create Windows 10 bootable USB from its ISO file.
So, let’s dive in!
Table of Contents
How to create Windows 10 bootable USB on macOS Big Sur without Bootcamp:
You need two things, here. First of all the ISO file of Windows 10 or any operating system, which will be used to create a bootable USB. And secondly, a software, which will help us to use the ISO file and turn it bootable USB in just a few steps.
Download Windows 10 ISO file:
You need to download the Windows 10 ISO file from the official website of Microsoft. Don’t download its ISO file from any other website. Because all of those ISO files are for Virtual machines.
- Go to the Microsoft.com
- From the dropdown menu, select the latest version of the windows 10 ISO and proceed.
- Then again select the system’s architecture and Continue.
- Confirm the download. And wait until it’s complete.
After the successful download of the Windows 10 ISO, you are ready to move to the second step. where you will need to burn the ISO file to USB and create a bootable USB.
Method 1: Create Windows 10 bootable USB from ISO Using UUByte ISO Editor app
UUByte ISO Editor for Mac is currently the most efficient and user-friendly app for making bootable USBs on macOS. There are two great things about it. First, it supports the latest Windows 10 and Windows 11 ISO files and splits the large install.wim file by default, which is one of the biggest challenges when using Command Prompt and other apps.
Secondly, it is fully compatible with Big Sur as well as the latest Monterey. In addition, this app works great on both Intel and Apple Sicilon Macs. You could not find any app that could possibly beat UUByte ISO Editor in this era.
- Download DMG File of UUByte ISO Editor from uubyte.com.
- Now, install the program by dragging the app icon to Application folder. There will be a shortcut in Launchpad.
- Connect a USB flash drive more than 8 GB and back it up. The creation process will format the USB and empty the content.
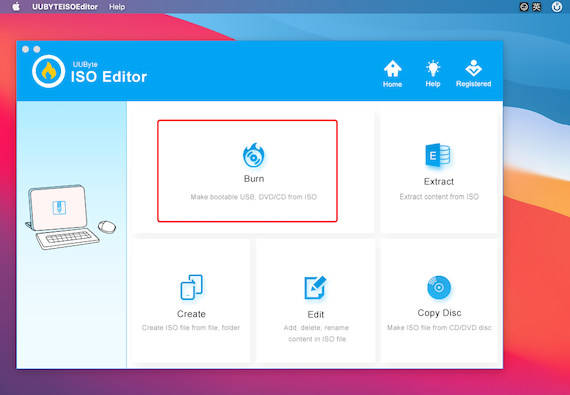
- Open UUByte ISO Editor and click Burn tab on the main screen. This feature will help you create a bootable USB from Windows 10 ISO.

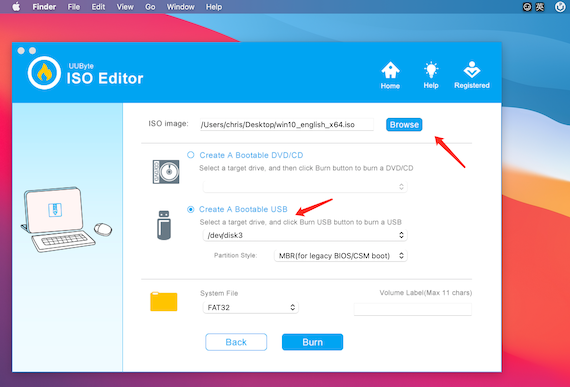
- From the settings field, please load Windows 10 ISO into the app and select the USB drive from drop-down list. Keep other fields untouched and click Burn button to create a Windows 10 bootable USB.

For a USB 3.0 flash drive, it takes about 7 minutes to complete the ISO burning task. It is a bit longer for low-speed USB drives.
Method 2: Create Windows 10 bootable USB from ISO on macOS using UNetbottin app:
As I said, earlier, we’re not going to use the command prompt. Instead, we are going to use the UNetbottin app, which burns the ISO file. And create a bootable USB in a short time. UNetbottin is a free and open-source utility, which can be used on any platform including Windows, Linux, or Mac.
Moreover, there are several other software too. Like, you can use Etcher App, Wonder ISO for Mac, and so on. But, I used the above one. But, you can use any of the software, we aren’t going to stop you from any.
Anyway, let’s go towards creating Windows 10 Bootable USB.
- Plugin the USB flash drive to the system. It is recommended to use a USB having at least 8GB Of space.
- Note down the name of the USB. You will need it.
- Then download the UNetbottin utility and launch it.
- From the home interface. Select the ISO from the disk image option.
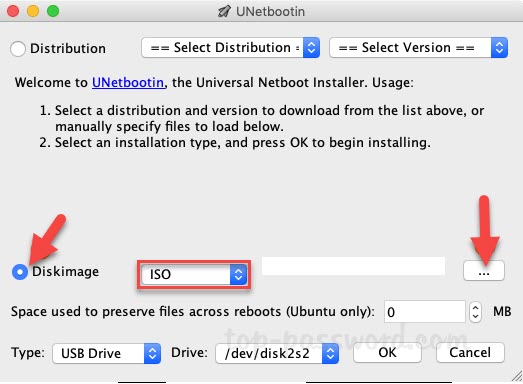
- Then, hit the Three dots. And select the Windows 10 ISO file from the download folder.
- After opening the ISO file. Take a look at all these settings. And if everything’s OK, then Continue.
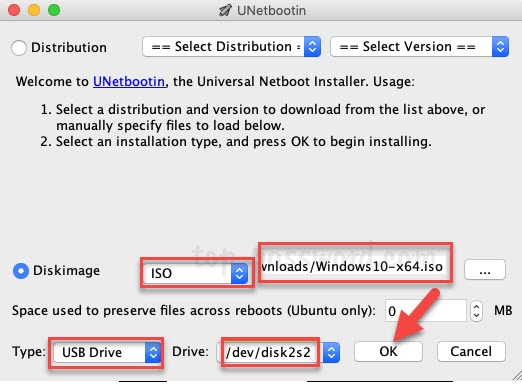
- After confirmation. Just click the OK button and the process will initiate.


It may take some time to burn the ISO file. And create a bootable USB of Windows 10. After the completion of the process. The screen will show the result. If the process concludes successfully. Then you are ready to use the USB flash drive for the installation of Windows 10 on any system. This process is several times easier than the command prompt.
Read Next:
- Download macOS Monetary DMG file.
- Download macOS Catalina VMware image file.
- How to create macOS Catalina Bootable USB installer on Windows 10?
- How to create macOS Big Sur bootable USB installer on Windows 10?
Conclusion:
So, this is how you can create a Windows 10 bootable USB on macOS Big Sur without Bootcamp in just two steps. You can use this app on any Mac operating system including the Catalina, Mojave, or High Sierra. And also, you can use the UNetbotten app to create a bootable USB of any operating system.
How did you find this guide? Did it help you? Feel free to reach us, if you encounter any unexpected issues.


2 comments